Heading out the door? Read this article on the new Outside+ app available now on iOS devices for members! Download the app.
In a classroom of wavering Tree Poses, one stood tall in the corner. The student’s Vrksasana had some undulation like everyone else’s, but possessed an unusual steadiness that was more than just concentration. As someone who appreciates anatomy, I understood that the difference was likely due to the student engaging a small and under-appreciated muscle that contributes to sacral stability in demanding yoga postures as well as in the movements of everyday life. That muscle is the piriformis.
The piriformis’ action of providing support your lower body is crucial. But when these muscles are too tight or too relaxed, they can lead to poor posture and low back pain. Tightness in the piriformis is one of the reasons behind pain in the glutes during intense hip stretches such as Pigeon Pose as well as pain and strain in the lower back as you bend forward during Standing Forward Bend (Uttanasana).
Anatomy of the Piriformis Muscle
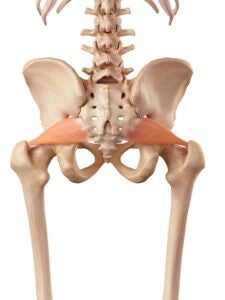
There are two piriformis muscles that sit behind the hip sockets, extending from the upper, outer corner of each femur (thigh bone) to the sacrum. They are joined by a band of fascia, a type of connective tissue, that stretches across the sacrum just above the tailbone.
To picture this, imagine that your leg bones are two trees. The piriformis muscles are two sets of ropes that blend into a fascial hammock that hangs between the two trees. The sacrum sits and rocks in the hammock, adjusting itself as the trees sway and move. This fascial hammock is the piriformis’s secret to regulating movement and stability in the sacroiliac (SI) joints.
And the SI joints are tricky to regulate. The joints have to be loose enough to allow your pelvic bones to move with your legs when you walk or run, yet stable enough to support the spine as it rests on the sacrum. The piriformis muscles help hold the sacrum together—but they also have to know when to let go.
The piriformis’ primary action is to externally rotate the hips. It’s one of several muscles that, when contracted, cause the legs to rotate outward. But when the piriformis muscles are tight, they pinch the sciatic nerves and cause a burning pain at various points along the nerves’ path, which runs from the buttocks all the way down to the feet.
Developing Awareness of the Piriformis Muscles
To help the piriformis do their job properly, it’s important to establish pelvic alignment that strikes a balance between chronic tightness and laxity. The key to sensing this lies in developing an awareness of your sitting bones. Try this:
- Tilt your pelvis back: Sit upright on a firm chair and feel your sitting bones beneath you. Lean back and curl your tailbone under to tilt your pelvis back in a slump. Feel your sitting bones slide forward.. You may be able to feel an excessive tightening of the piriformis and the other deep muscles surrounding the sitting bones as they contract to support you.
- Tilt your pelvis forward: Next, arch your back and draw your sitting bones back and apart so that you’re resting on their front edges. Notice how your lower back and hip flexors contract when you tip your pelvis forward. The muscles at the outer edges of the sitting bones and behind the hip joints, including the piriformis, are currently inactive. The low back will feel tight because of the forward tilt of the pelvis, but the sacral joints will feel unstable and unsupported.
- Find a neutral position: After moving your pelvis between those two extremes, try to find some middle ground. Allow your tailbone to get heavy so that your weight is in the center of your sitting bones. (Note: Don’t “scoop” the tailbone. ) It should feel like you are standing tall on your sitting bones.
Just as you found optimal pelvic alignment while seated, you can find it when standing. You may notice that, instead of having a well-balanced pelvis, you find yourself standing with your tailbone scooped, your pelvis pushed forward, and your feet turned slightly outward. Standing like this shortens the piriformis and causes turns the tops of the femurs out. The sweet spot in your posture, where the piriformis muscles are best situated to stabilize the sacrum without over-tightening in the buttocks or hip joints, helps you feel truly grounded through the legs without a feeling of rigidity or excessive effort.
To find optimal alignment for the piriformis in your normal standing position:
- Bend your knees slightly, tilt your pelvis forward a little—just enough to deepen the inward arch in your lower back and release your hip flexors—and then shift your hips backward until you feel your weight become more grounded through the center of your heels.
- At the same time, spread your toes and bring equal weight and contact to all four corners of your feet.
- Then, as you straighten your legs, let your tailbone descend while gently lifting your abdomen. When you feel grounded through the bones of your legs and experience a lightness and lift in the arches of your feet and your pelvic floor, you’ve found the sweet spot where your hips are aligned and your piriformis is supporting your sacrum.
Yoga Poses for the Piriformis Muscle
When you know what optimal pelvic alignment feels like in your everyday sitting and standing postures, you can bring that alignment into your yoga poses. In many postures, the glutes take on the piriformis’ actions of external rotation and abduction (taking your legs away from the center of your body), which allows the piriformis muscles to better perform their primary stabilizing function. This will allow for greater ease in your low back during forward bends and backbends, and better stability during standing and balancing poses.
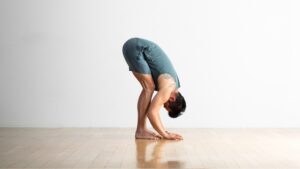
1. Standing Forward Bend (Uttanasana)
When you practice abduction in Standing Forward Bend, you use the glutes to center and stabilize the thigh bones in the hip joints. This brings greater ease to your forward bend while reducing strain on your low back.
How to:
- Begin standing with your feet hip-distance apart or wider.
- Microbend your knees and try to draw your legs away from each other, as if you were trying to stretch the mat between your feet. Keep your knees facing straight forward. Don’t pull the feet apart so strongly that you feel your buttocks tighten inward, but rather feel how the muscles above the hip joints are drawing the tops of the thighs outward, away from the hip joints. That expansion at the hips is abduction.
You’ll also feel a subtle broadening or release across your sacrum, at or below your waistline and in your low back. It’s up to you to calibrate just how much abduction is enough to create this feeling of release.
- From this engaged standing position, move into the forward bend. First tip your pelvis slightly forward, increasing the arch in your low back, and shift your hips back until you feel your weight come into the centers of your heels. With your knees slightly bent, fold forward at your hips and rest your hands on the floor, blocks, or a chair. You can start to straighten your legs to intensify the hamstring stretch, but continue to isometrically draw your inner heels apart to increase the stretch at the outer edges of your legs and hips to release the piriformis. If you are very flexible, ground through your outer heels to engage the piriformis, steadying the sacrum while reducing the extreme forward tilt of the pelvis that can cause strain where your hamstrings attach. To come up without straining your lower back, microbend your knees and continue to isometrically draw your thighs apart.
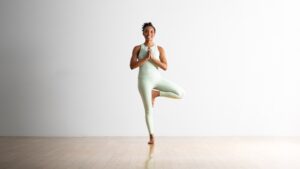
2. Tree Pose (Vrksasana)
Balancing poses challenge the piriformis in the standing leg to work strongly in order to stabilize the SI joint while engaging the glutes to hold the pelvis level. Tree Pose also challenges you to contract the glutes to open the hip of the lifted leg without over relying on the piriformis by tucking or scooping the tailbone.
How to:
- Stand next to a wall on your left side. With your feet hip-distance apart, turn your right foot out slightly andshift your weight onto your right foot, grounding through your outer heel. Balance your weight evenly between your big toe mound and outer heel, and spread your toes. You will feel the glutes of your outer right hip activate in order to keep the pelvis steady and level.
- Lift your left foot, turning your thigh out to the side, and place the heel at your inner right thigh, shin, or ankle. Your left knee will be in contact with the wall to help you balance. Keep your hipsand chest facing forward. Press your right thigh in against your left heel while continuing to ground down through the right leg. At the same time, press your left heel into your right thigh, which will keep the right leg from excessively rotating outward. It’s the slight inward rotation of the thigh that keeps the piriformis from tightening.
- Engage your lower belly by drawing the pit of your abdomen toward the spine and slightly upward. Press your left knee into the wall as you extend down through your standing leg and up through your head. From the combination of all of these forces, your left thigh will open naturally without a feeling of pinching or gripping in your left piriformis (which you would feel deep in your left buttock, just behind the hip joint). Press your palms together in front of your heart. Then release the pose and repeat on the other side.
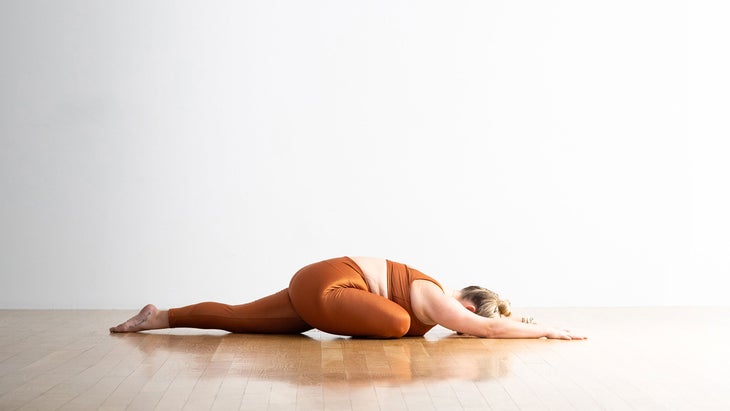
3. Pigeon Pose
Pigeon Pose stretches the part of the piriformis that causes the most problems. The glutes provide some abduction to moderate the intensity of the stretch.
How to:
- From Downward-Facing Dog Pose (Adho Mukha Svanasana), bring your right leg forward, your knee toward the outer edge of your mat, and your heel in line with your left hip, with your shin at about a 45-degree angle to the front of the mat.
- Lean forward and extend your left leg back. To go more deeply into the right piriformis stretch, tuck your left toes, lift your left knee, and inch your hips toward the wall behind you. Your right thigh should rotate outward, and your right hip should descend toward the mat. If your hip doesn’t reach the mat, support it with a block or folded blanket. From there, lean forward to further deepen the stretch to the piriformis.
- Next, untuck your back toes and point through your left big toe. Spiral your left thigh inward so the center of the thigh muscle faces the mat and your left hip point turns more toward the mat, increasing the stretch to the right piriformis muscle. If the stretch is too intense or causes a twisting in your right knee, supplement whatever prop you have underneath your right hip.
This article has been updated. Originally published July 30, 2012.