Updated February 25, 2025 09:04PM
8 Best Yoga Poses for Low Back Pain Relief
For those moments when your back is feeling out of whack.
(Photo: Andrew Clark)
Given that your lower back literally supports your every movement—whether you’re walking, running, lifting, or doing just about anything—it probably comes as no surprise that 80 percent of Americans experience lower back pain at some point in their lives. When your back feels out of whack, your everyday life seems hijacked, your mood plummets, and you may find yourself anxiously awaiting the day when you can return to your normal activities without gritting your teeth in pain. Practicing yoga for lower back pain can help.
What Causes Lower Back Pain?
There are several potential issues that can cause lower back pain. A bulging disk can happen when the cushioning between your vertebrae is compressed and can no longer do its job properly. A herniated disk can create pressure and cause pinched nerves. Osteoarthritis can also play a role.
Lumbar pain can also be a symptom of a strain or tear that occurred as a result of weakened muscles. A major cause of this is prolonged sitting or standing. The more you sit, the less you use your stabilizing muscles, causing them to weaken and have difficulty doing their job when you need them. When your muscles are weak, lower back pain can result from even the simplest actions, including picking up something heavy or twisting in an awkward position.
Why Practice Yoga for Lower Back Pain?
Stretching your lower back won’t necessarily remedy the underlying cause of low back pain, but it can help you manage discomfort and increase mobility by relaxing tight muscles. Research suggests that taking slow deep breaths, as you do when practicing yoga, can also help reduce back pain.
ADVERTISEMENT
Safety Tips for Stretching With Low Back Pain
Whether or not you should practice yoga depends largely on the cause of your back pain. Certain poses might bring relief whereas others aggravate your condition. Consult with a doctor to discern the cause of your issue prior to stretching.
8 Yoga Poses for Lower Back Pain
Take your time getting into each pose and focus on your breath throughout. If any particular shape is uncomfortable, slowly make your way out of the pose. Trust your body and focus only on the poses that offer relief.
ADVERTISEMENT
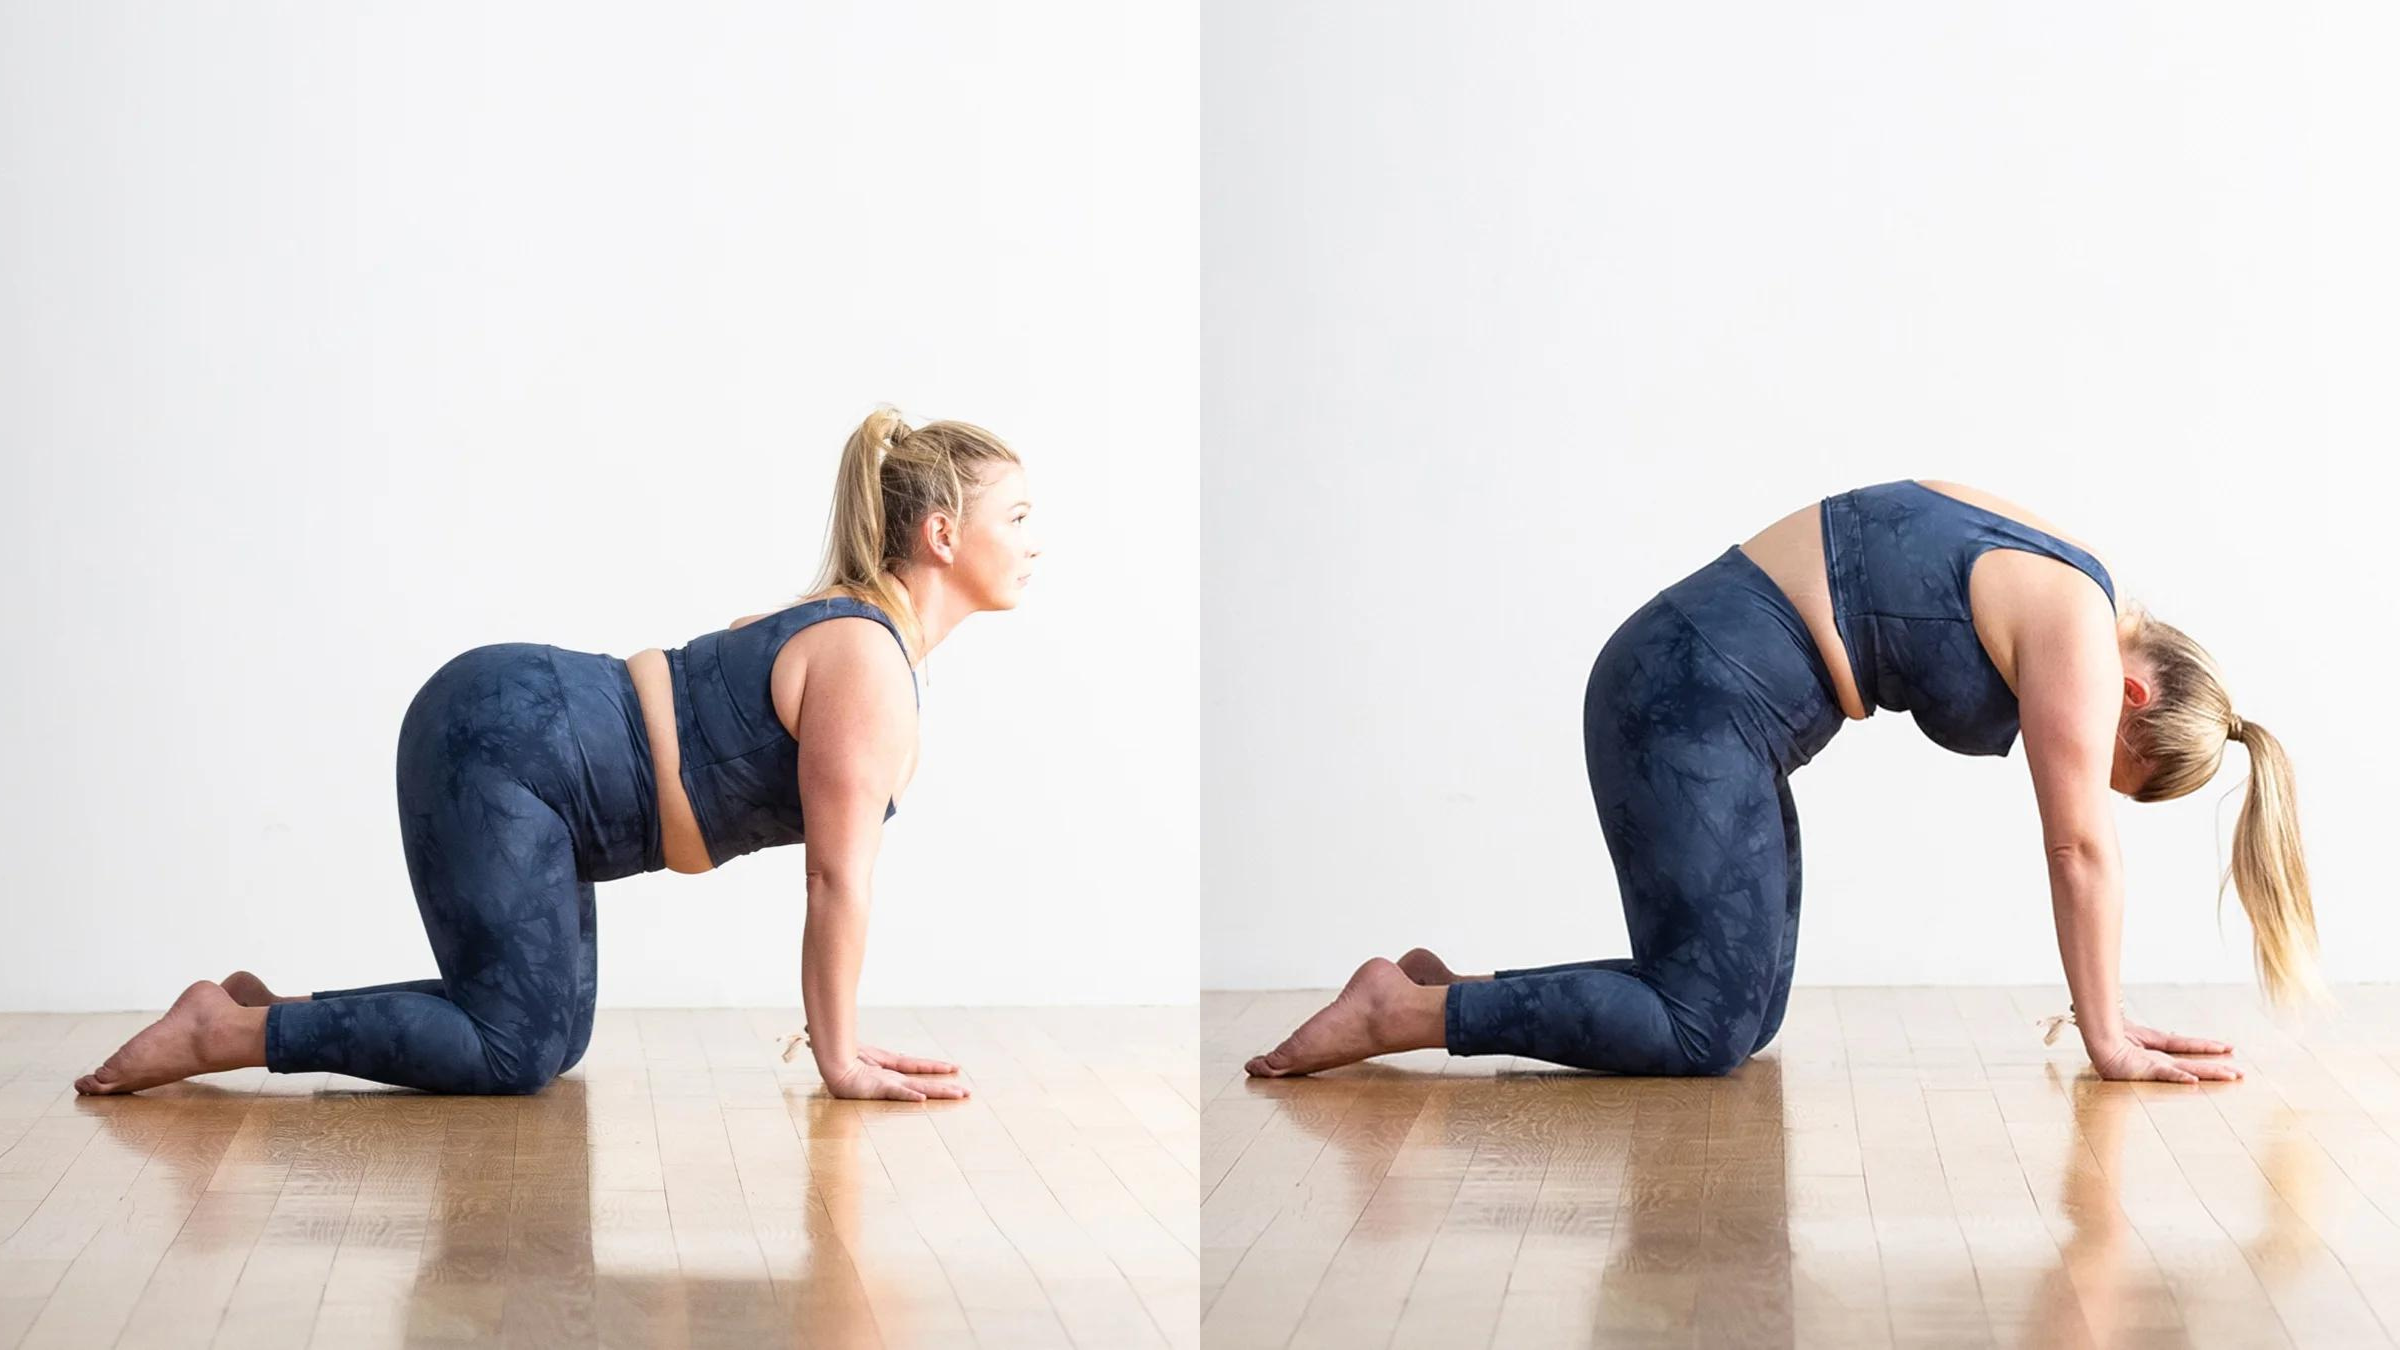
1. Cat-Cow Pose (Marjaryasana-Bitilasana)
Take your time as you move in between these two shapes, which stretch your back and front body and can help improve spinal flexibility over time.
How to:
- Come to your hands and knees with your hands stacked underneath your shoulders and your knees stacked underneath your hips.
- As you inhale, lift your chest forward and toward the ceiling, allowing your belly to sink toward the floor and your back to arch in Cow Pose.
- As you exhale, round your back and lower your head toward the floor in Cat Pose. Repeat as many times as you desire, following the pace of your breath.
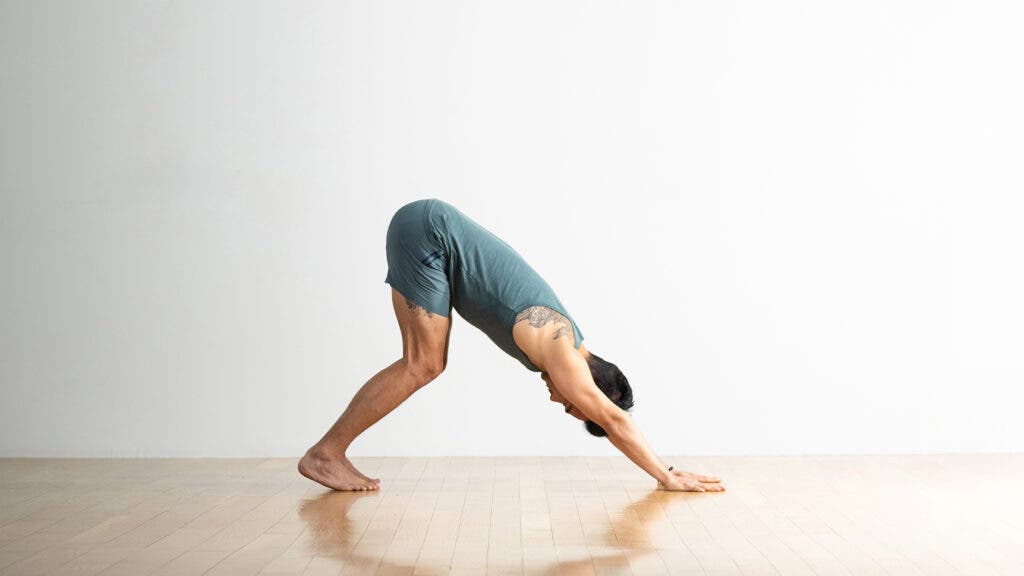
2. Downward-Facing Dog Pose (Adho Mukha Svanasana)
This iconic yoga pose lengthens and strengthens your back body and can help relieve tightness in your shoulders, back, and hamstrings.
ADVERTISEMENT
How to:
- Start on your hands and knees in Tabletop.
- Tuck your toes, press your hands into the floor, and lift your hips up and back toward the wall behind you in Downward-Facing Dog. The more you bend your knees, the less strain on your low back. Press down firmly through your knuckles, draw your shoulders away from your ears, and relax your head and neck. Breathe here. When you’re ready, lower your knees back to all fours. Stay here or push your hips back into Child’s Pose.
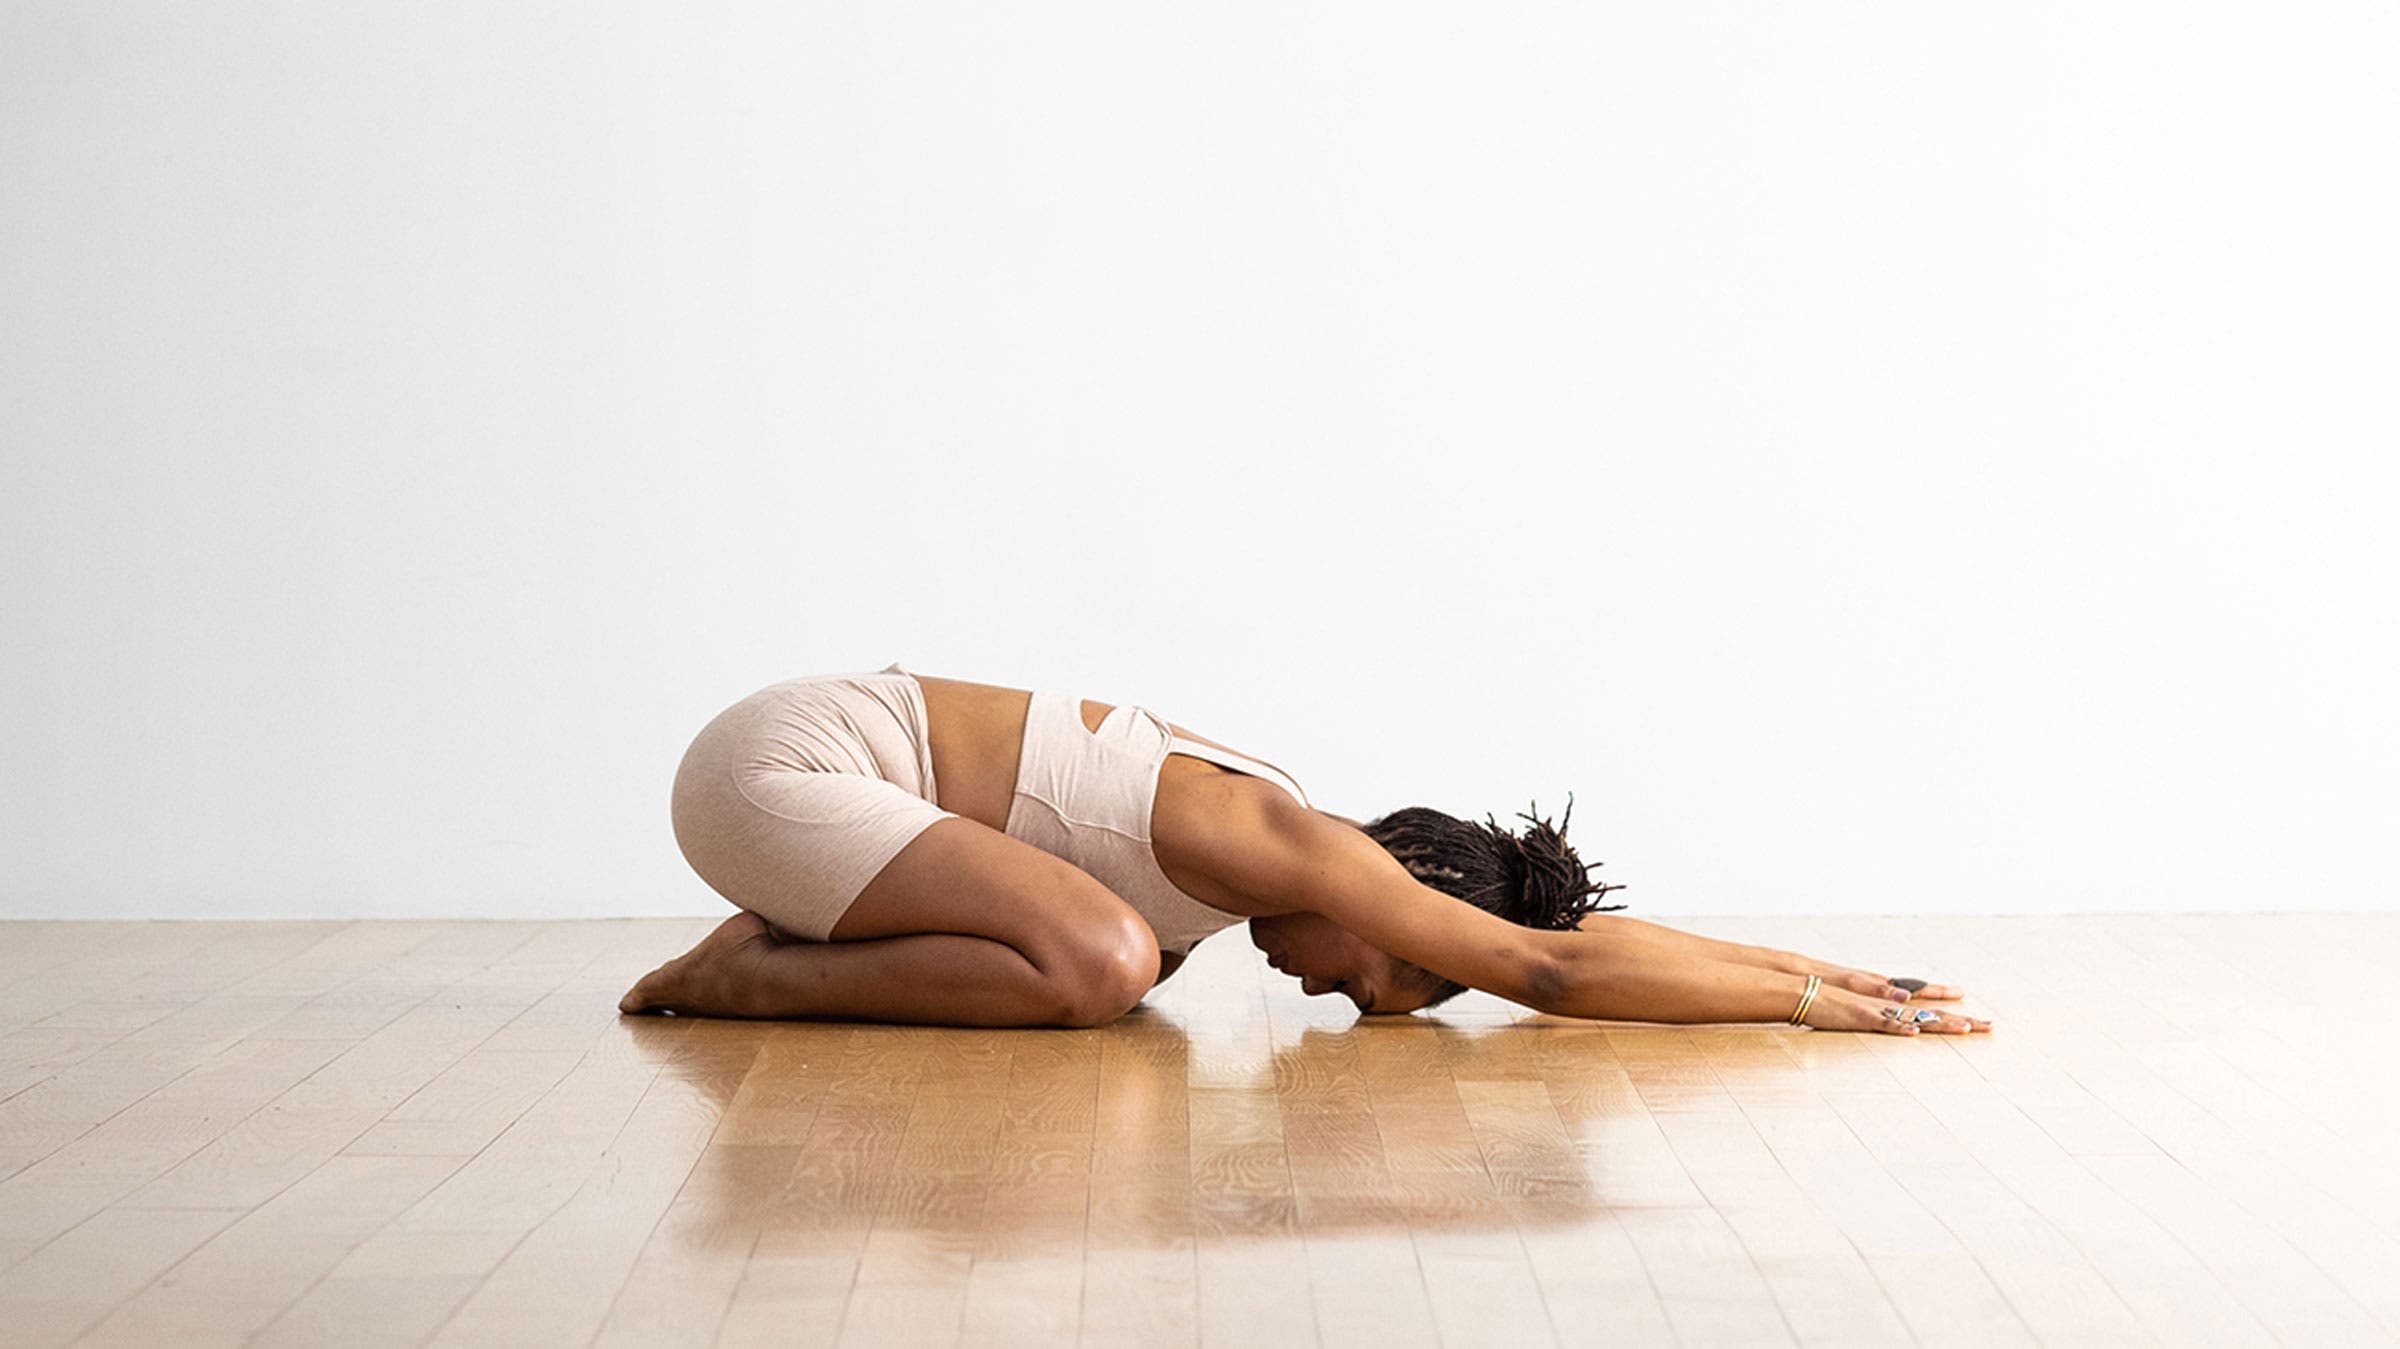
3. Child’s Pose (Balasana)
Yoga teachers commonly cue Child’s Pose as a resting posture between sequences. Practice it any time to stretch your low back and hips and focus your attention inward. You can take a blanket beneath your knees for cushioning.
How to:
- Kneel on the floor. Touch your big toes together and sit back toward your heels as you separate your knees wide.
- Exhale and walk your hands forward as you lower your chest toward the floor in Child’s Pose. Rest your forehead on the floor, a pillow, or a folded blanket. Stretch your arms forward with your fingers spread wide. Breathe here for as long as is comfortable.

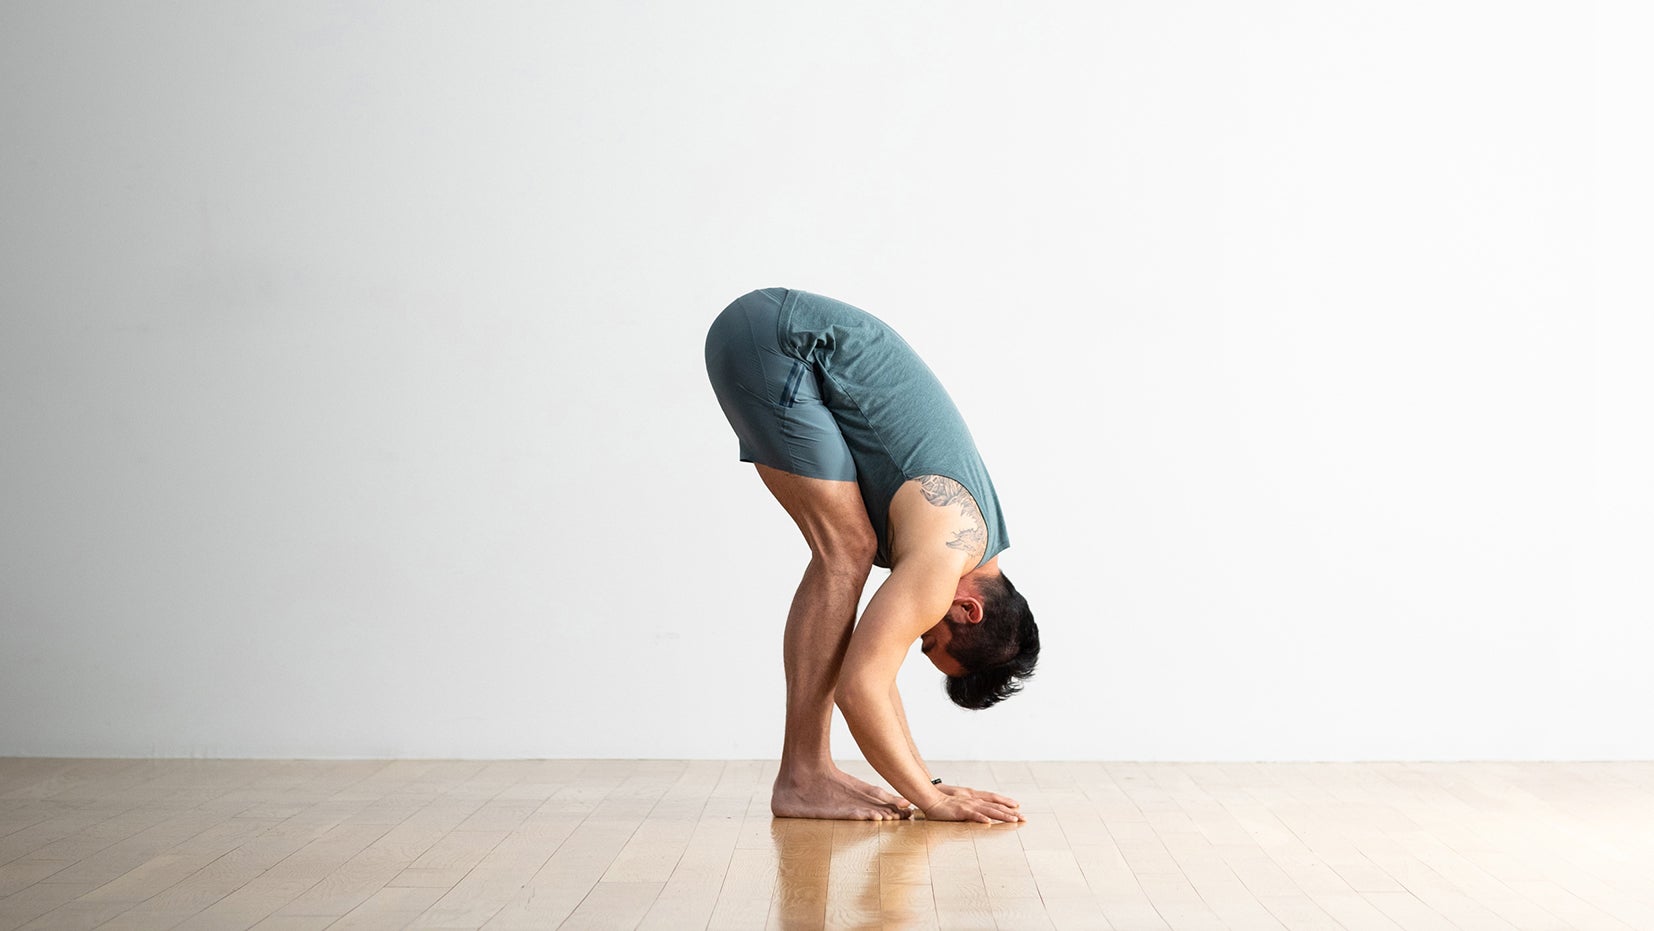
4. Standing Forward Bend (Uttanasana)
This pose may seem basic but it can offer tremendous relief for low back pain. Those with disc issues, however, may want to skip this posture.
How to:
- Stand with your feet hip-distance apart or wider. Bend your knees and hinge forward from your hips. Lower your palms or fingertips to the floor or blocks or stacks of books at the sides of your feet. Or hold opposite elbows. Press your feet firmly into the floor and lift your sitting bones toward the ceiling, keeping your knees bent in Standing Forward Bend. Relax your neck and shoulders. Breathe here.
ADVERTISEMENT
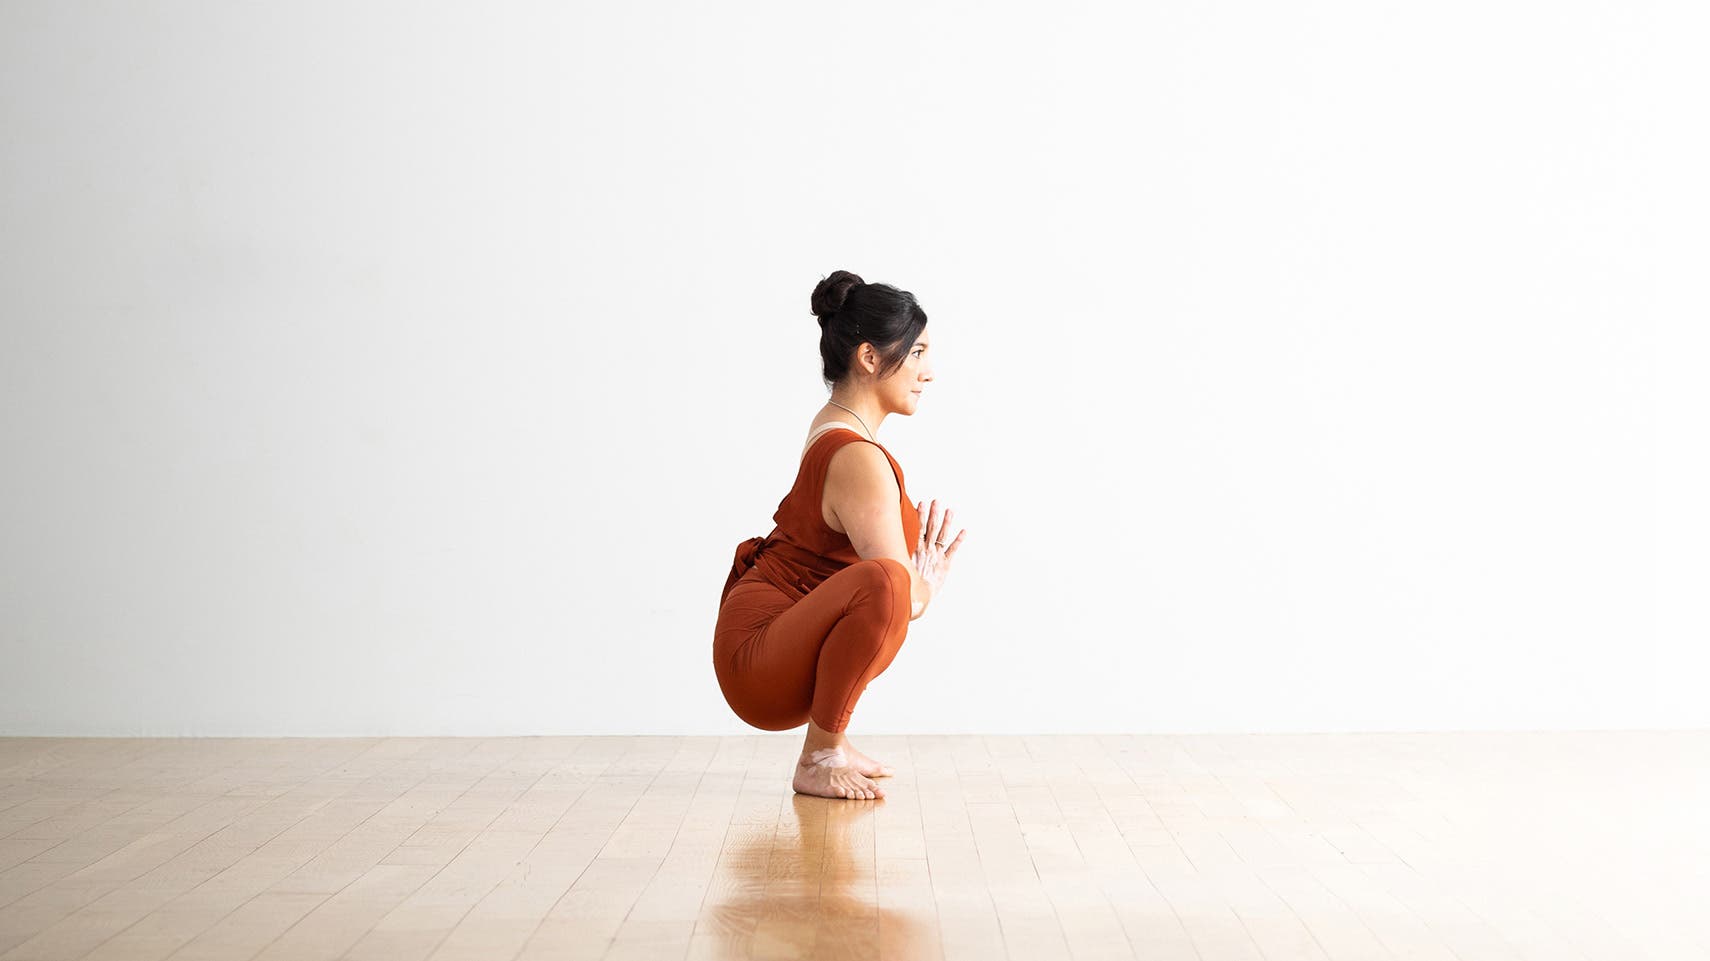
5. Squat (Malasana)
It’s equally important to release tension in the muscles supporting the lower back. Squat does that for the glutes, hamstrings, and hips.
How to:
- Stand with your feet at least hip-distance apart and angled outward.
- Press your feet into the floor, bend your knees, and lower into a Squat. Stay here or place a block or stack of books underneath your sitting bones and rest on it for support. Bring your hands to prayer position (anjali mudra) at your chest and gently press your elbows against your inner knees. Draw your navel toward your spine. Reach your chest forward slightly in Squat. Breathe here.
ADVERTISEMENT
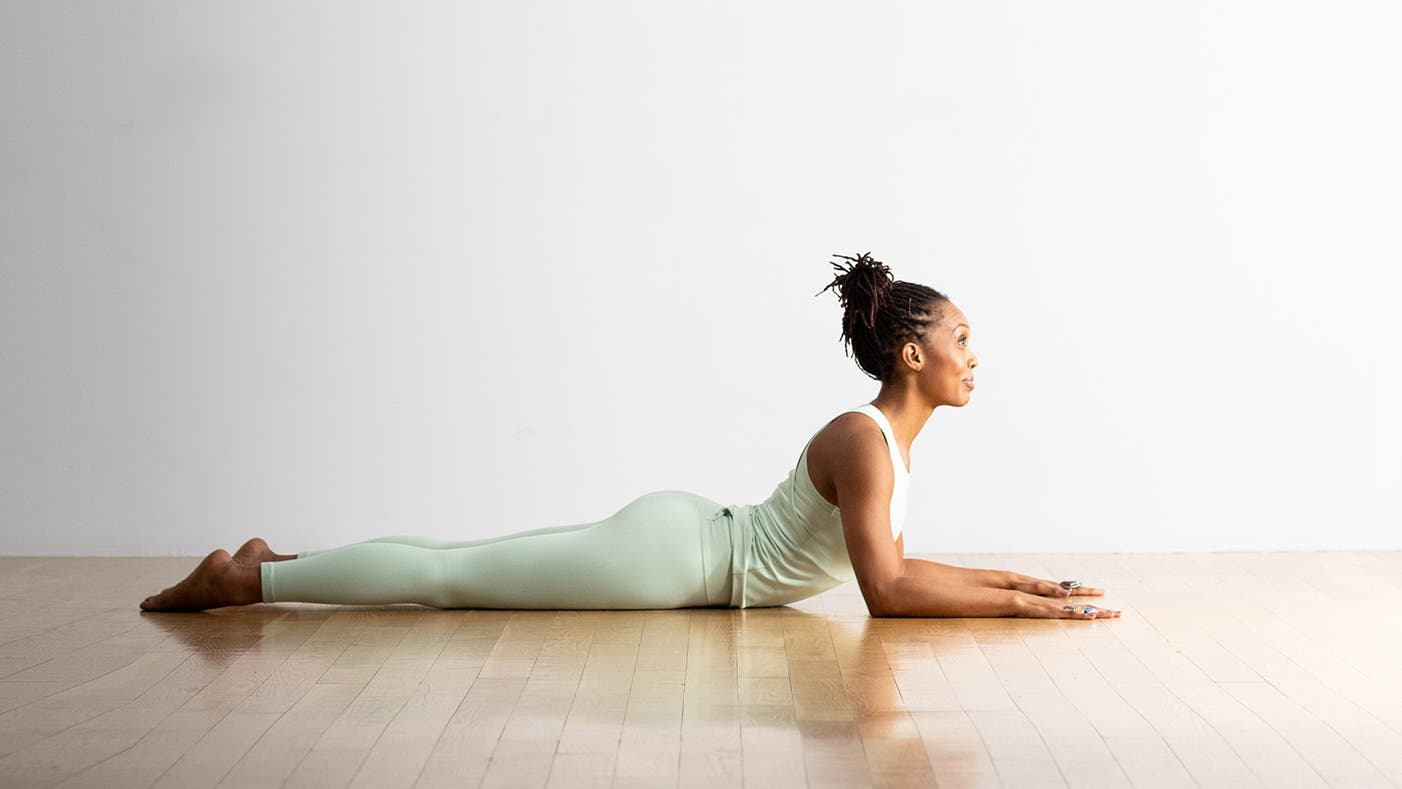
6. Sphinx Pose
A backbend engages your back muscles and improves spinal stability over time. Sphinx Pose is considered a passive backbend because your arms help support you.
How to:
- Lie on your belly with your legs hip-distance apart.
- Come onto your forearms with your elbows slightly in front of your shoulders and your forearms parallel. Roll your outer thighs toward the floor. Reach the crown of your head toward the ceiling and imagine your tailbone is lengthening toward your heels in Sphinx Pose. If this feels too intense, stack your hands on top of each other, lower your chest toward the floor, and rest your forehead on your top hand. Stay in your chosen variation for 5-10 breaths.
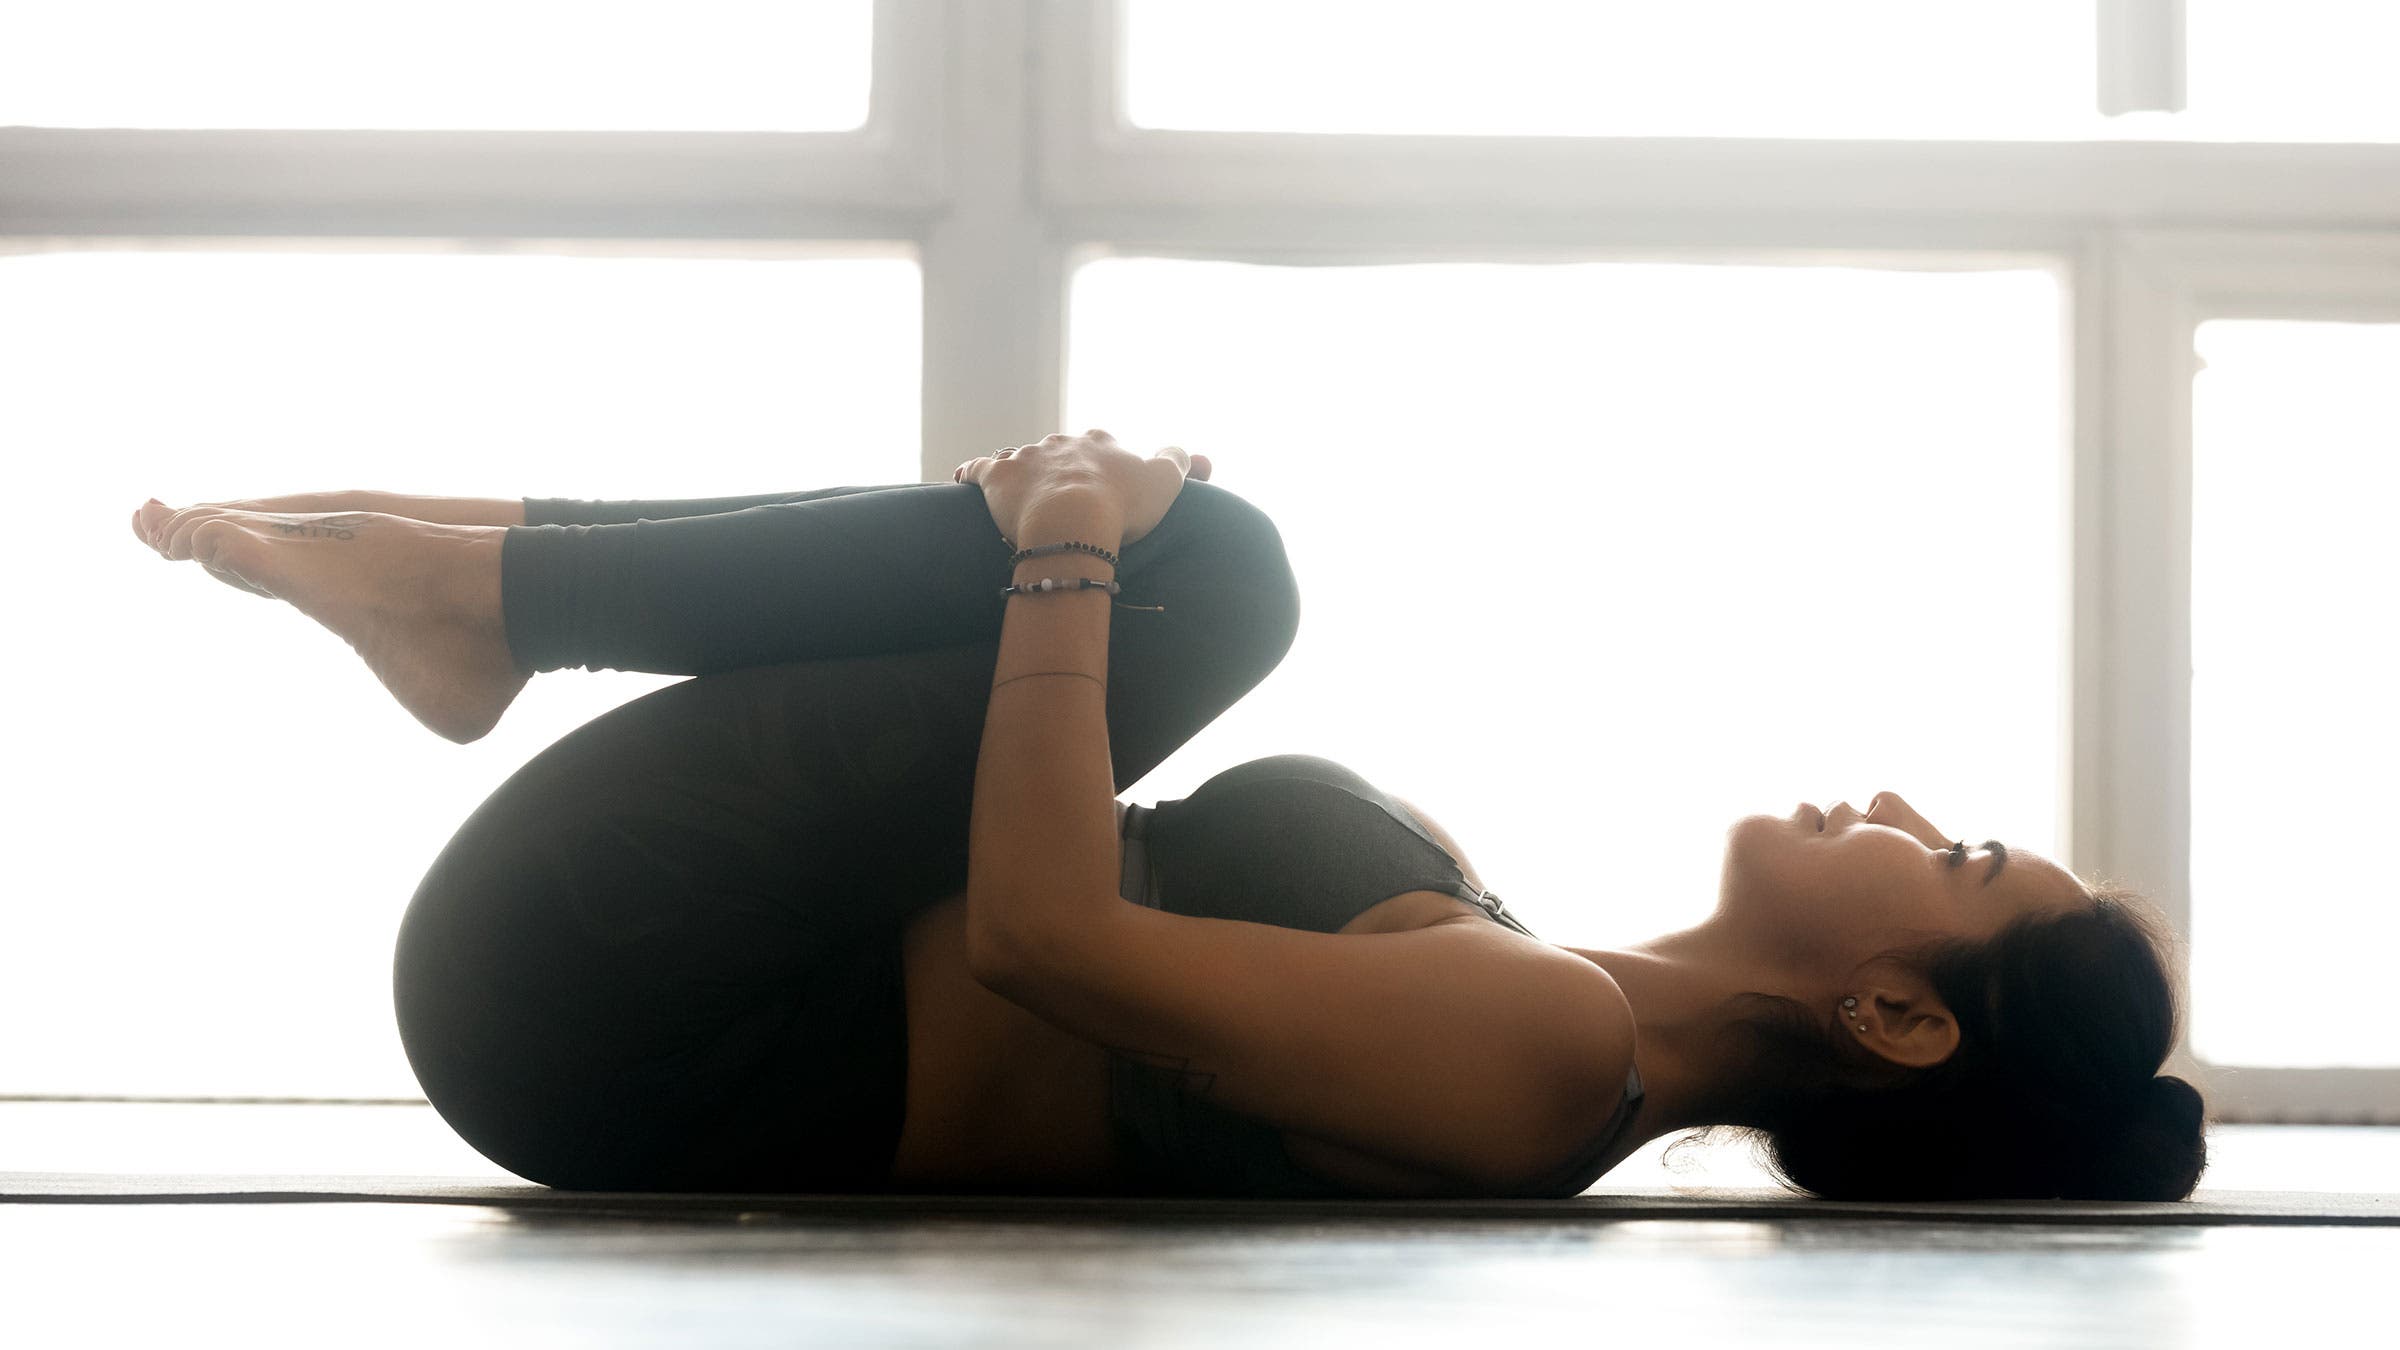
7. Knees-to-Chest Pose (Apanasana)
Let gravity do the work here as you let your entire back sink into the floor.
How to:
- Lie on your back.
- Bend your knees and lift one foot off the floor, then the other, drawing your knees toward your chest. Grasp both shins or the backs of your thighs. Stay here or rock gently from side to side. Breathe here for as long as is comfortable. To release, lower one foot back to the floor and then the other.
ADVERTISEMENT
8. Reclining Spinal Twist (Supta Matsyendrasana)
This posture stretches your glutes and back muscles. However, twisting can sometimes irritate an inflamed lower back, so if you experience any pain, slowly come out of the stretch.
How to:
- Lie on your back and reach your arms to the sides.
- Bend your knees and plant your feet flat on the floor.
- Inhale as you lift one foot off the floor and then the other, stacking your knees over your hips. Exhale as you gently lower your knees to the left. Keep your shoulders on the floor. Keep your gaze toward the ceiling or, if it’s comfortable, bring your gaze toward the right in Reclining Spinal Twist. For more support, place a block or stack of books underneath your outer left calve and rest on it. Bring your legs back to center and switch sides.