Published November 22, 2022 10:58AM
Go-To Restorative Yoga Sequence
Some days, you just need to slow things down and accept a little support.

(Photo: Sarah Ezrin)
I’ve always found it reassuring that most of my students seem to have the same energy level as one another on any given day. I arrive for class some days and everyone is completely abuzz. On other days, they’re all lying on the floor in some kind of supported posture as if they’re at a Restorative Yoga class.
Witnessing everyone feel the same thing reminds me that we are deeply influenced by the world around us, whether current events or the Sun, Moon, and stars. I find it reassuring that we’re not alone in our experiences.
On the days their pleading eyes tell me that they need to chill, I turn to my “restorative-ish” go-to yoga sequence.
The “-ish” is because I am a vinyasa flow teacher, so there are still some active poses included. But all of us can benefit from a more restorative approach to yoga every once in a while, and I appreciate being able to give that opportunity to others, no matter what style of yoga they typically practice.
ADVERTISEMENT
Go-to Restorative Yoga (or Restorative-ish) sequence
For this practice, I ask students to take a bolster (or a couple pillows if you’re at home), two blocks, two blankets, and one strap (or a belt).
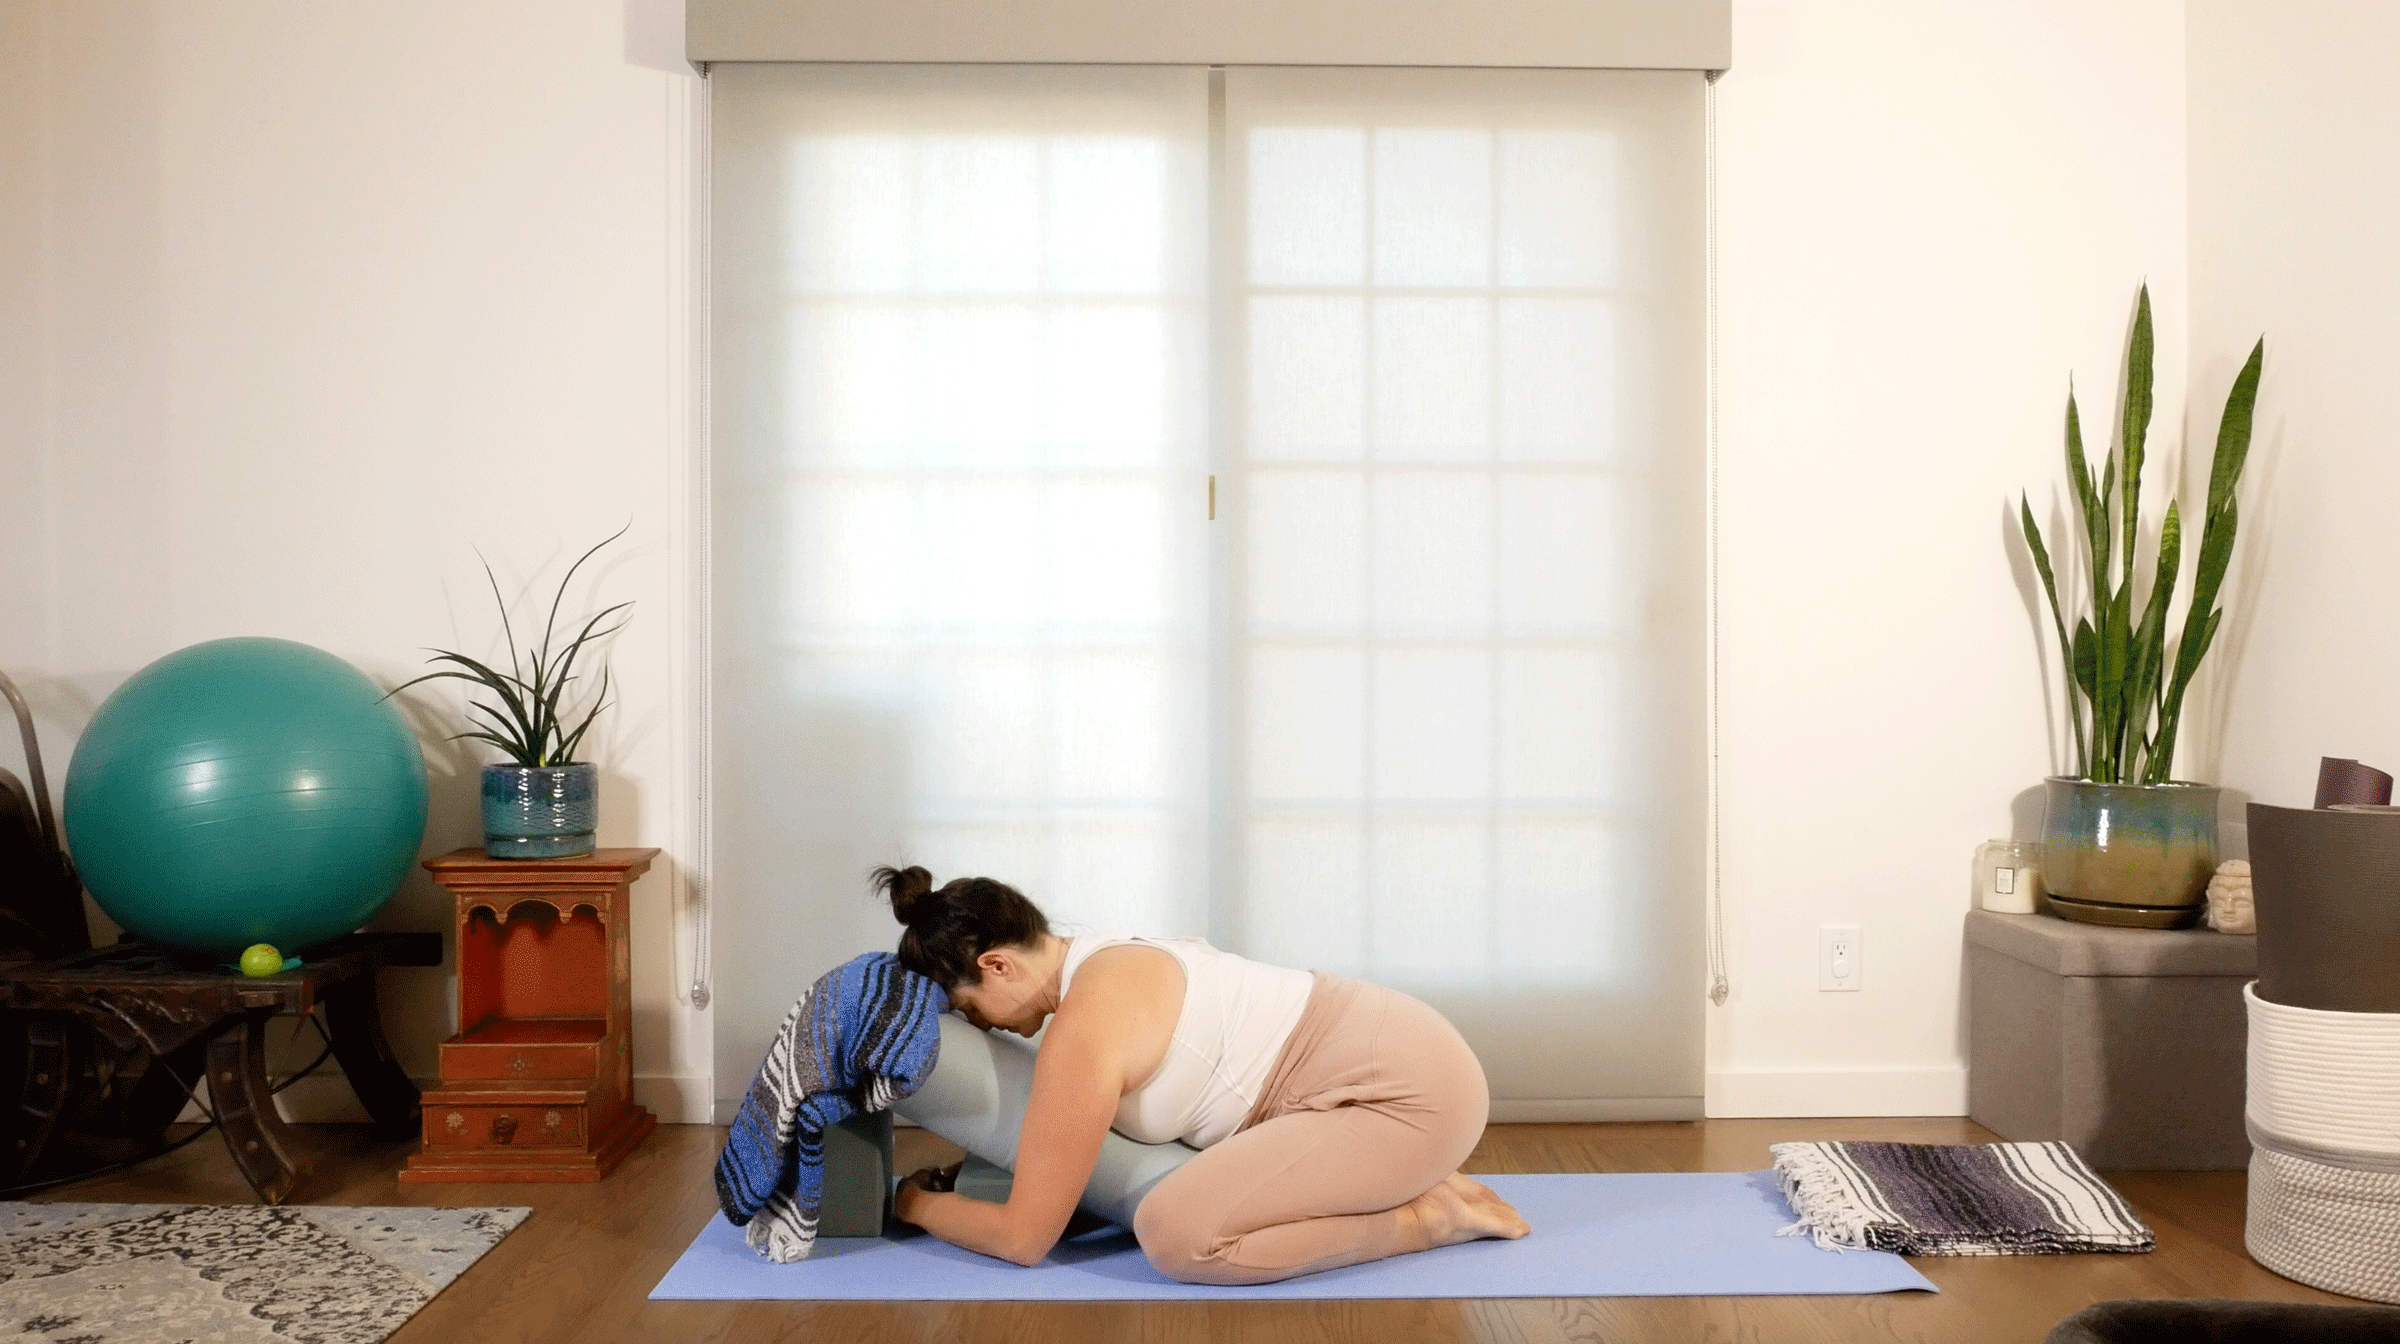
Supported Balasana (Child’s Pose)
This might be my favorite restorative pose. Whereas the classic Child’s Pose can be difficult and uncomfortable for many of us, the somewhat upright quality of this variation makes it more accessible. Also, hugging the bolster can feel comforting and encourage us to soften and relax. However, it’s worth noting that some people find burying their face in the bolster confining and stressful. Feel free to come out early and sit quietly for a few moments. If you prefer, you can practice it without the bolster or skip the pose and move onto the next posture.
ADVERTISEMENT
How to: Arrange 2 blocks at the front of the mat so the one at the edge is in the highest position and the one closer to you is on the middle or lowest level. Rest a bolster against them so that it’s angled upward. Take Child’s Pose by coming onto your knees facing the bolster. Bring your big toes to touch and separate your knees. Sink your hips toward your heels. Lean forward, bring your forehead to the bolster, and wrap your arms around it. Make sure your upper body is supported and elevated. You can roll up a blanket and place it under your forehead as a pillow or you can turn your head to one side. Close your eyes and take several moments to establish your breath. Remain for 3 minutes if you are able. If your head is turned, switch it to face the opposite direction halfway through. Slowly come up to sitting and pause.
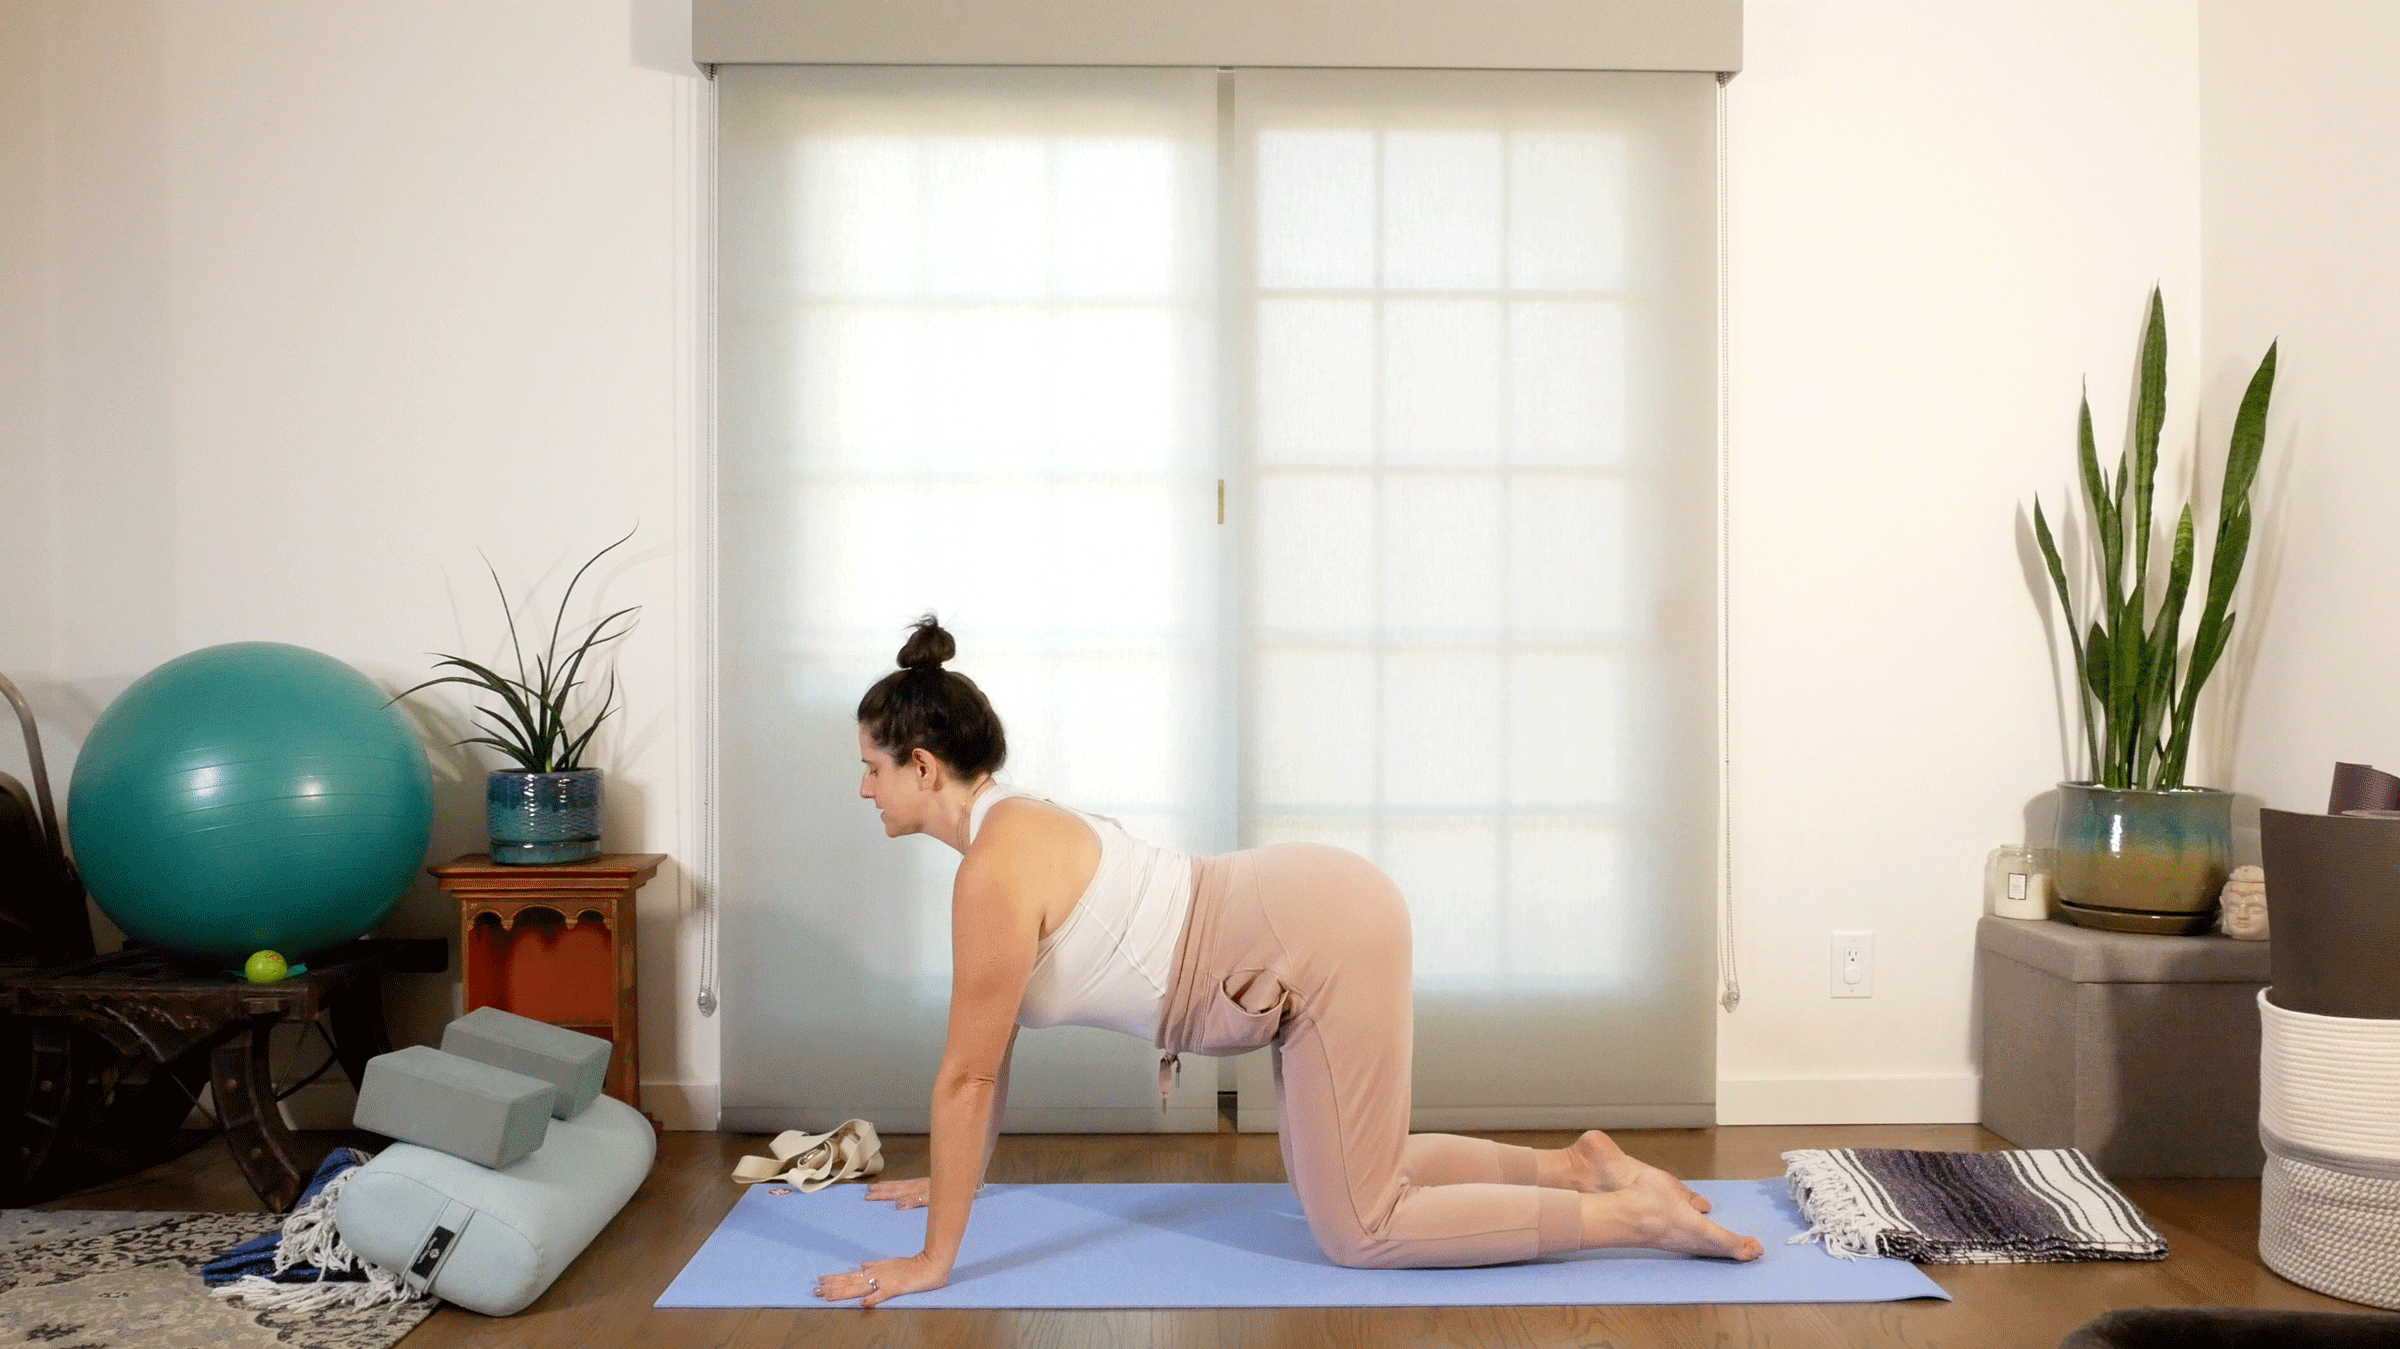
Marjaryasana-Bitilasana (Cat-Cow)
On days when our energy is low, it’s nice to do more freestyle flows versus alignment-heavy ones. I like to think of it as letting our body move us, using its innate intelligence to get into the areas where it needs. Cat-Cow is used as a breath and wrist warm-up, but it’s also excellent at targeting all the available movements of our spine. The traditional sequence goes between flexion (rounding) and extension (backbending). Consider adding side bending (lateral flexion) and even rotation by opening your arms to the sides and twisting your torso open.
How to: From Supported Child’s Pose, set your props neatly off to the side and take Tabletop. Align your knees beneath your hips and your wrists slightly ahead of your shoulders. Inhale and lift your heart toward the ceiling as you arch your back in Cow.
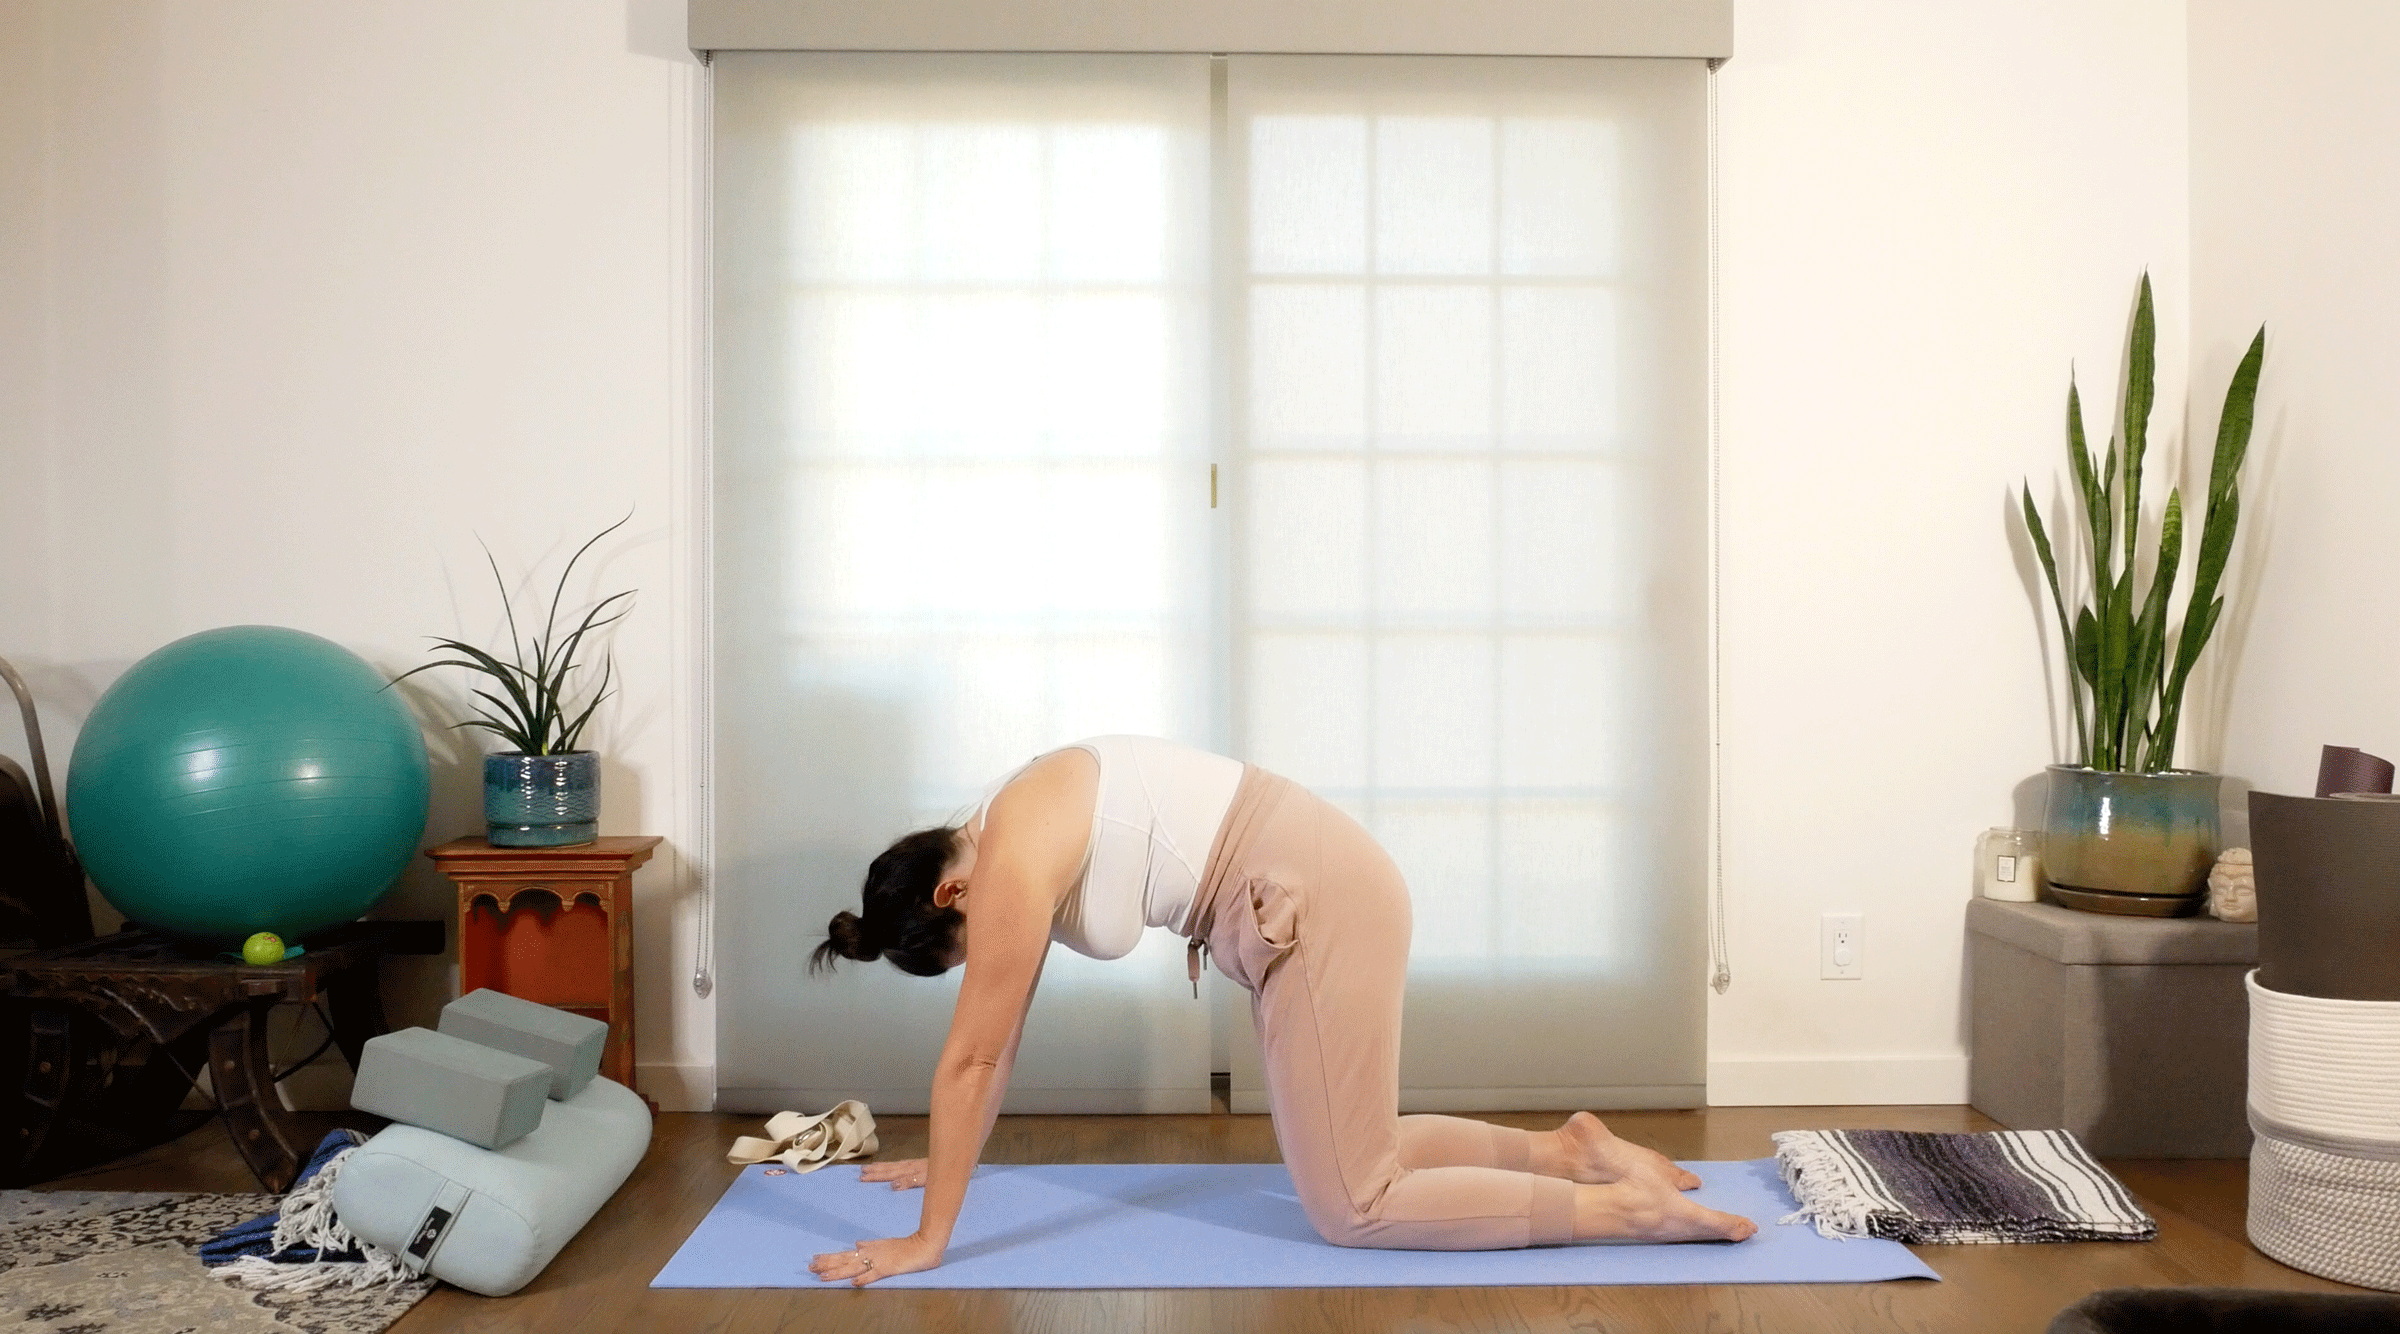
As you exhale, round your back in Cat. Repeat this on the breath for a few rounds. Then feel free to let it riff as your body desires. For example, you can add in hip circles or side bends. Simply move your body in tune with your breathing.
ADVERTISEMENT
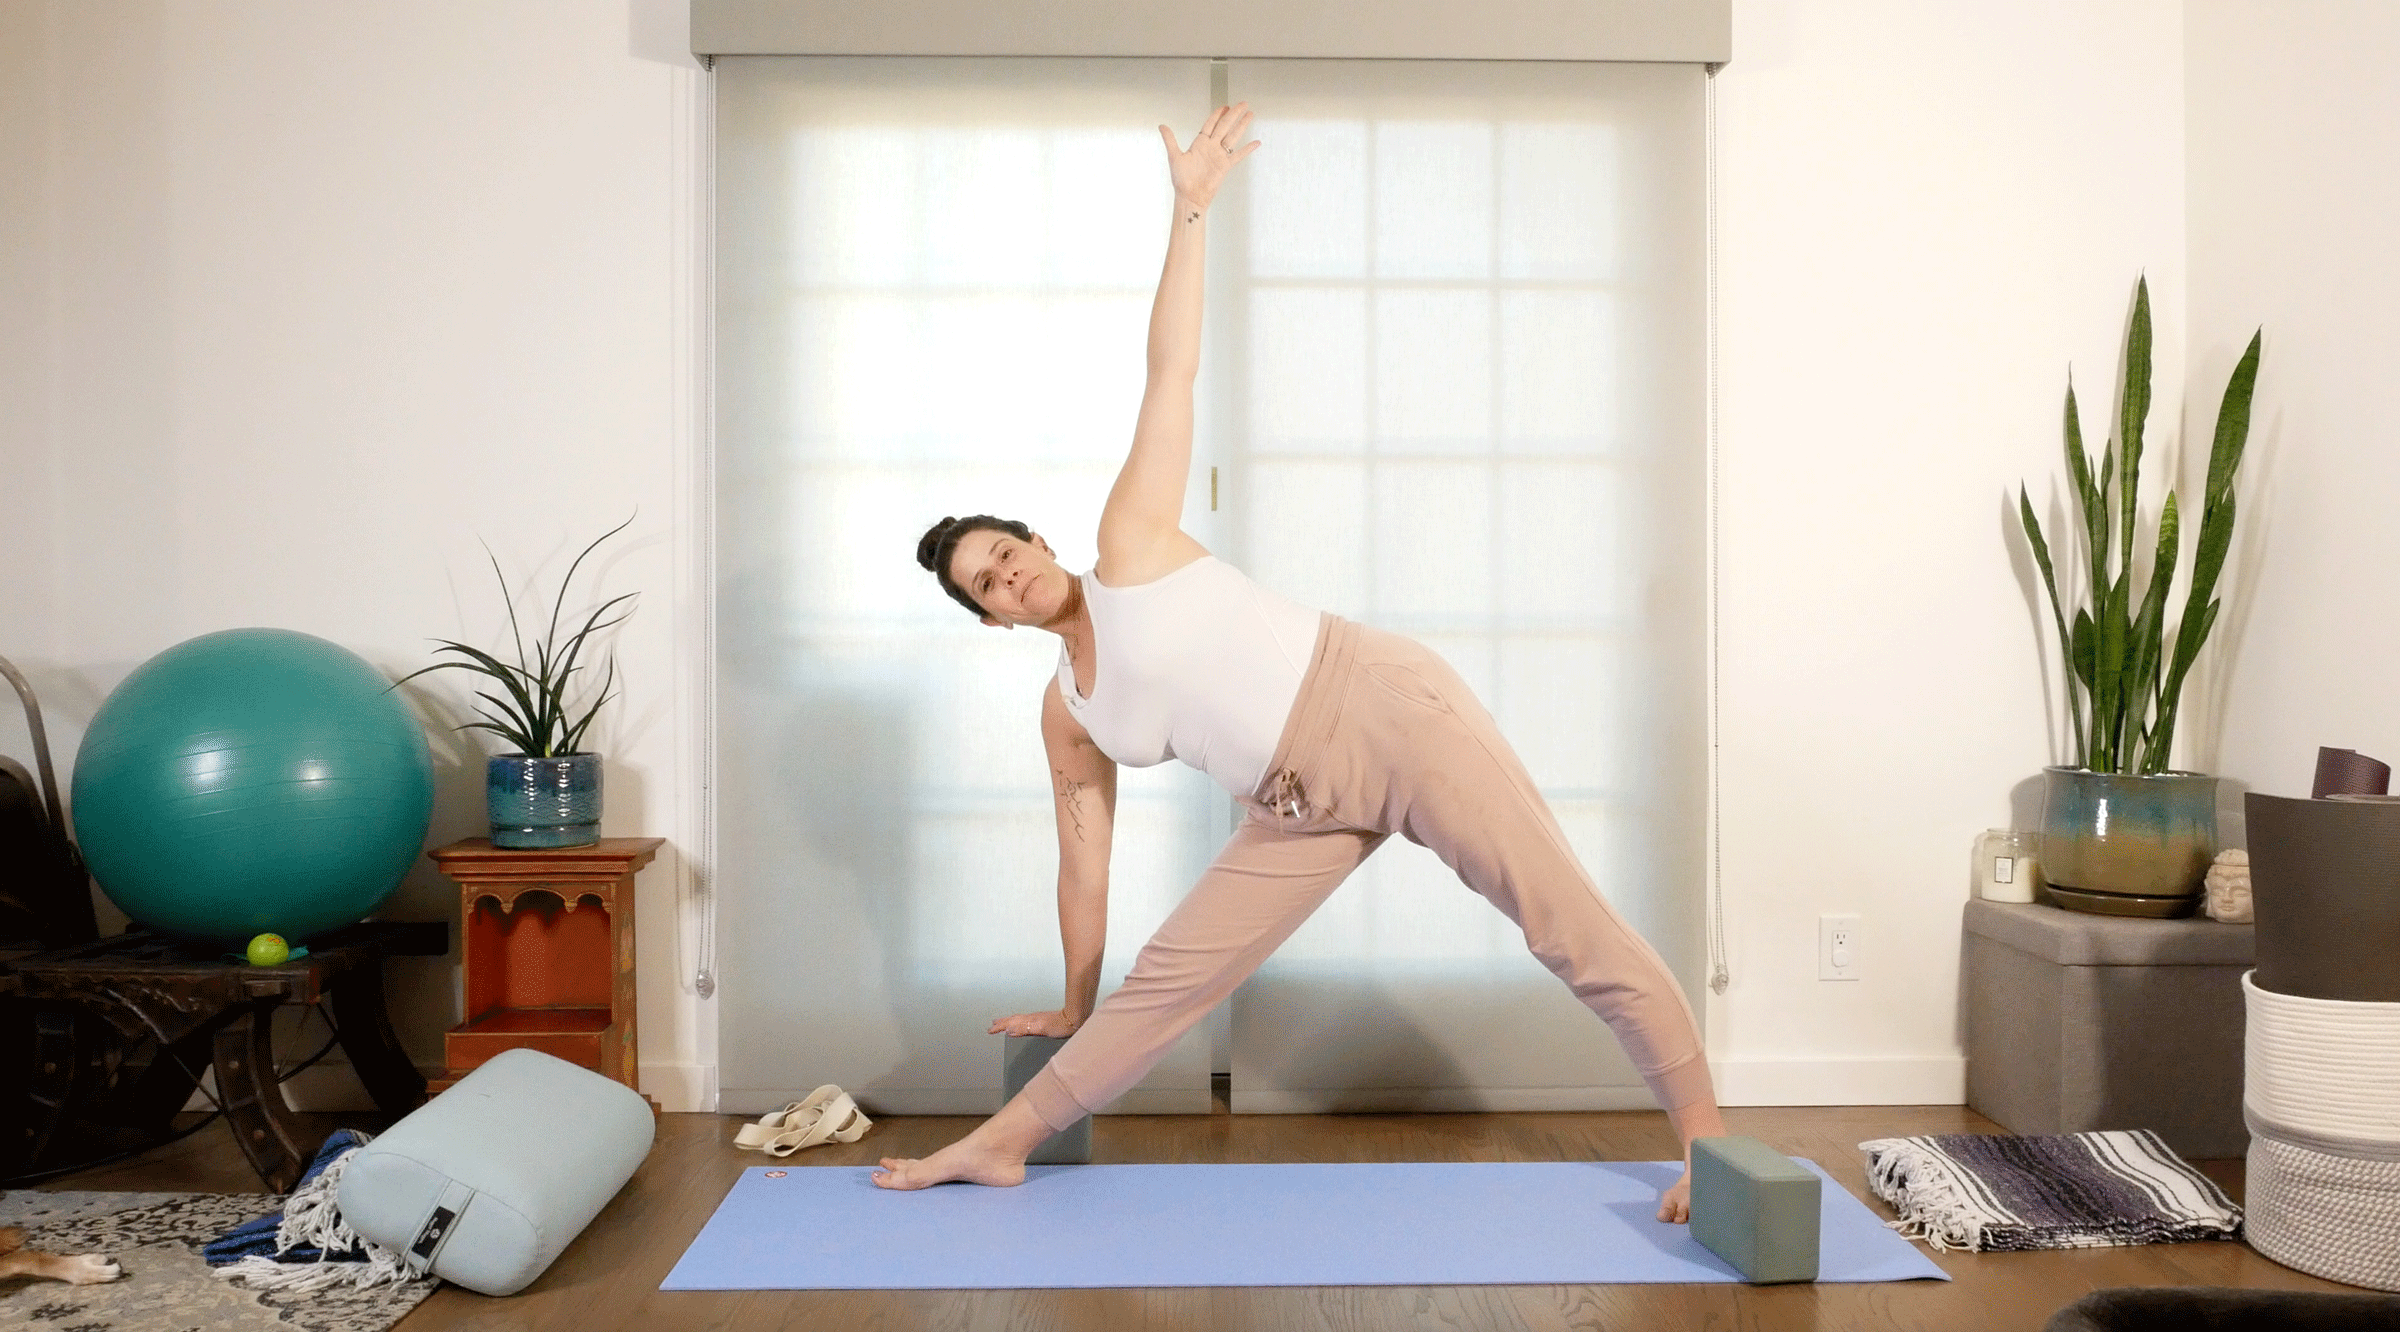
Trikonasana (Triangle Pose)
You don’t ordinarily see a standing pose during a “restorative” practice. But once you take this super wide and well-supported Triangle, you will feel why it’s such a great complement to the rest of the practice.
How to: From Tabletop, pass through Adho Mukha Svanasana (Downward-Facing Dog Pose) for a few breaths. You can freestyle here, like you did in your Cat/Cows, by pedaling your legs or doing side stretches. Take few deep sighs. When you’re ready, walk your hands back to your feet. Inhale your chest forward into Ardha Uttanasana (Standing Half Forward Bend), exhale your hands to your hips, and inhale as you rise to standing.
Turn and face the long side of the mat, standing at the center. Step your feet out wide and set your two blocks up behind your feet. Bring your hands onto your hips. Turn your right leg so your toes face away from your midline and toward the front of the mat. Angle your back foot and hip in slightly, aligning your feet heel-to-heel. On an inhale, stretch your arms wide out to the sides at shoulder height. On an exhale, tip your pelvis over your front thigh and place your right hand on a block just outside of your front foot in Triangle Pose. Even if you’re able to reach the floor, consider using the block today to remind yourself that you are accepting support. (You can move the block inside your foot if you need.) Reach your top arm toward the ceiling. Since today’s practice is a little more mellow, consider looking down at the floor instead of up at the ceiling. Hold for 10 breaths. Use an inhale to lift your trunk back upright. Parallel your feet and bring your hands to your hips before you repeat on your left side.
ADVERTISEMENT
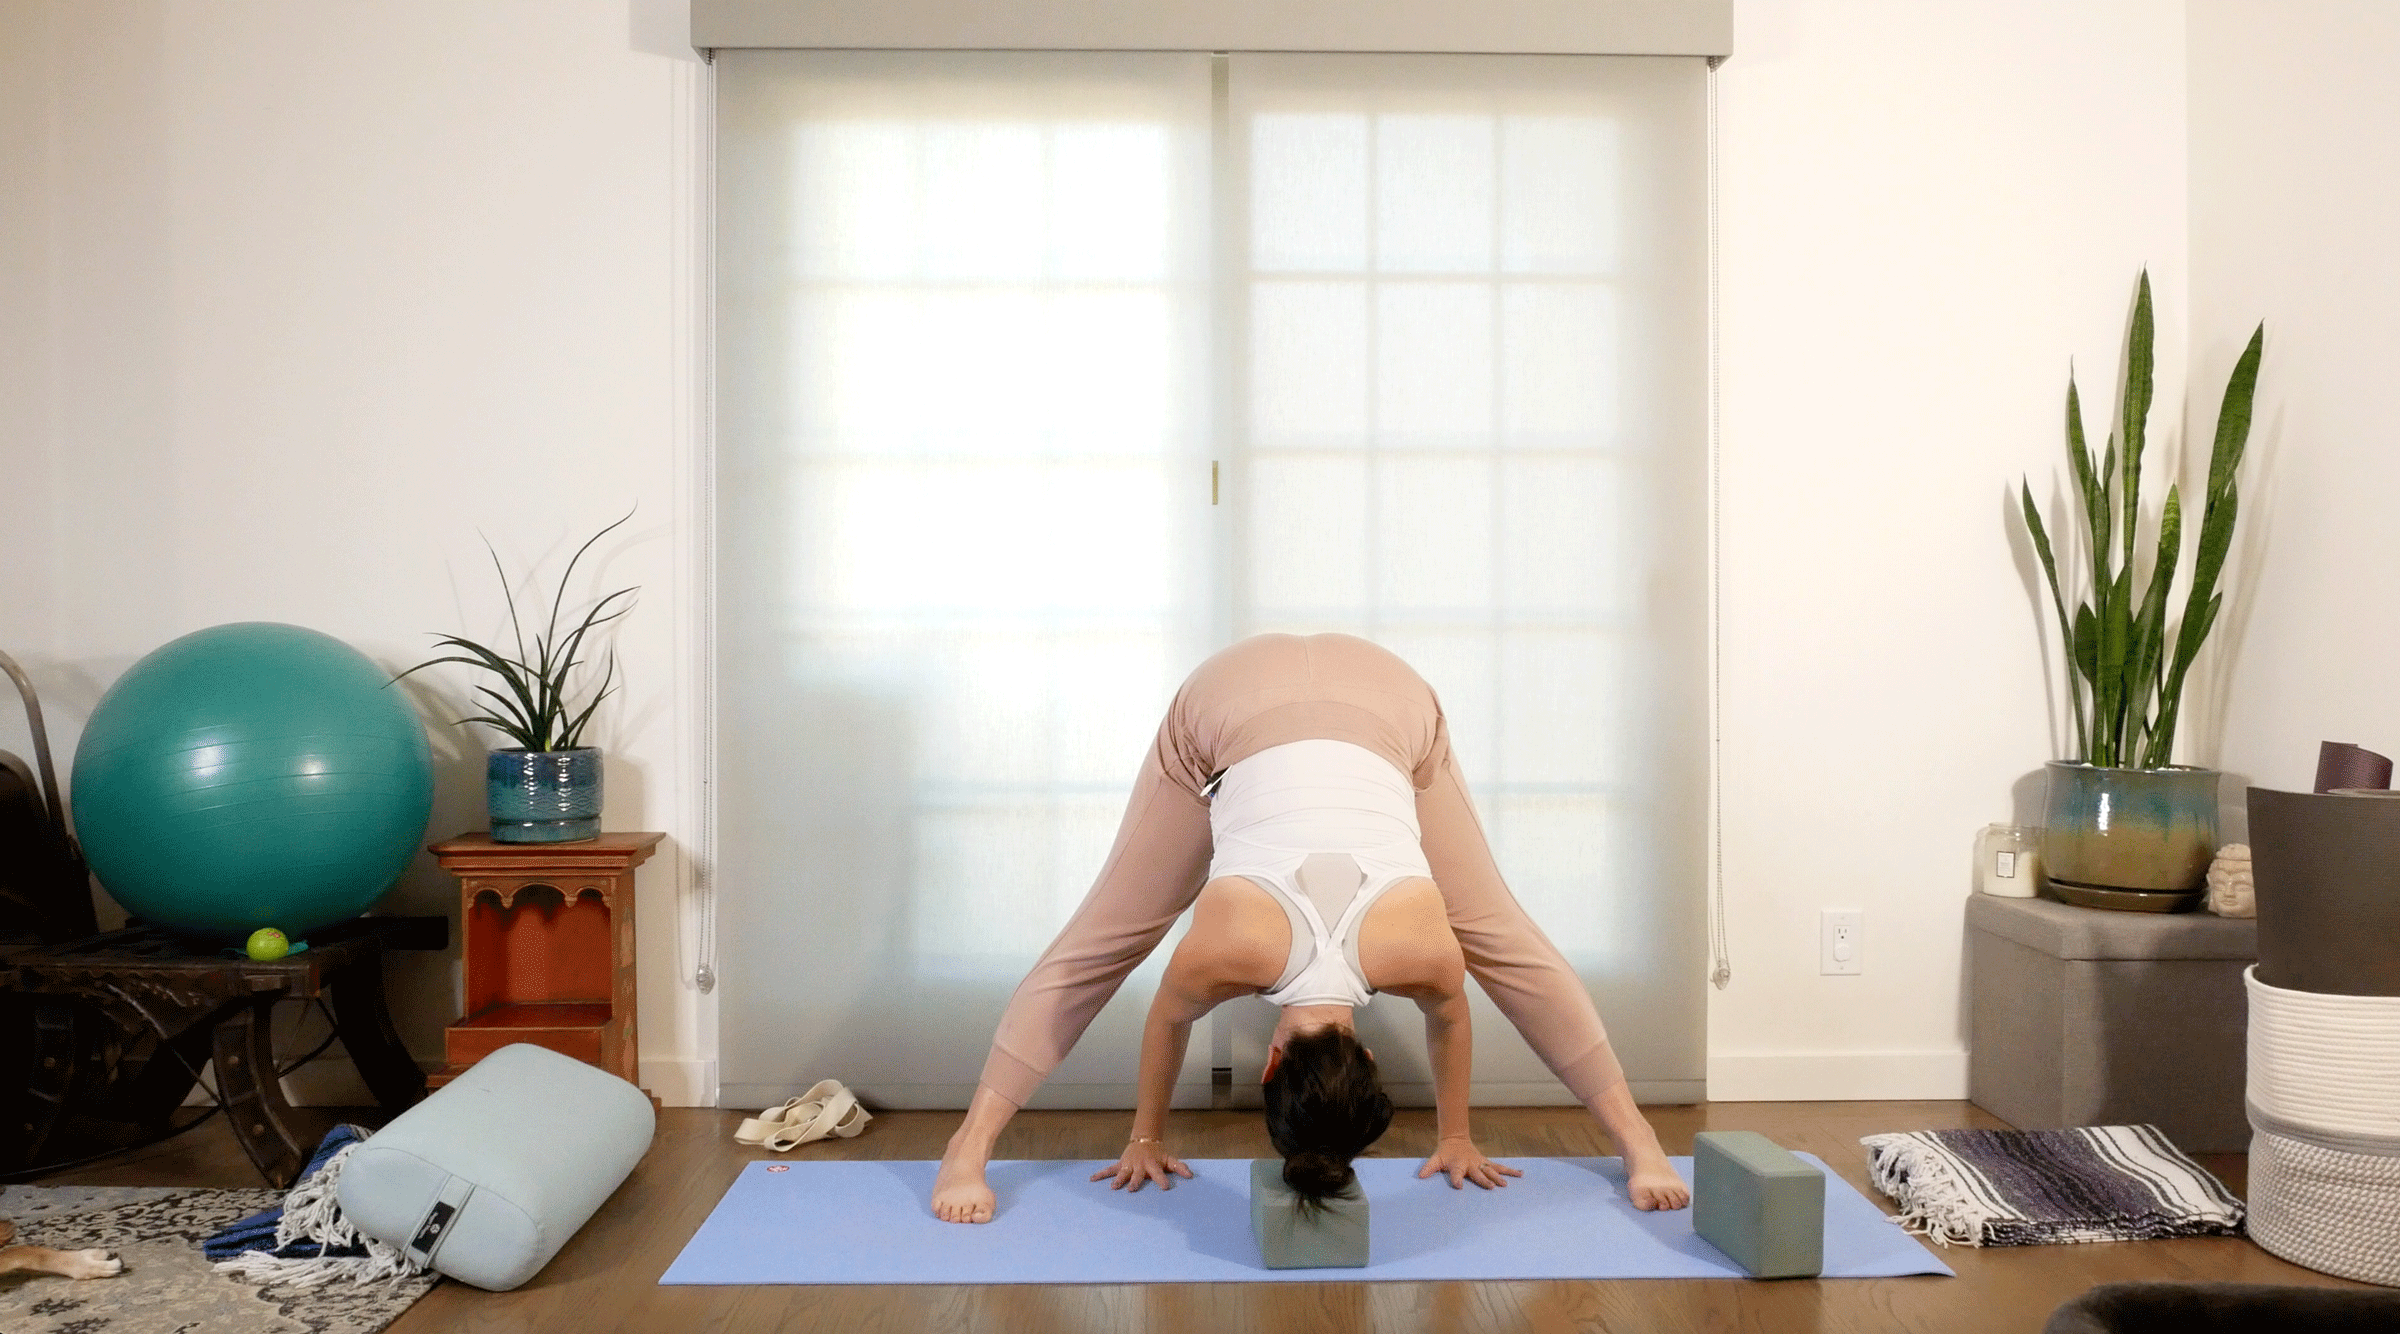
Prasarita Padottanasana A (Wide-Legged Standing Forward Bend)
We hold our heads up all day long, letting our minds rule our lives. This version of Prasarita Padottanasana helps create anatomical space in our neck and also creates metaphorical mental space as we learn to truly let our heads hang and release.
How to: After Trikonasana, grab your blocks, stand facing the long side of the mat, and place your blocks in front of you. Reach your arms straight out to the sides from your shoulders and step your feet out as wide as your hands. Bring your hands to your hips and, on an inhale, lift your chest toward the ceiling. On an exhale, fold at your hip crease, bringing your hands to your shins or the mat, shoulder-width apart. Inhale your chest forward again, and this time when you exhale, fold forward as much as is comfortable and walk your hands between your feet. Bend your elbows and stack them over your wrists. Pull the blocks toward you and rest the crown of your head on the stacked blocks. If you need props under your hands and your head, get creative, either using additional blocks, if you have access to them, or subbing in your bolster or pillows. Lift your shoulders away from your ears. Breathe here for 15 to 20 breath cycles. On an inhale reach your chest forward. Exhale as you pause and bring your hands back to your hips. Inhale and slowly rise all the way to standing and step your feet together.
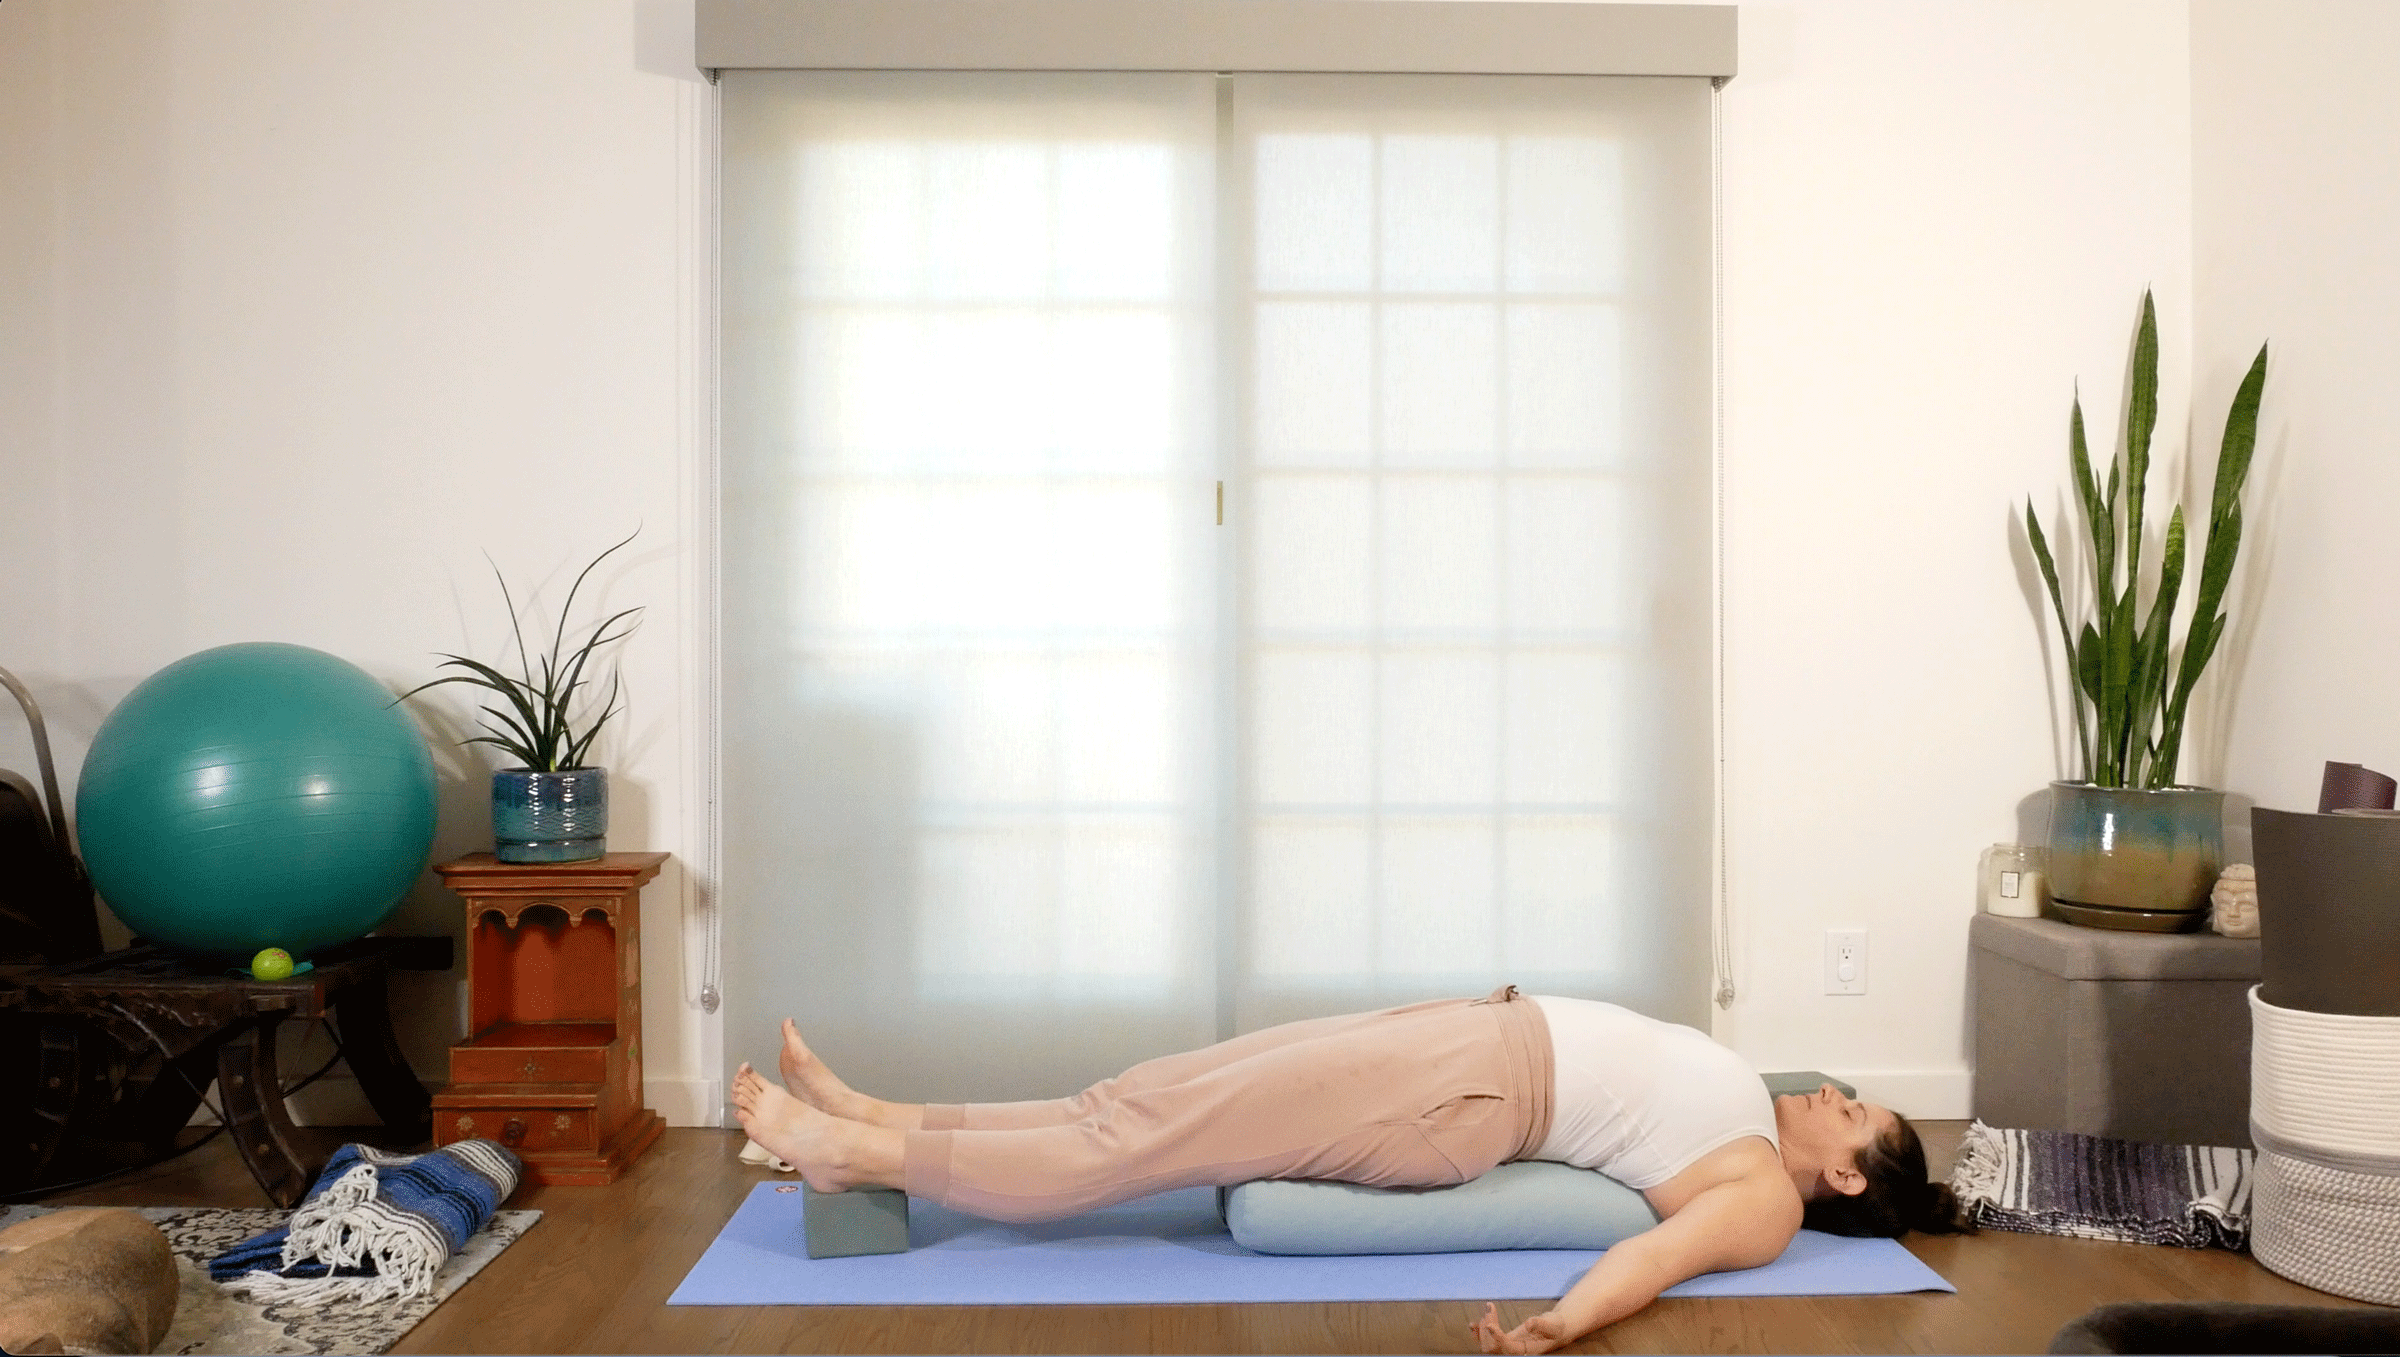
Supported Setu Bandha Sarvangasana (Supported Bridge Pose)
Alright, alright. Now let’s get into some shapes that may be more in line with what most of us think of as restorative: poses where we get to lie down or be close to the floor and fully cocooned by props. This version of Bridge Pose is excellent at passively opening our chest and front body. Please note that if your low back feels stiff or sore, a helpful tweak can be taking your legs higher than your pelvis, which means scooching your seat near a chair and resting your calves on it.
How to: From standing at the front of the mat, feel free to take Surya Namaskara A (Sun Salutation A) if you have the desire and energy to flow a little. Otherwise, come down to the floor and once again, gather all of your props.
Place your bolster lengthwise along the center of the mat and sit at the edge of the bolster closest to you. Straighten your legs and place your block there. Then make a loop around your ankles with the strap, bend your knees, and place your feet on the floor about hip-distance apart. Cinch your strap to keep this distance between your legs. Lie down on your bolster and slide backward toward the top of your mat until your shoulder blades are at the bolster’s edge and your upper back is directly on the mat. Straighten your legs and place your heels on the block, lengthening yourself out fully. If your lower back is tender, keep your knees bent and your feet on the mat. If you prefer, you can turn the block higher or move to a wall and rest your legs against it to have your feet above your pelvis. Take your arms to the sides and bend your elbows. Cover your eyes, close them, or simply soften your gaze. Lie here quietly for 3 to 5 minutes. Coming out, slip your feet out from the strap, bend your knees, and place your feet on the floor. Roll over to one side. Use your opposite arm to press up to sitting slowly.
ADVERTISEMENT
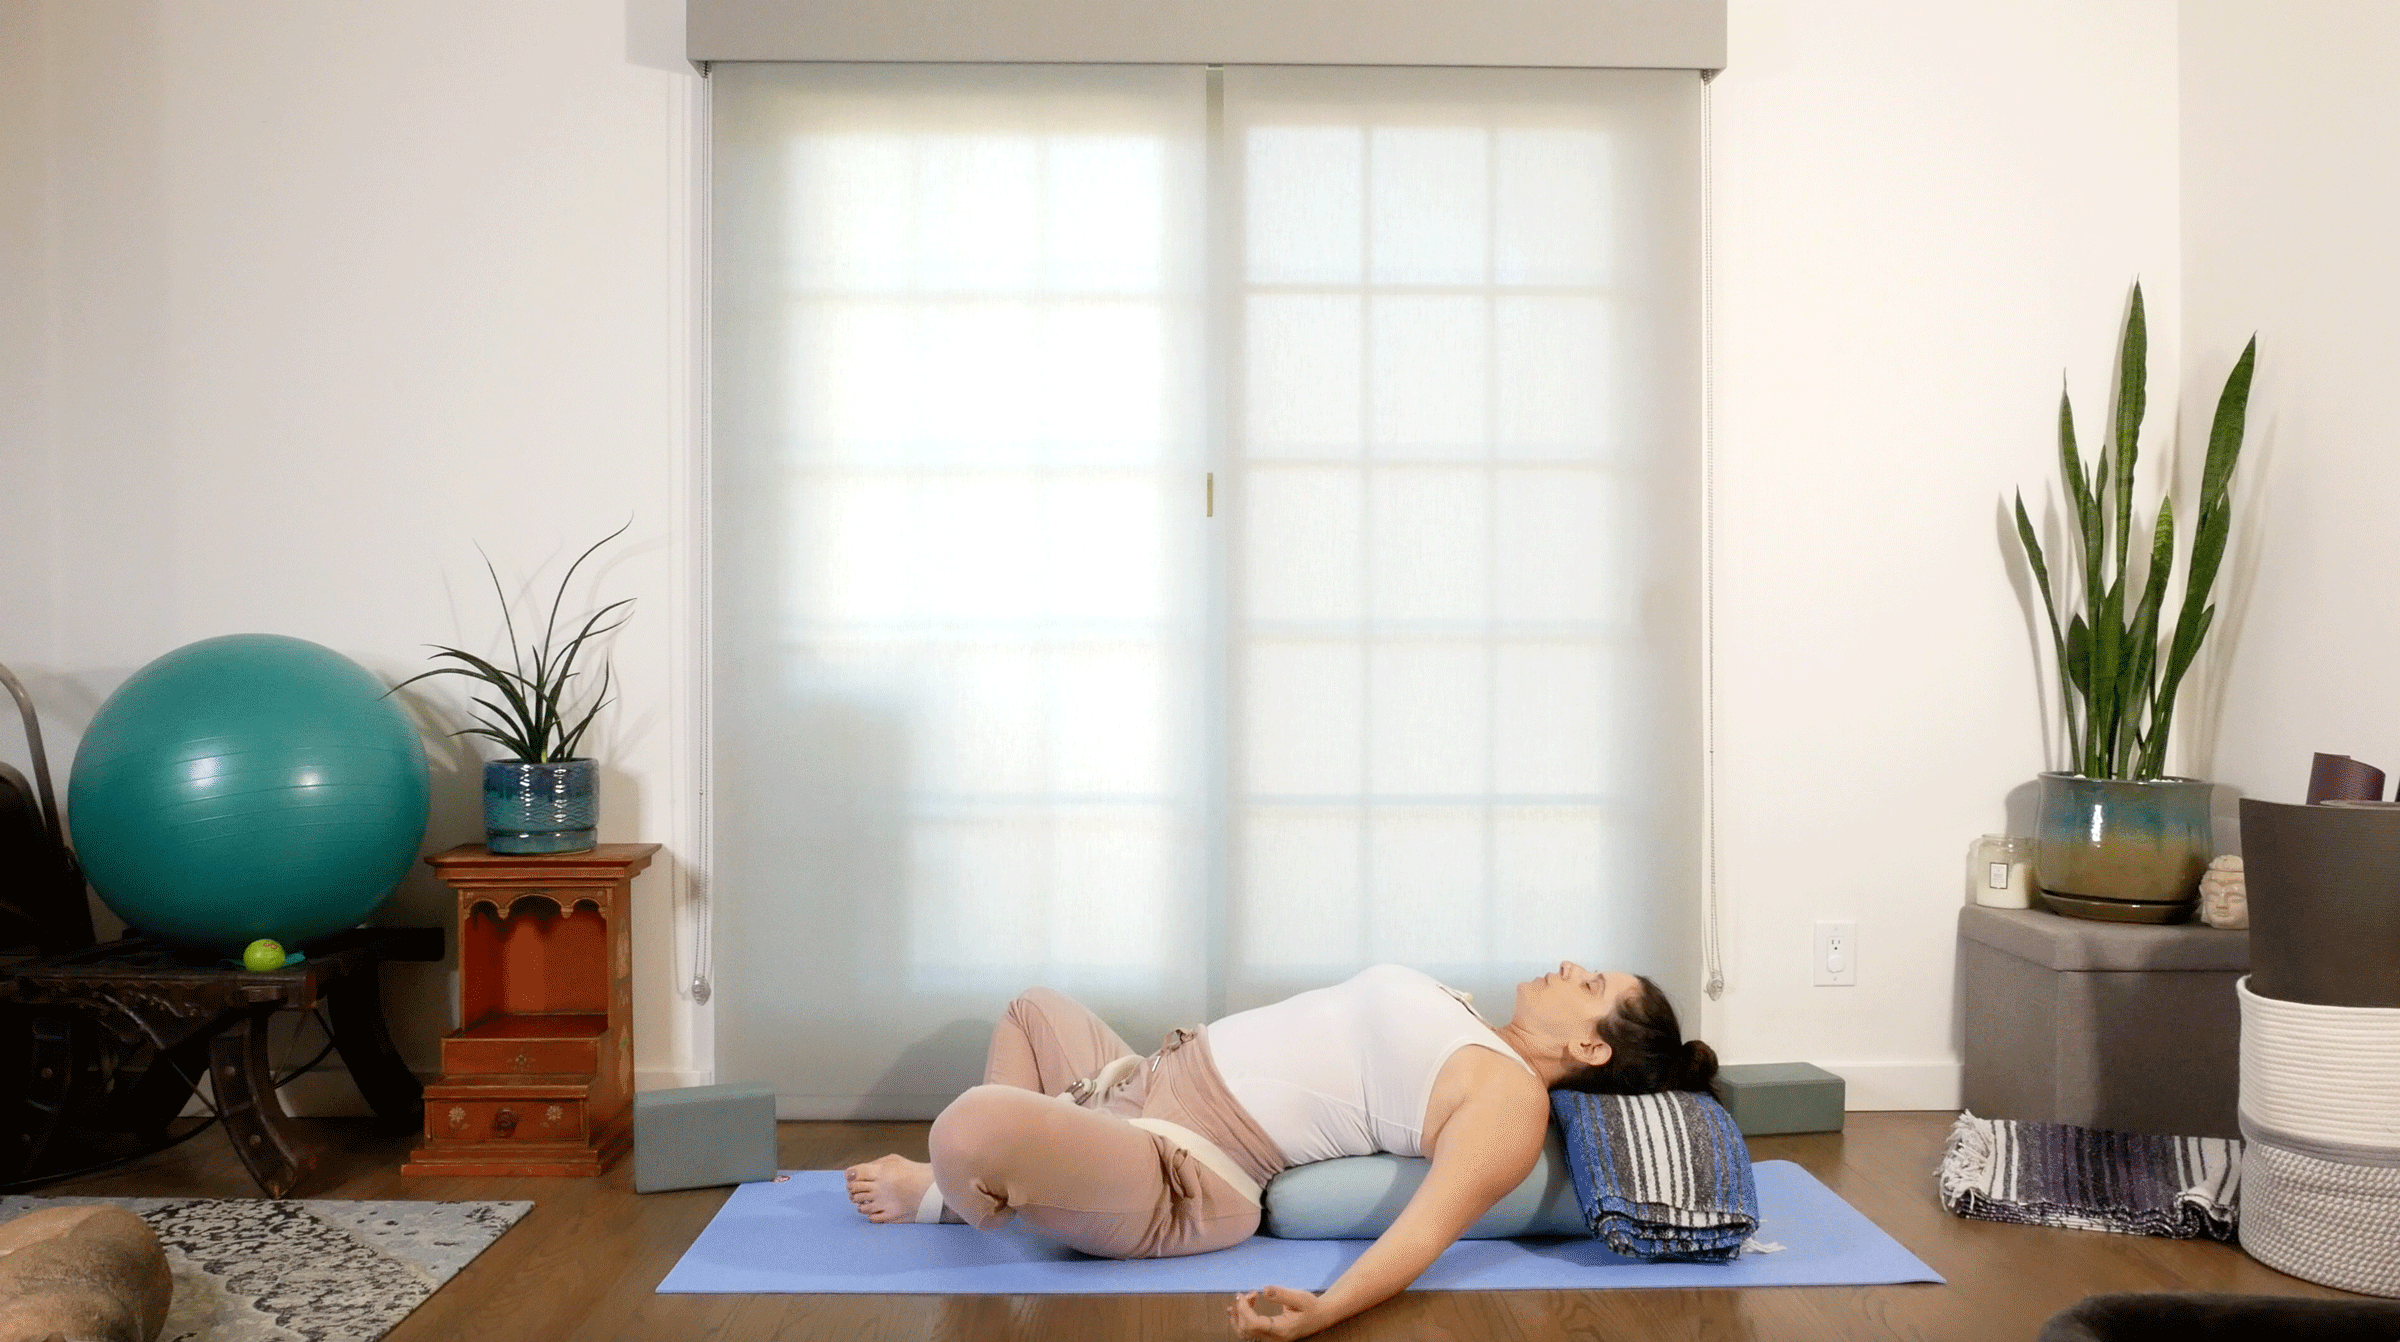
Supported Supta Baddha Konasana (Supported Reclining Bound Angle Pose)
Many of us curl in to protect ourselves instinctually making ourselves small as a response to habitual stress. There is an element of unfurling that comes with this posture as we surrender our entire front body open.
Reclining Bound Angle can be a great Savasana substitute that can be propped even more by adding blocks beneath the knees to support your thighs and calves.
How to: Keep your bolster in the center of the mat. Take a blanket, fold it over once more from standard fold, and place it at the top of the bolster. This will act as a pillow.
Sit in front of your bolster so your bum is at the short end of the bolster. Make a large loop of your strap. Touch the soles of your feet together and pull your heels toward your hips. Line up your strap with your sacrum (the back of your pelvis) and then run it along your inner thighs, finally looping it around your feet. The point of the strap is to support your lower back and sacroiliac joint, where your pelvis and spine meet. It can also accentuate the inner thigh release. Slowly lie back on the bolster, using the blanket as a pillow. Let your arms release by your sides and turn your palms upward. Lie here quietly for 3 to 5 minutes.
ADVERTISEMENT
When you are ready to come out, slip your legs out from the strap and straighten them, lying quietly for a few moments. Bend your knees and roll to one side. Slowly press yourself up to sitting.
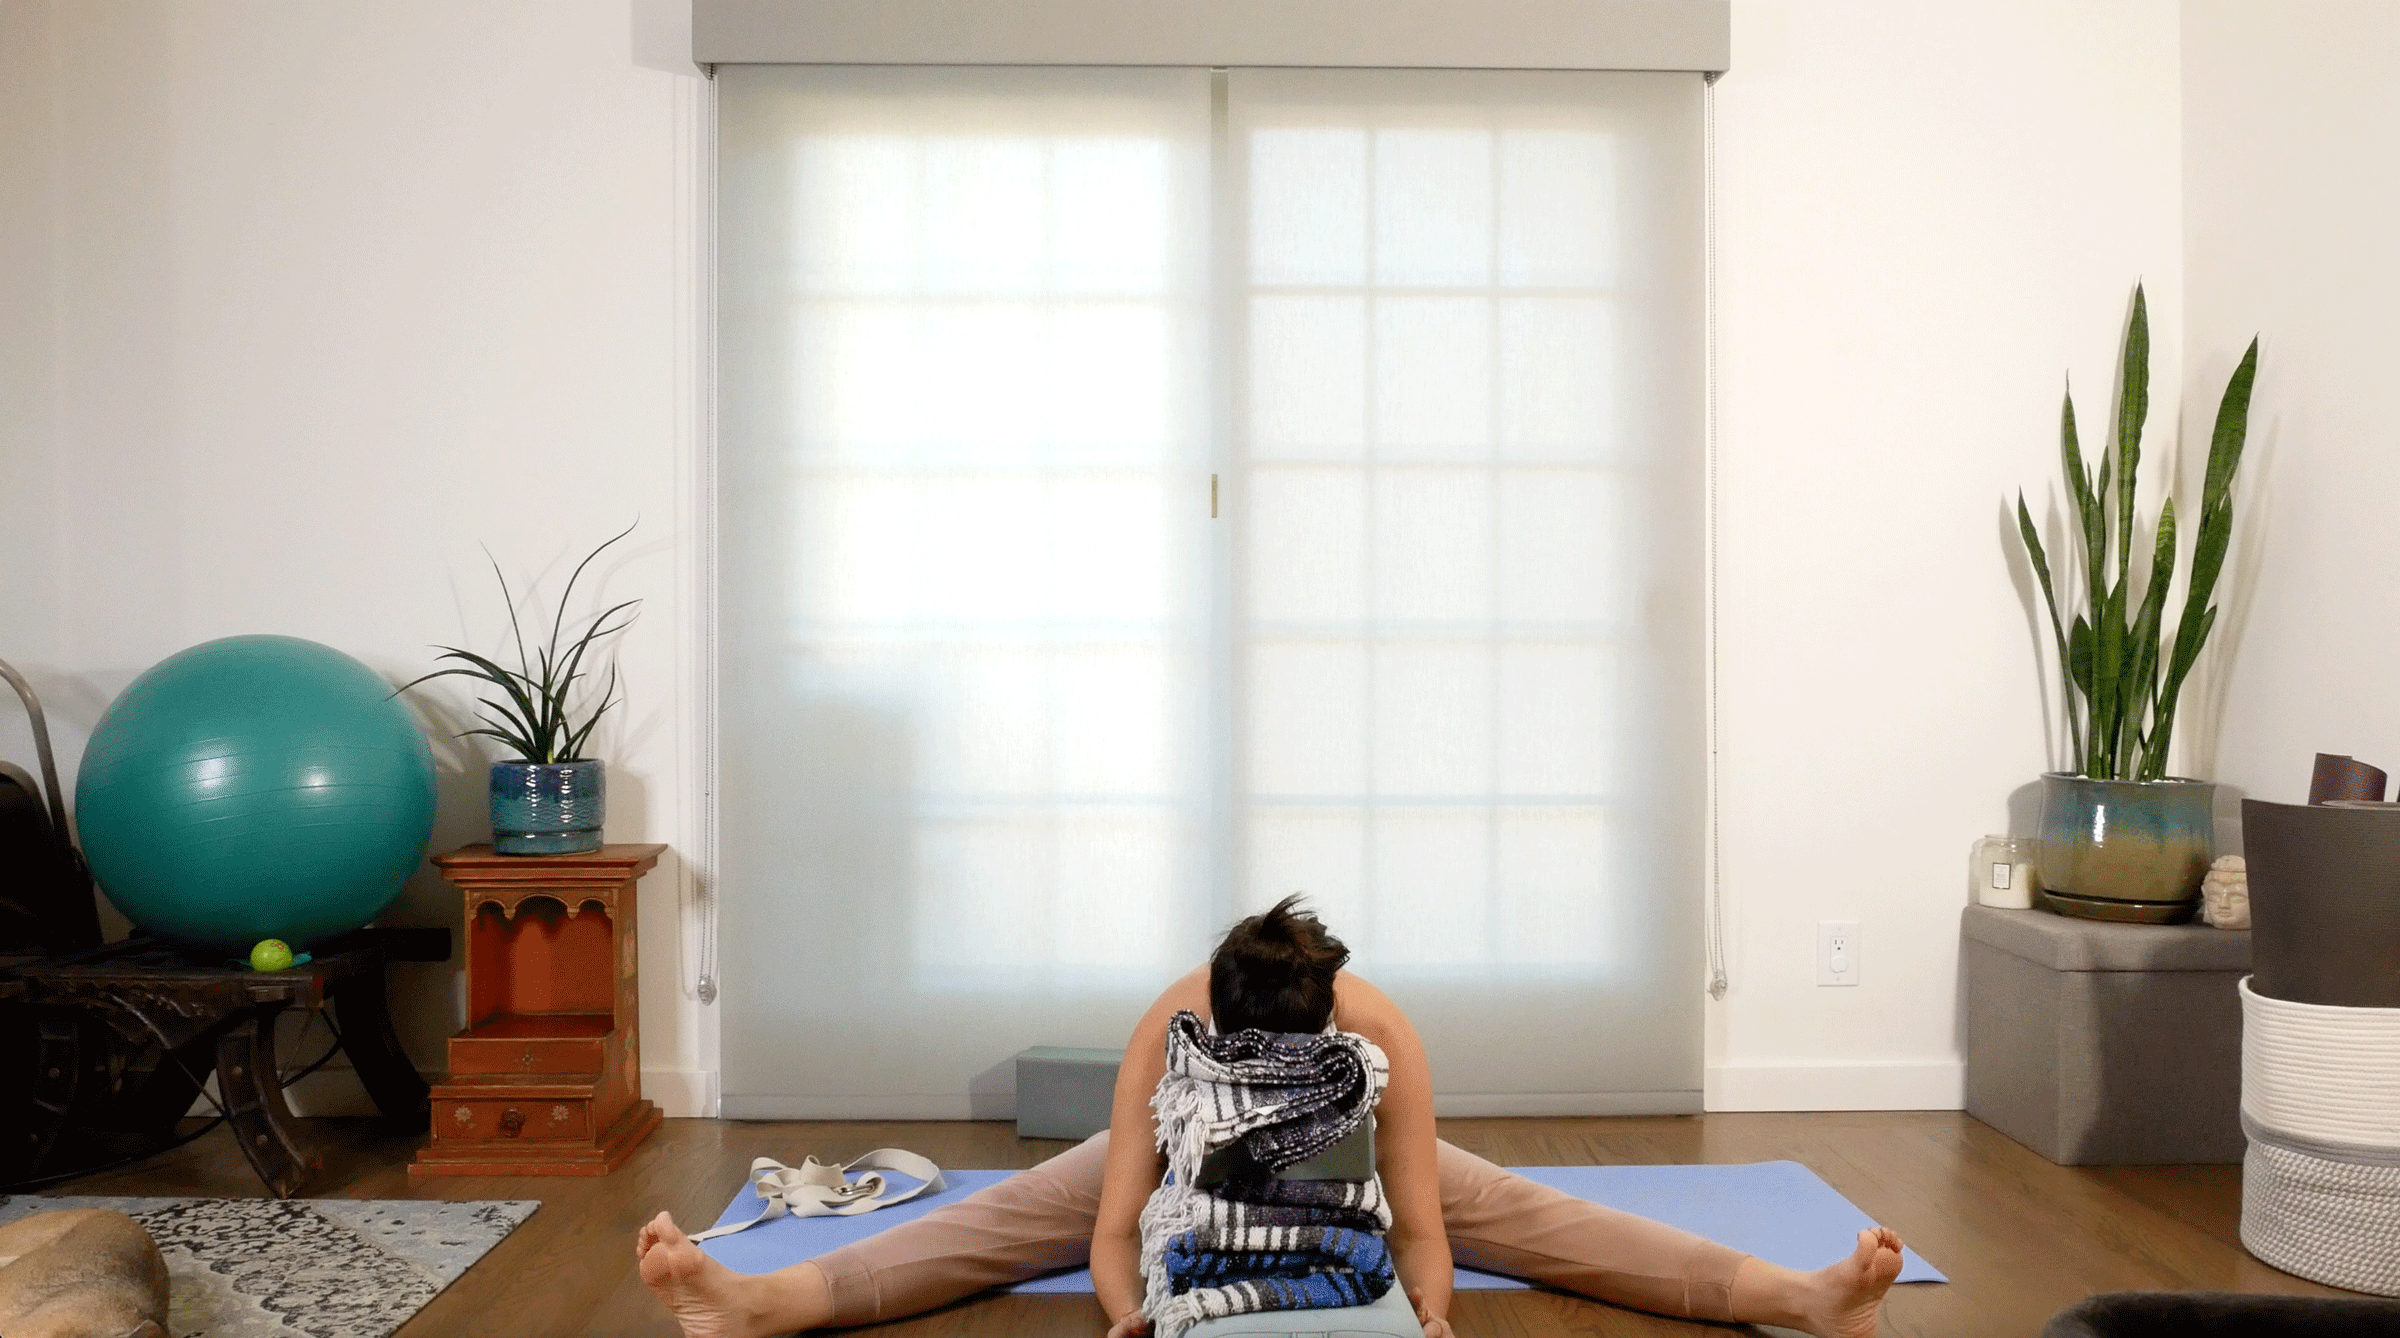
Supported Upavistha Konasana (Supported Wide-Angle Seated Forward Bend)
This particular variation of a common forward bend was a game changer for me during pregnancy. Some restorative versions of this pose ask you to pile a bunch of props together willy-nilly, like a Jenga tower, where you can rest your forehead. That can feel unstable for some. I much prefer to build a “prop shelf” at an appropriate height for your body and in a way that feels stable and supportive. For example, set your blocks on the medium setting a foot or so apart and place the bolster or pillows across the top of them to create a shelf. You may need to use several pillows or place some folded blankets on top to make the “shelf” taller.
How-to: Grab 2 blocks and your bolster or some firm pillows and blankets. Turn to face the long side of the mat and open your legs wide. Stack your bolster, blankets, and blocks between your legs. I like to alternate the direction of my blankets so the tassels are on opposing sides at each blanket level.
Inhale as you reach your arms up and as you exhale, bend forward to bring your upper body over the props however is comfortable for you. (If you are using the shelf, cross your forearms and make a stack of your palms and use them as a pillow to rest your forehead.) It’s okay if your spine rounds a bit. In restorative poses, it’s much more about releasing tension and receiving stillness than it is forcing yourself to hold a particular shape. If having your forehead down is not comfortable for your neck, try turning your head to rest on one side; halfway through the pose, turn it to the other side. Rest here for 3-5 minutes. Slowly come back to sitting and pause before moving to our final shape.
ADVERTISEMENT
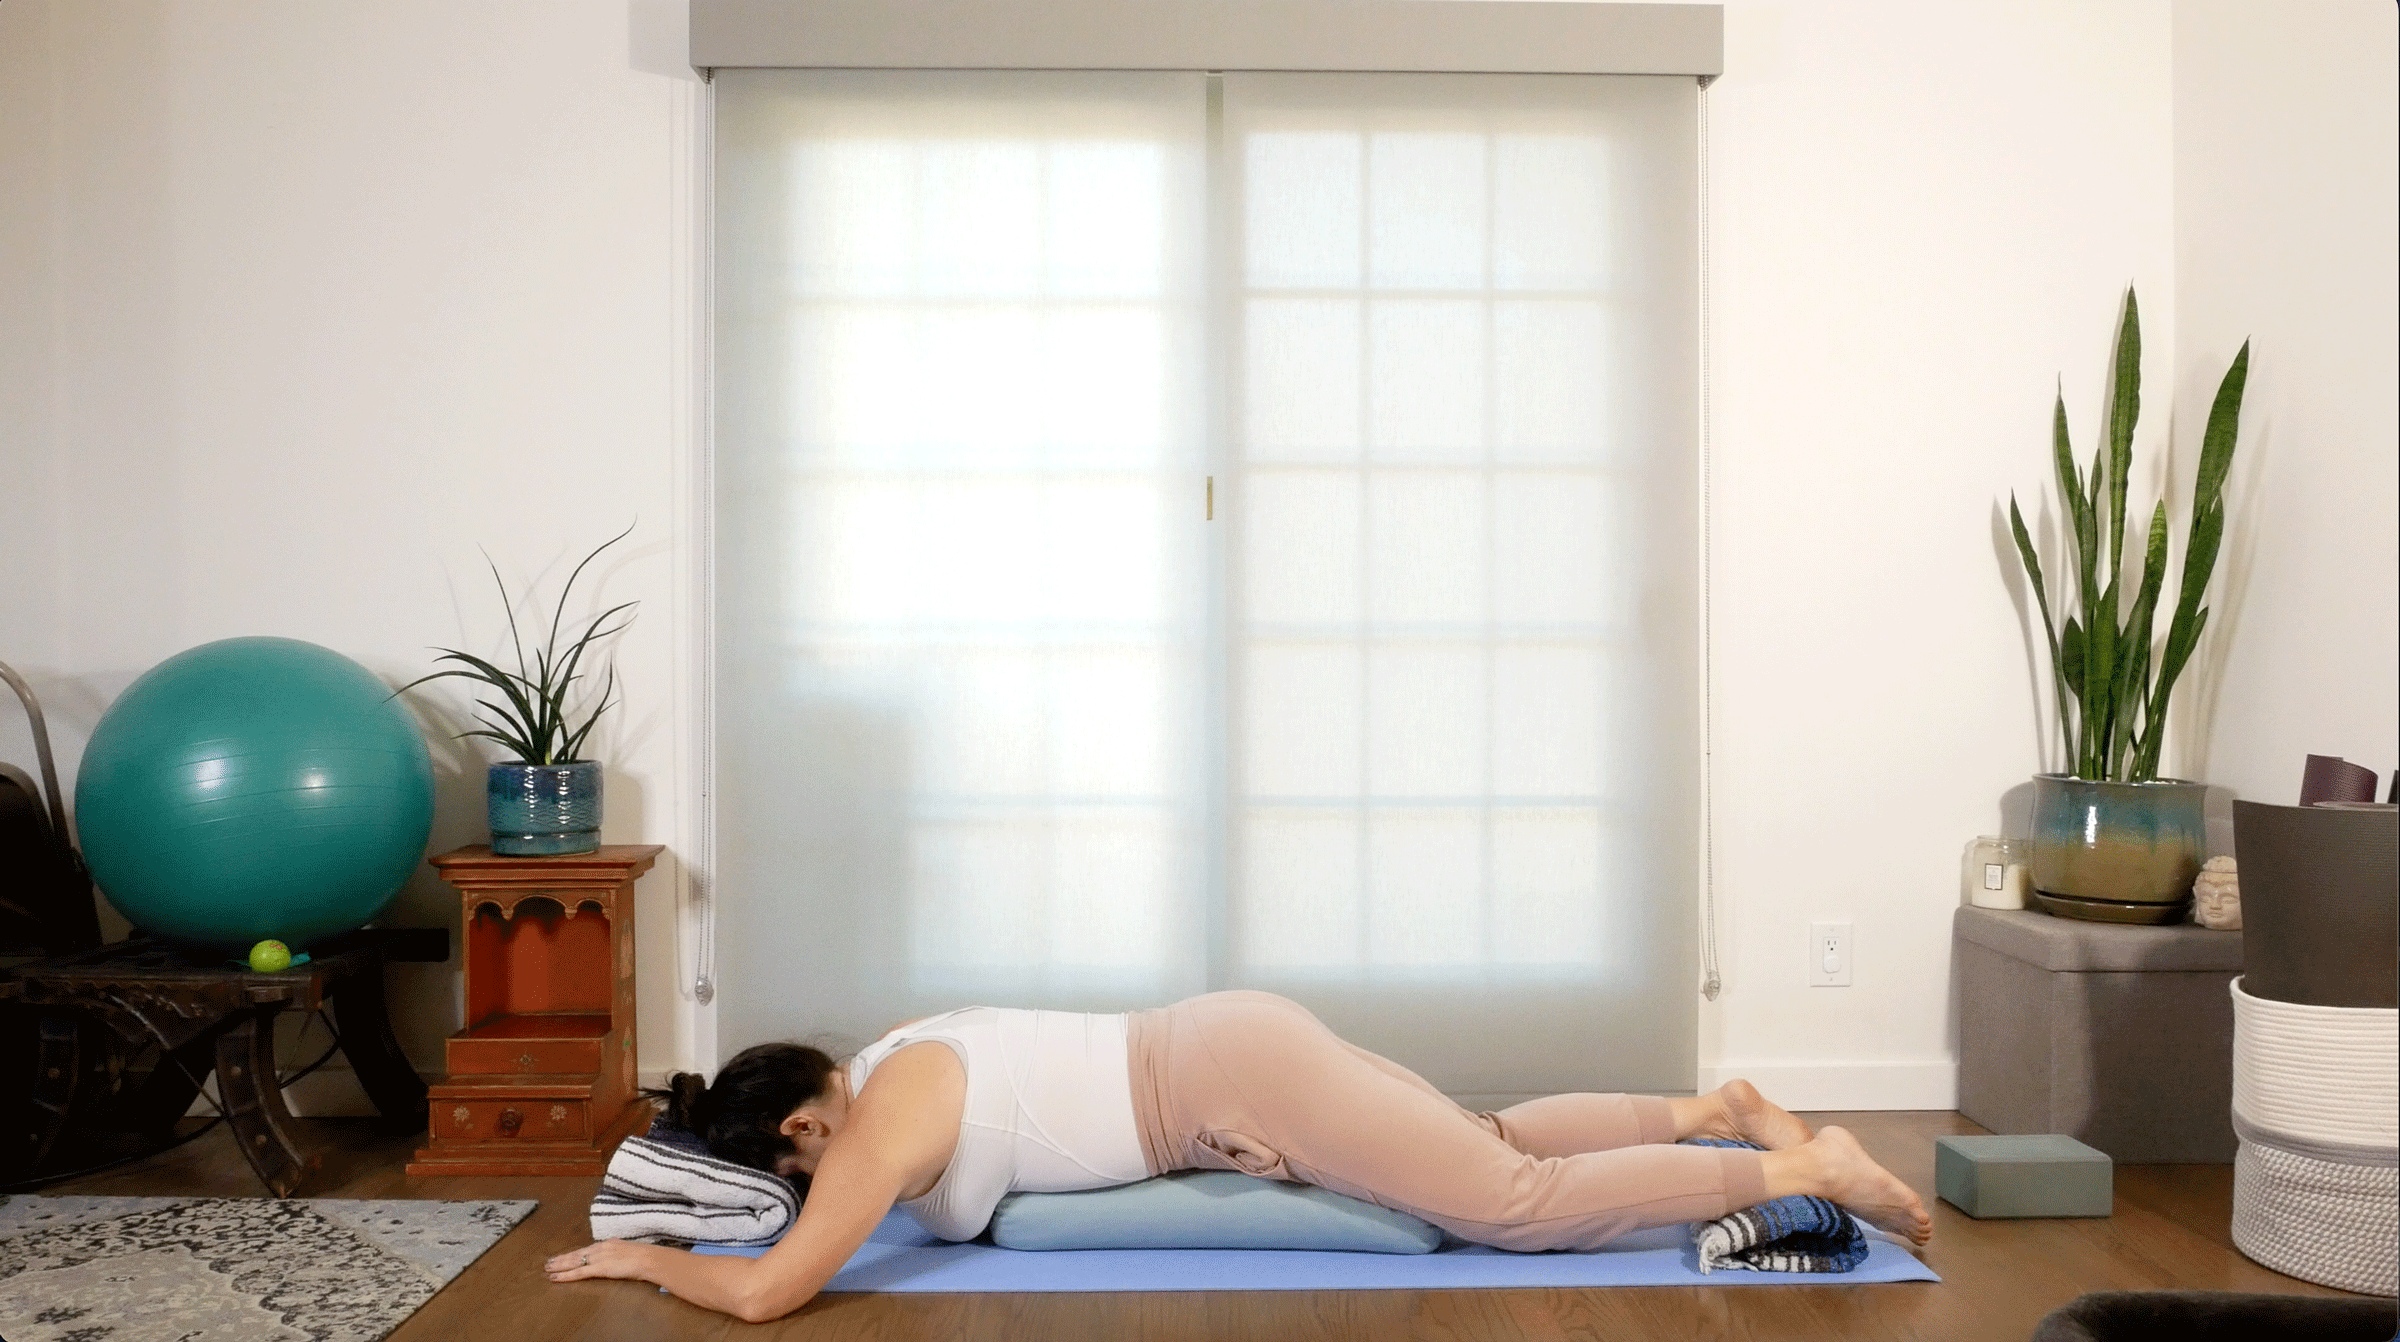
Prone Savasana
This face-down version of Savasana is an anxiety-reducer for me. I find it comforting to have a bolster hugging into my belly. Play with the position of your head, either keeping your forehead down or turning your head to one side.
Please note: If you are pregnant or claustrophobic, take the traditional version of Savasana on your back or feel free to repeat Supta Baddha Konasana or any other relaxation pose that feels profoundly restful for you.
ADVERTISEMENT
How to: Bring your bolster lengthwise down the center of the mat again. Take one of your blankets and fold it into a square. Put it about a foot above the top of your bolster. Roll a second blanket up and place it horizontally (so perpendicular to the bolster) a foot away from the bottom end of your mat.
Lie on top of your props, face down, with the bolster running from your chest to your thighs. Your forehead will rest on your folded blanket up top. (Please note the height and spacing may need to be adjusted to make sure the blanket is high enough for proper space for your nose. Rest your ankles on the rolled blanket at the bottom of your mat. Reach your arms out to the sides, so your elbows are in line with your shoulder and your palms face down. Remain here for from 5-7 minutes.
When it is time to come out, bring your palms beneath your shoulders and press up to Tabletop. If you like or need, take a few hip rolls or Cat/Cows before sinking back to Child’s Pose for as little or as long as you like. Roll yourself upright and pause before resuming your day or settling into your evening.
ADVERTISEMENT
About our contributor
Sarah Ezrin is an author, world-renowned yoga educator, popular Instagram influencer, and mama based in the San Francisco Bay Area. Her willingness to be unabashedly honest and vulnerable along with her innate wisdom make her writing, yoga classes, and social media great sources of healing and inner peace for many people. Sarah is changing the world, teaching self-love one person at a time. She is also the author of The Yoga of Parenting. You can follow her on Instagram at @sarahezrinyoga and TikTok at @sarahezrin.