Published October 31, 2022 09:02PM
Go-To Sequence for Coming Into Handstand
This is your fail-proof sequence for preparing your—or your students—body and mind for Handstand. You're going to find yourself going back to it again and again.
(Photo: Andrew Clark)
As someone who still struggles with coming into Handstand, despite two-plus decades of practicing yoga, I have always appreciated the postures that prepare the body to attempt this pose. Which is probably why the very first go-to yoga sequence I ever created—and still come back to after years of teaching—is a sequence leading up to Handstand.
The anatomical focus of this sequence is the upper arms in external rotation, meaning a heavy focus on how to safely turn the upper arm away from the midline in the shoulder socket, which is a key feature to any arms-overhead pose.
Adho Mukha Vrksasana (Handstand) is generally thought to be a pose for more experienced practitioners, but you can alter it for intermediate classes. I actually use many parts of this sequence in beginner-level classes simply by stopping at an earlier point. (One of my favorite things to ask beginner students is if Downward-Facing Dog (Adho Mukha Svanasana) is a Handstand, because in the literal sense, it absolutely is!)
While some pieces of this go-to sequence have changed, like certain transitions or the exact order of poses, my anatomical focus and peak pose remain the same.
ADVERTISEMENT
As a reminder, the ordering of the postures is important as each pose progresses to the next, but feel free to get creative with your own transitions between poses and remember, you and your students can (and should) always stop where you need along the way.
Go-to sequence for coming into Handstand
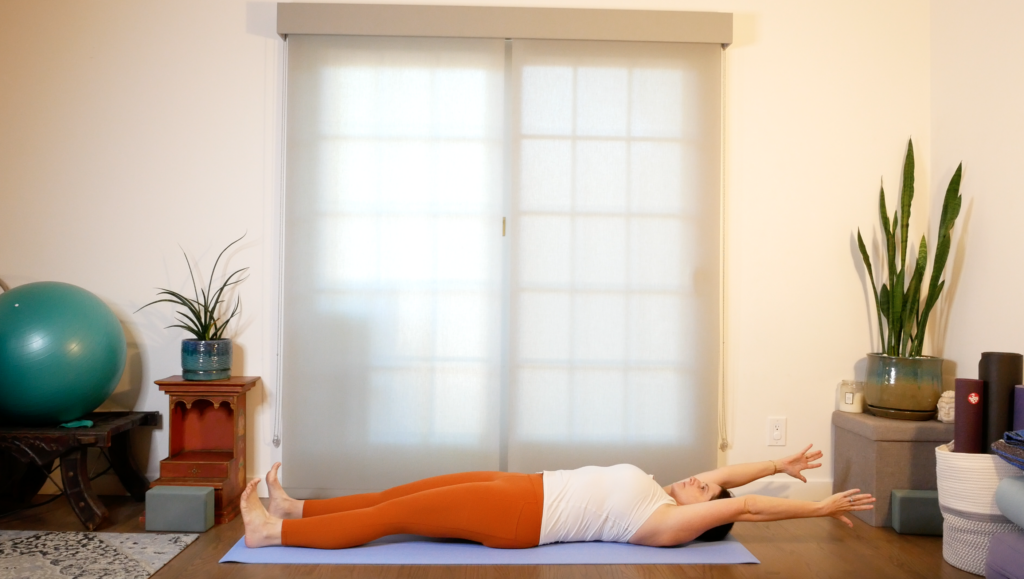
Supta Utthita Hastasana in Tadasana (Supine Tadasana with Arms Overhead)
We don’t necessarily need to go upside down to do Handstand. This supine version has all of the same elements without the added stress of balance. The floor is great for giving feedback about where your students are initiating movement. For example, are they moving from the arms or the rib cage, which which could cause overarching and lead to instability once they attempt the weight-bearing version of the pose on their hands.
And, because students aren’t contending with the fear and overwhelm that can accompany getting upside-down, students can really hone these actions and comment them to muscle memory.
ADVERTISEMENT
How to: Lie on your back. Stretch your legs straight in front of you. Reach your arms above your chest, fingers pointing to the ceiling. Actively turn your arms so your outer arm wrap toward your face so your palms face each other. Option to hold a block between the hands as a space holder. Slowly, on an inhale, begin to take your arms alongside your ears. Observe your lower ribs and try to keep them stable rather than allowing them to jut toward the ceiling. You may find your arms don’t go past your cheeks. That’s okay! Prioritize keeping your spine long. Once you find your stopping point, pause and stay here for 8 breaths. On an exhale, lower your arms by your side. You can repeat this a few times dynamically, moving with your breath, or do another round while pausing.
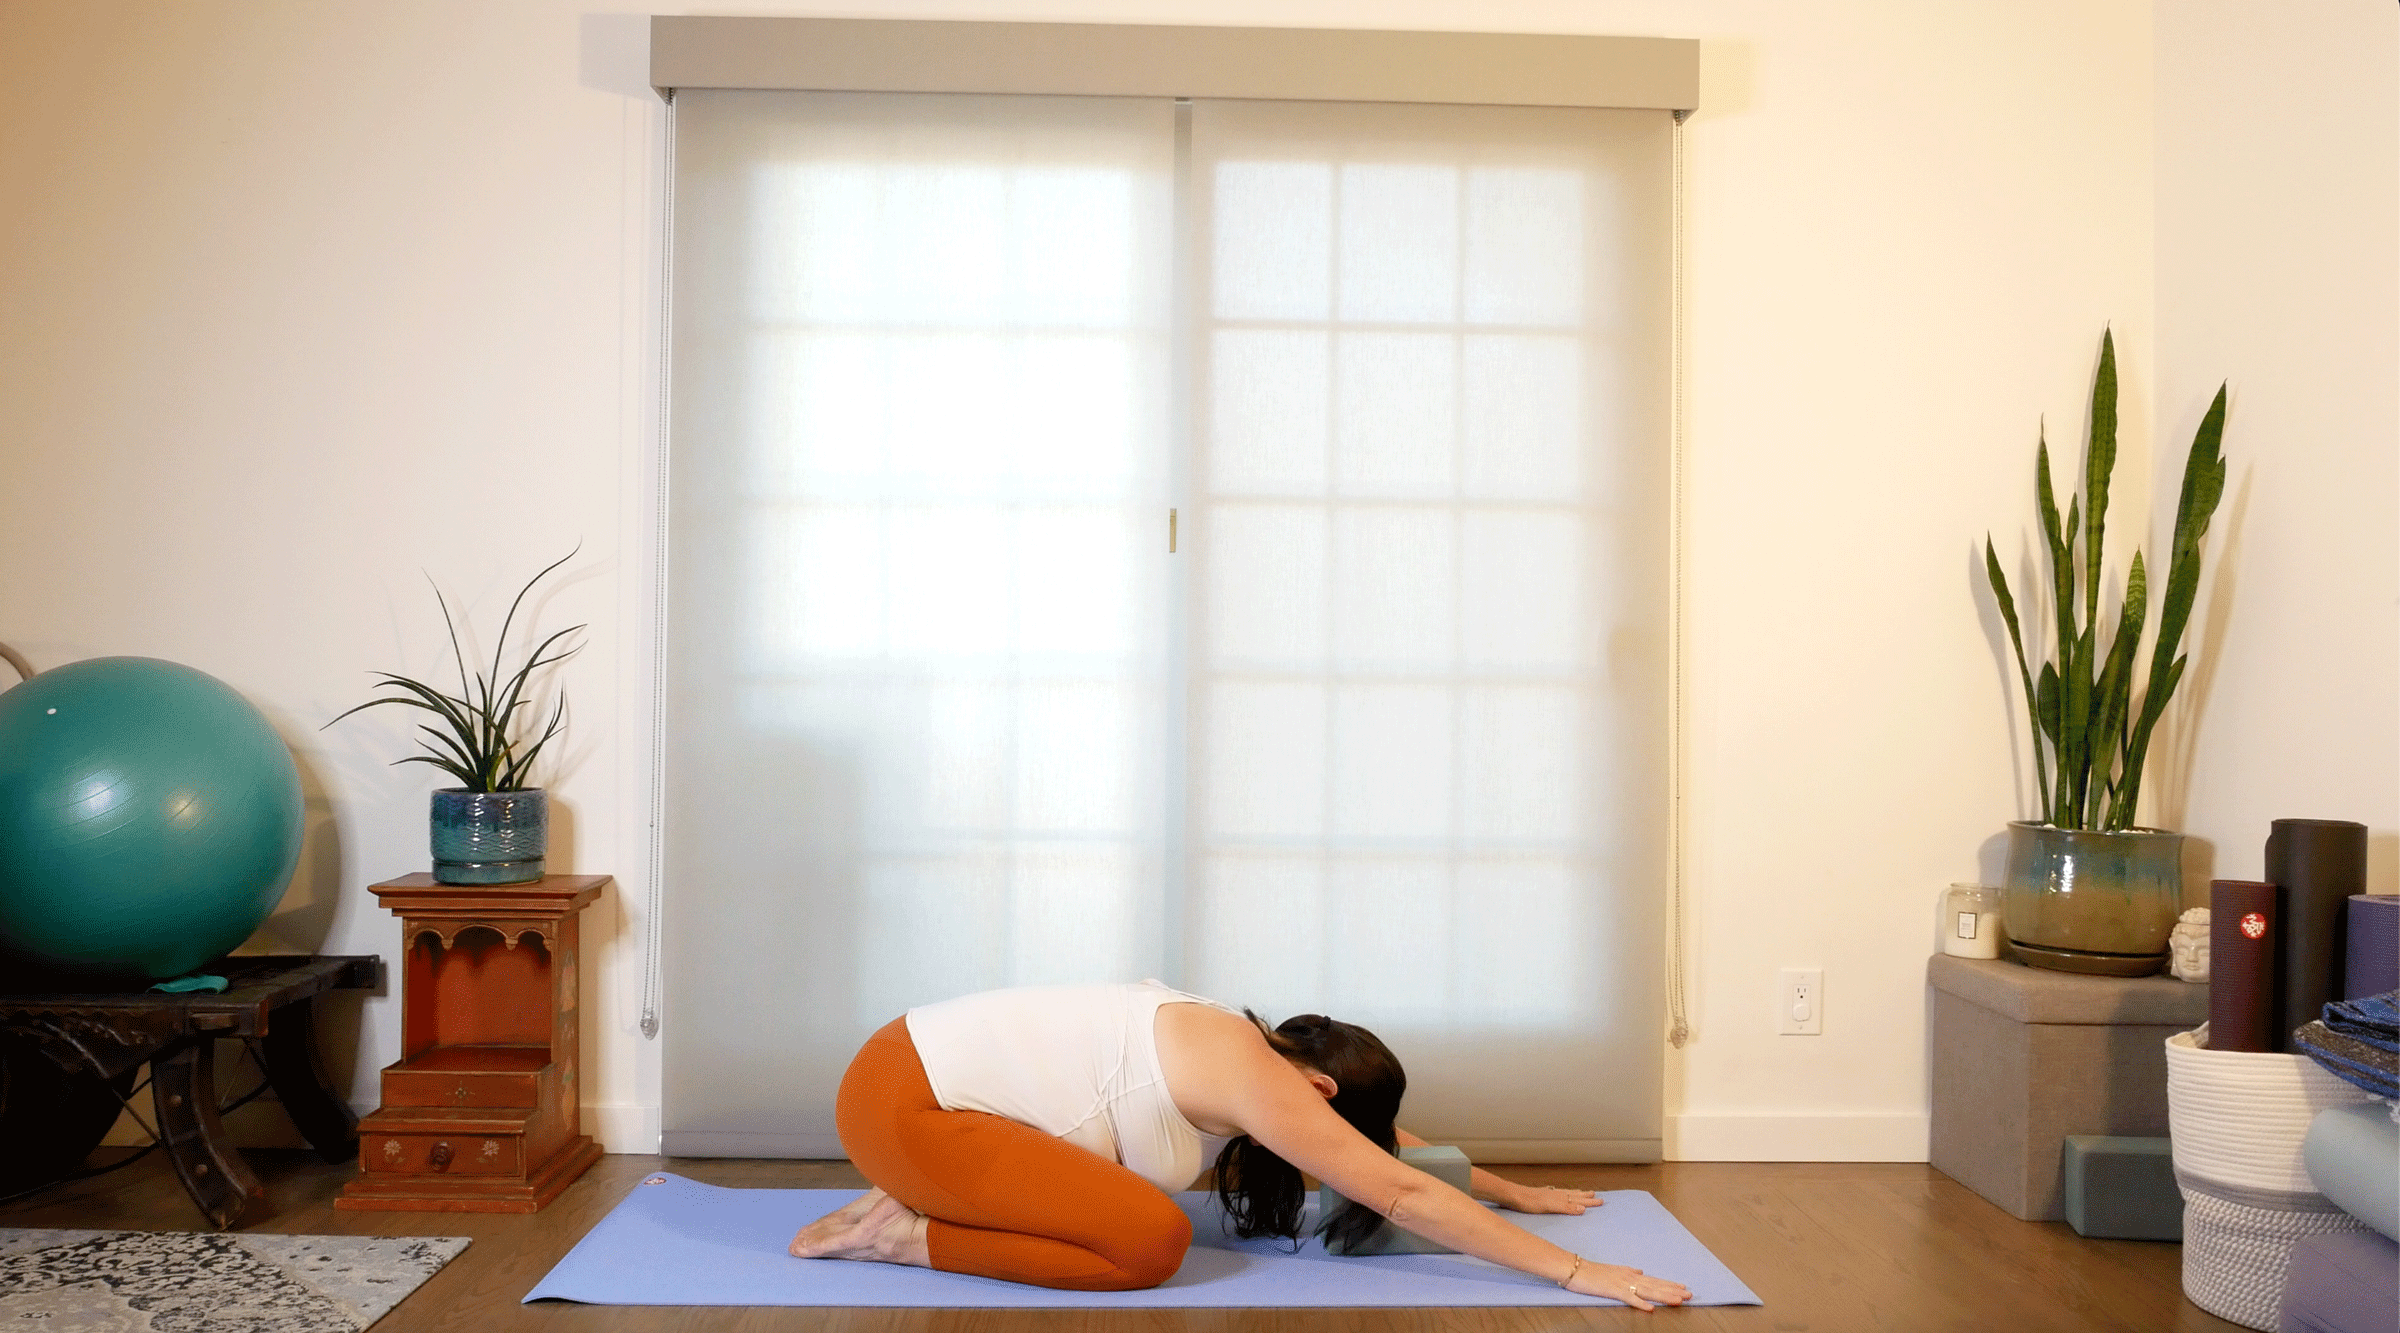
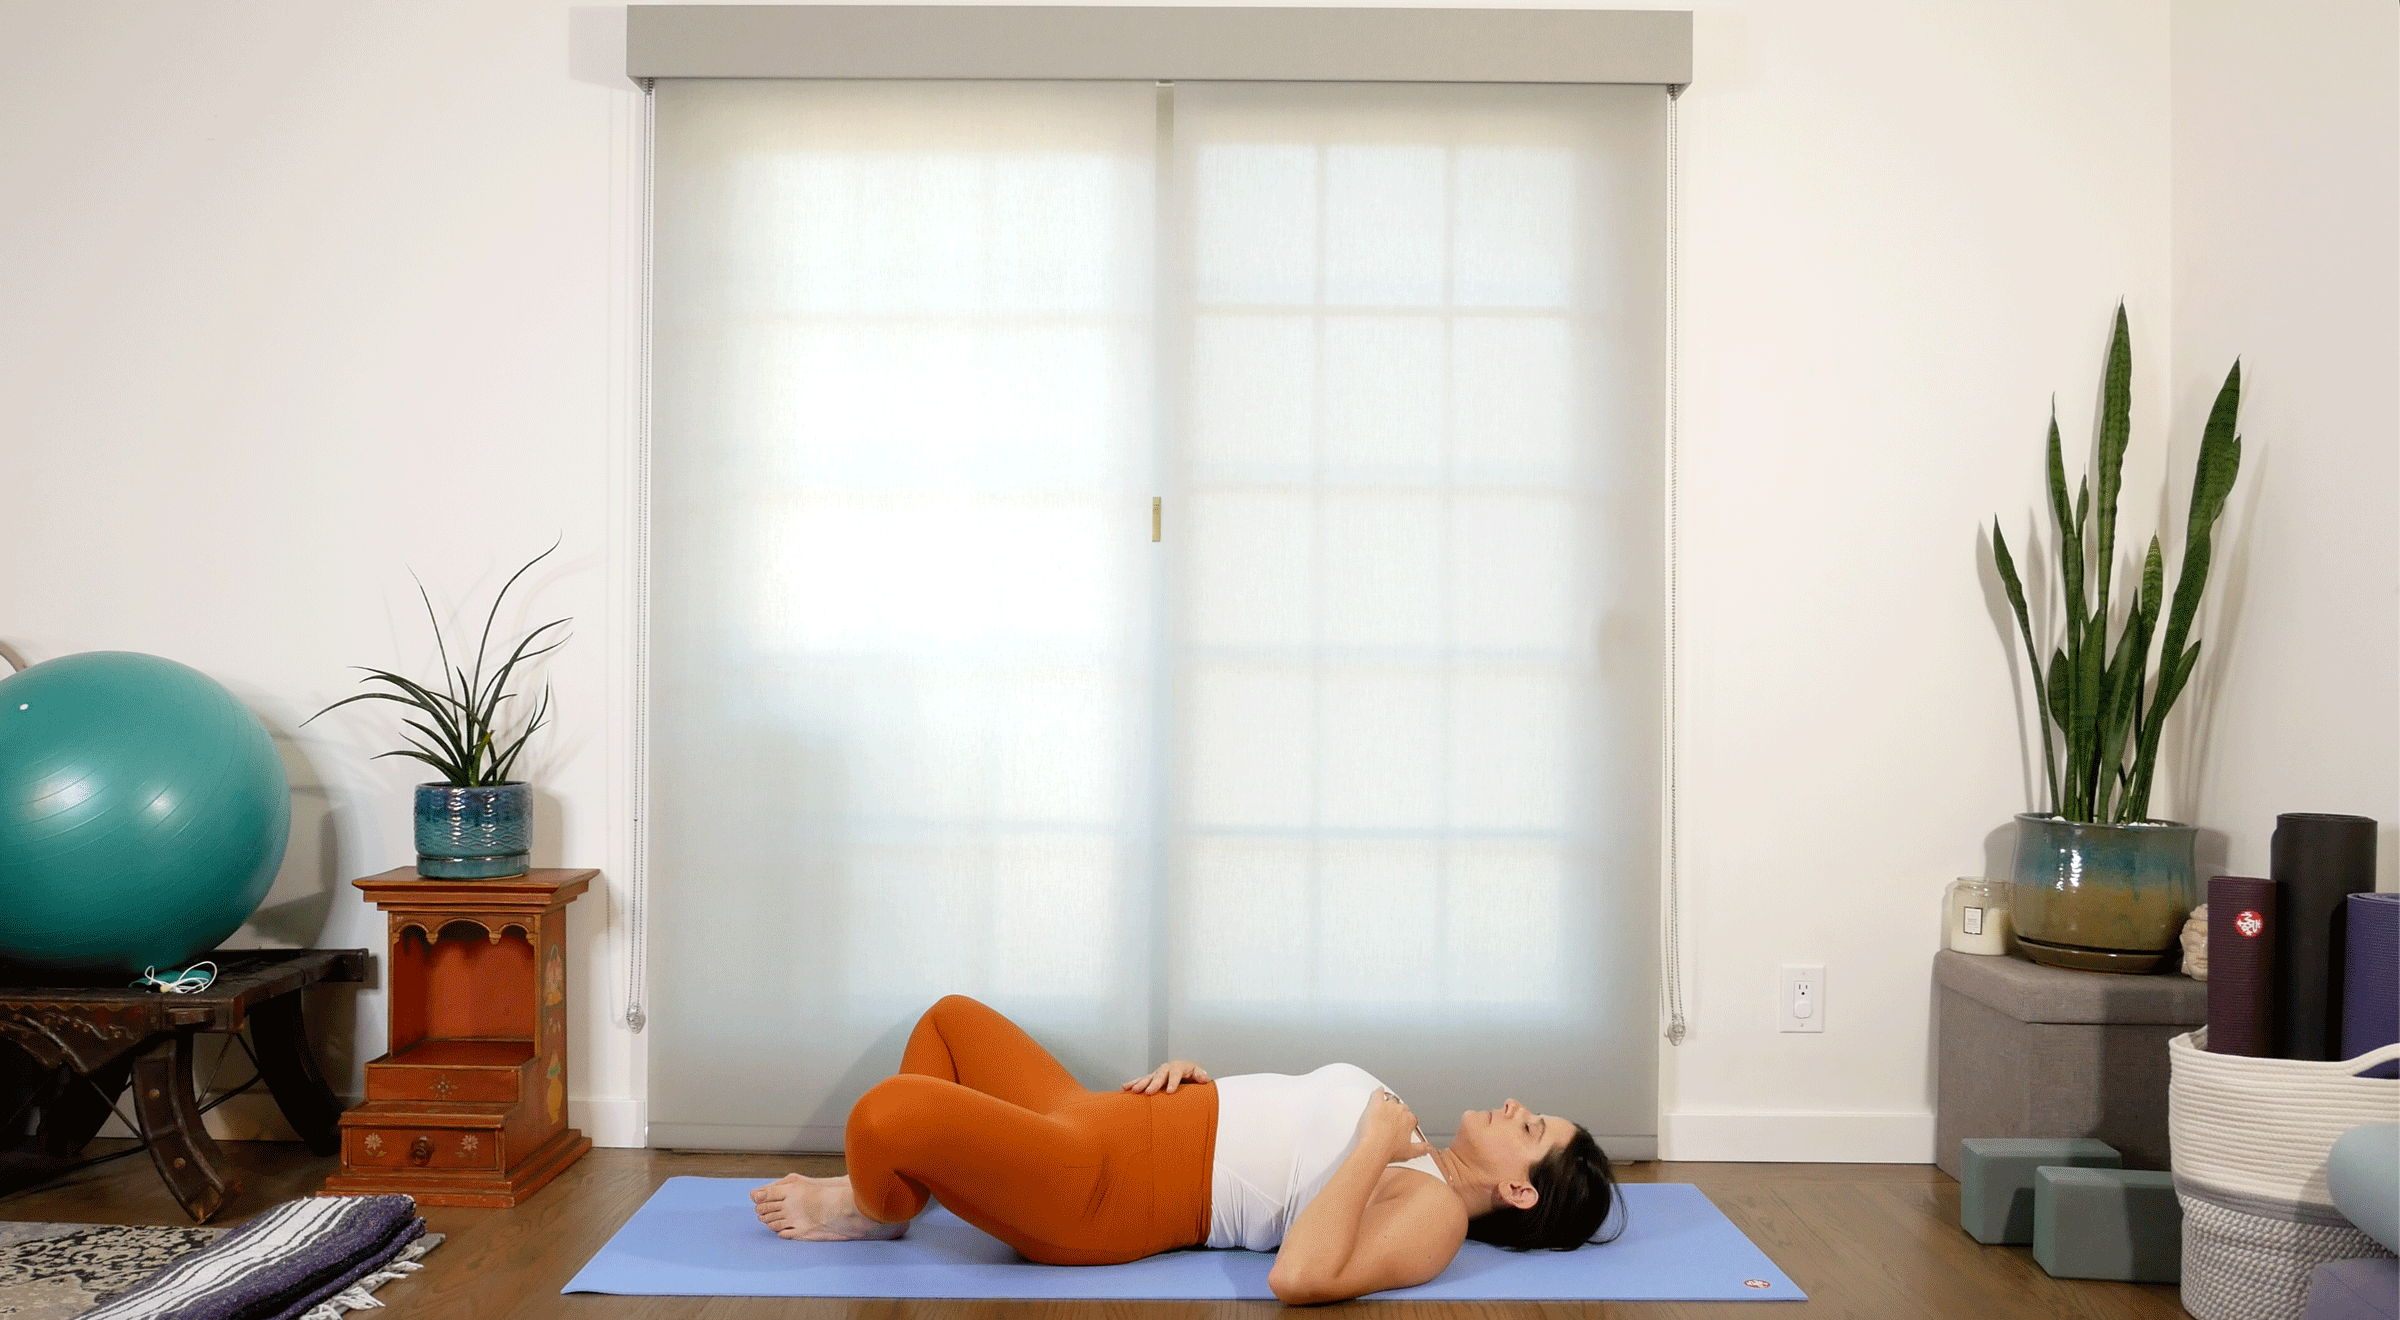
Balasana (Child’s Pose)
Child’s Pose is commonly explained as a resting pose, but this is not the case for every body. The key to this version is that we can feel the effects of the arm movement on our neck. When you externally rotate your upper arms, your neck should feel spacious and your shoulder blades should feel expansive. If you are internally rotating your arms, this can lead the trapezius muscles to bunch up and your elbows to lean away from your torso.
How to: From lying on your back, roll over onto one side and come onto your hands and knees. Place a block a few inches in front of you. Shift your hips back to Child’s Pose and reach your arms forward with your palms pressing down into the floor as you rest your forehead on the block. Keep your arms active as you lift your forearms and spin your triceps down to the ground. Feel free to take your arms as wide as you need to access this external rotation. Your forehead will remain resting on the block. If it’s comfortable, close your eyes. Stay here for 10 breaths.
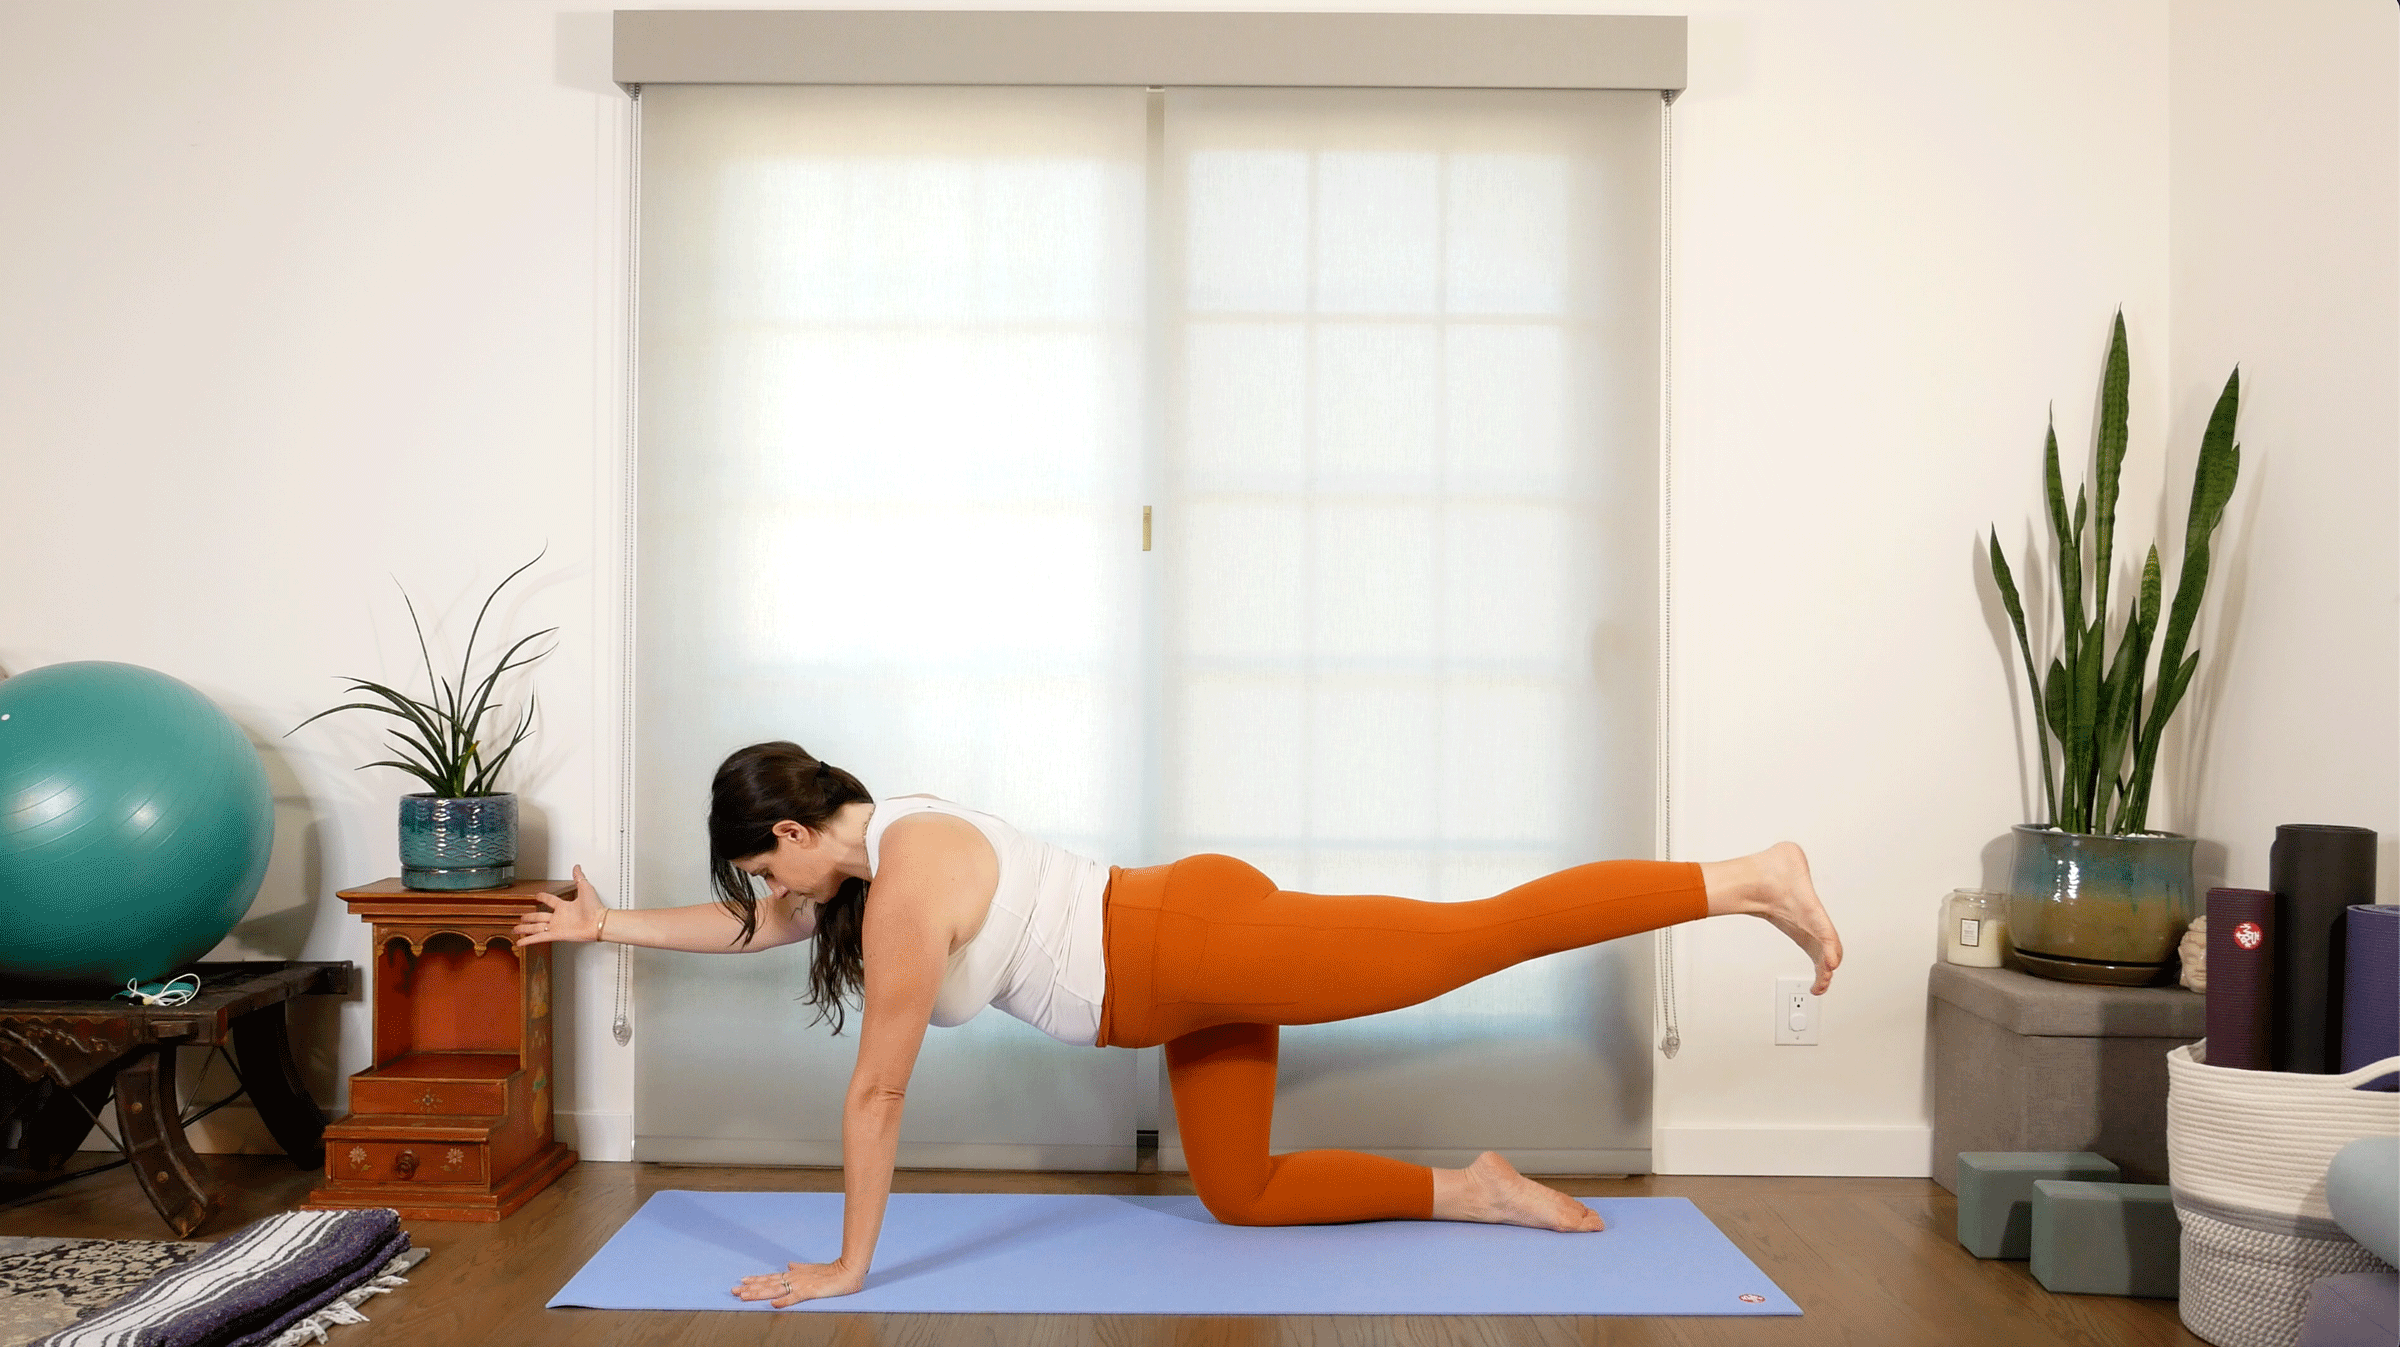
Tabletop with alternating legs and arms
I’m a big fan of repeating movements in different orientations so the body is prepared for any version of the final pose. So far, we have taken our arms overhead while lying on our back and prone in Child’s Pose. Now, let’s try it on all fours in Tabletop. The added leg movement teaches another key feature of Handstand, which is the ability to lift one’s leg while keeping your pelvis neutral, meaning even in all planes.
How to: From Child’s Pose, lift yourself to Tabletop. Inhale your right arm forward, so it is in line with your cheek or ear. Wrap your outer upper arm downward so your palm faces the center of the mat. Keep your trunk stable as you inhale and lift your left leg behind you. Imagine you are holding your leg up from the innermost thigh, thisRoll your left inner thigh toward your outer thigh, which will help stabilize your pelvis. Though the leg appears to lift higher, if we lift from our outer leg and hip, everything can become unstable. Stay here andhereand breathe for 5 counts. On an exhale, lower your hand and knee to the mat and repeat on your left side.

ADVERTISEMENT
Adho Mukha Svanasana (Downward-Facing Dog Pose)
Alright, now it’s time to work the external rotation action of your upper arms in more of a weight-bearing posture. This action is a key feature in Downward Dog and, when we learn it early on in our yoga career, it can save a lot of necks over time. This pose is also a milder inversion than Handstand, which helps us start to get comfortable with being upside down.
How to: From Tabletop, walk your hands forward an inch, tuck your toes, lift your knees, and exhale your hips back to Downward-Facing Dog. Your knees can be bent or straight, whatever gives your spine the most length. Keep your wrist creases parallel to the front of your mat as you roll your biceps to face the ceiling and your triceps to face the mat. Seek that same spaciousness of your upper back and neck that you found in Child’s Pose. Some bodies will benefit from turning your hands and wrists out too to exaggerate the external rotation. Keep your neck long by finding a gazing point between your feet. Stay here for 10 full breaths.
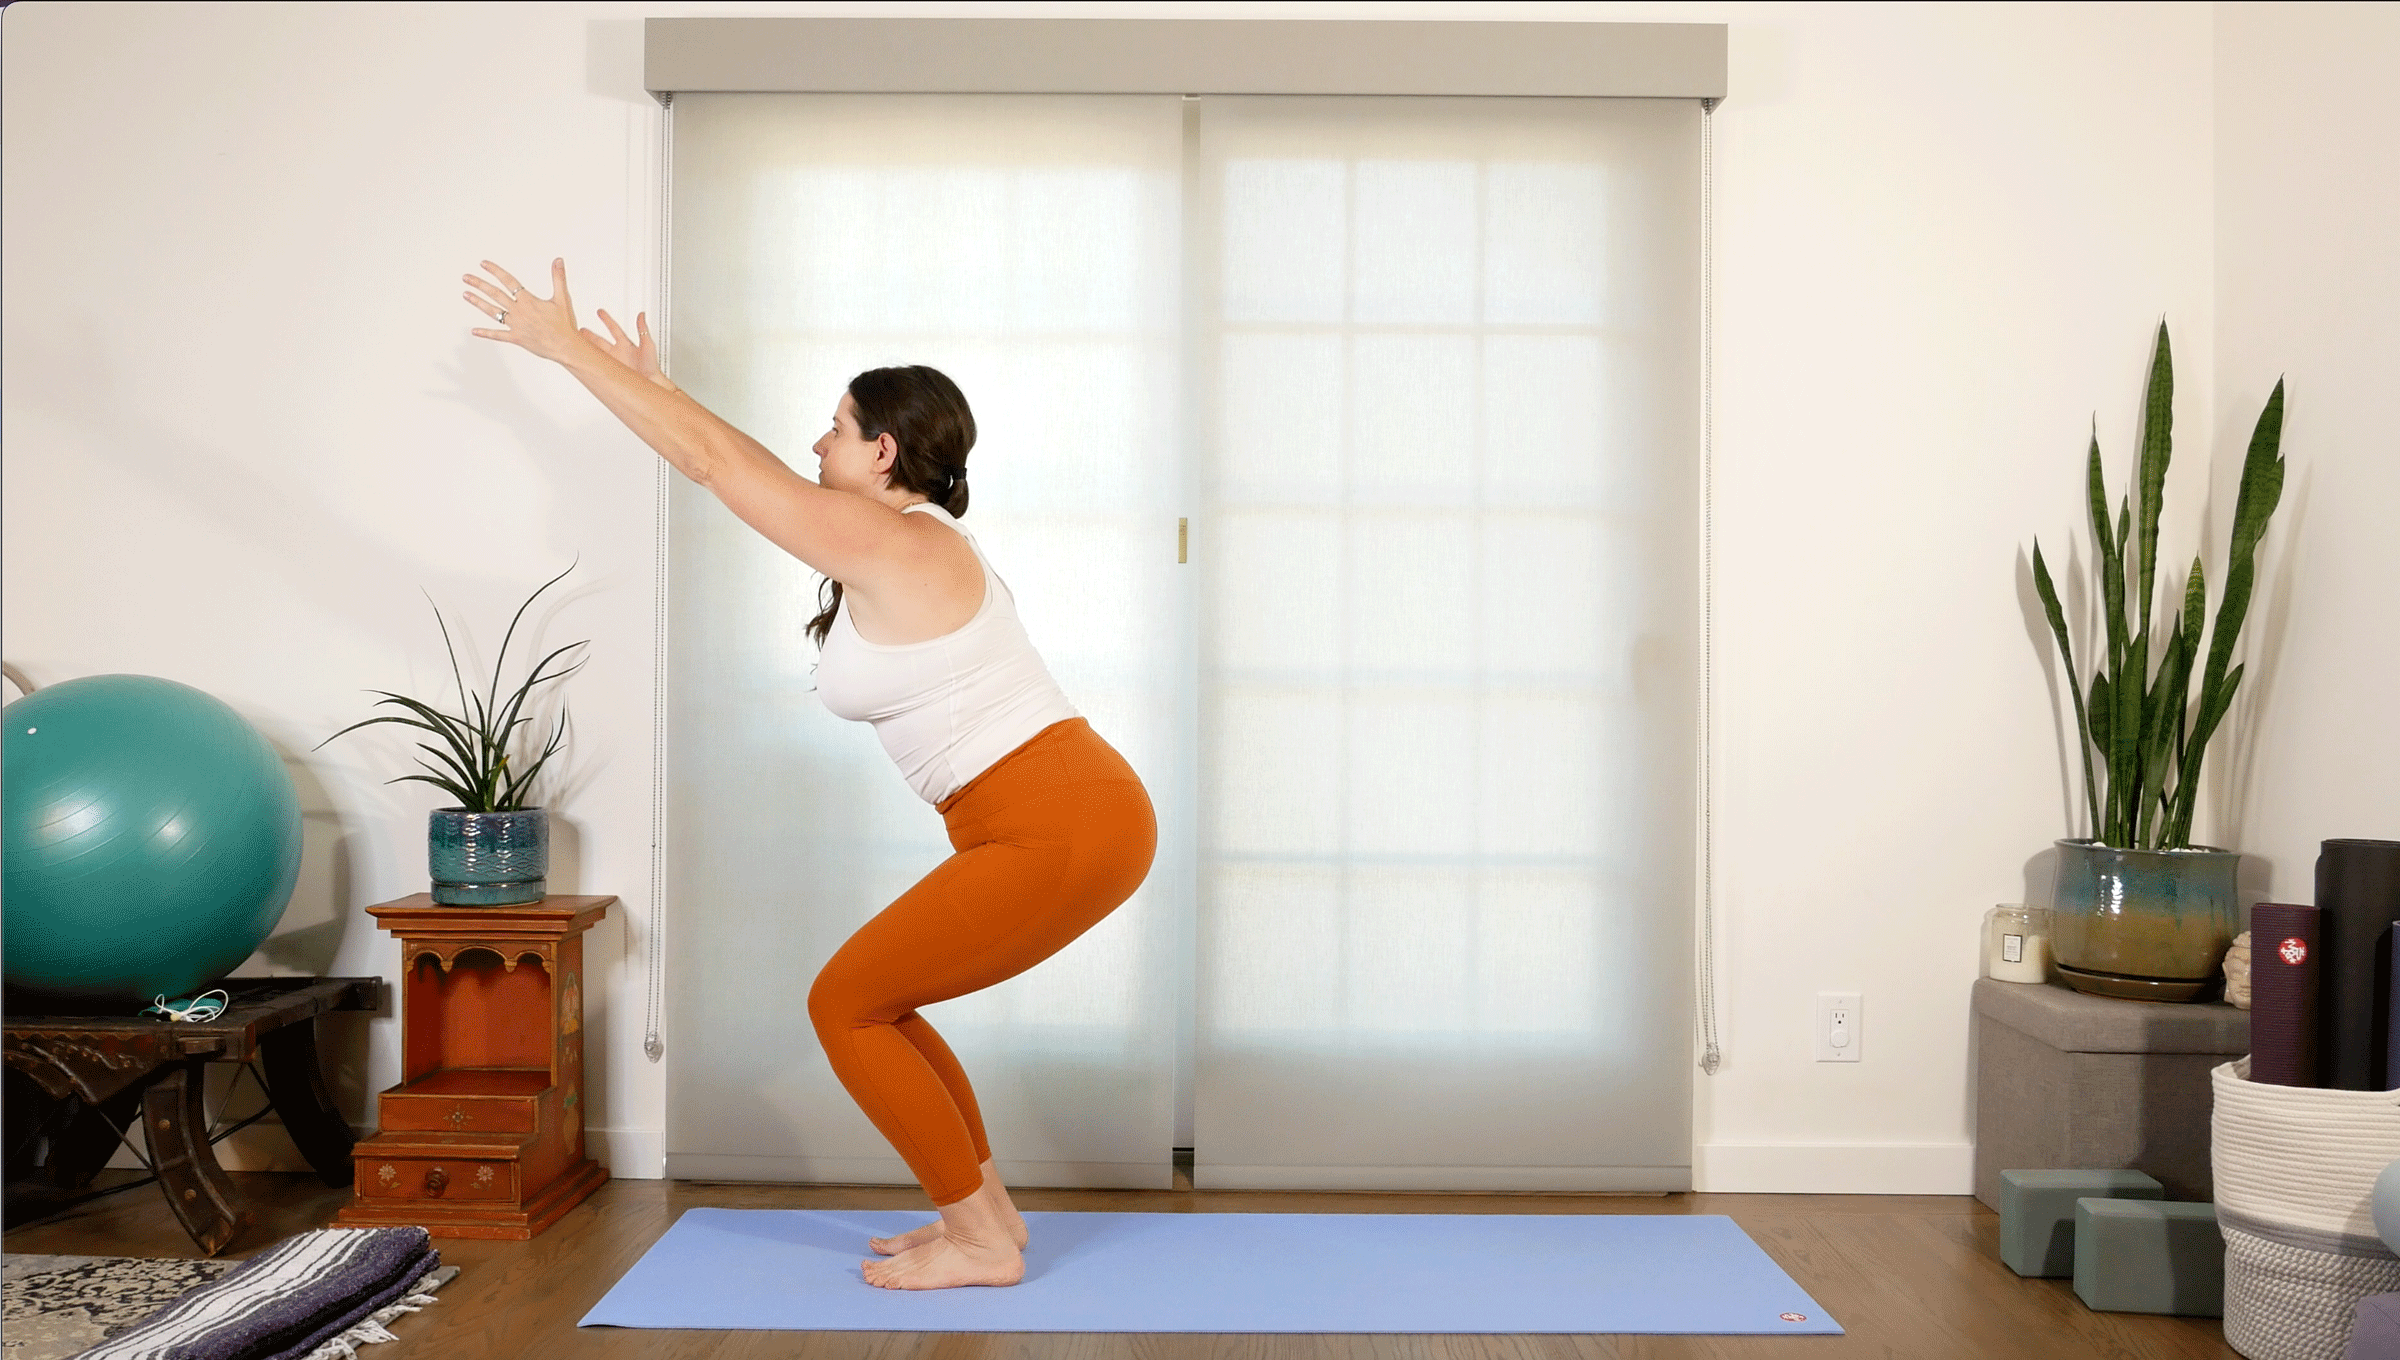
Utkatasana (Chair Pose)
It’s much easier to remember actions when you are lying on the mat, supported by props, or in a familiar posture, but what happens to that muscle memory in intense poses? Chair Pose is literally translated as “Fierce Pose” (utkata means “fierce”), which can be helpful to remember when it feels like a teacher is holding you in it for an interminable amount of time! This can be a great mental exercise for learning how to stay focused on the physical body and alignment in the face of discomfort. Of course, we always want to practice ahimsa, non-harming, so please do not feel the need to overdo it.
How to: Walk your hands toward the back of your mat. Inhale your chest forward halfway and exhale your hands onto your hips. Inhale slowly as you rise to standing. Walk to the front of the mat. Either bring your feet together or keep them a comfortable distance apart. On an inhale, lift your arms overhead toward the sky. Remember the work from the floor at the beginning of class, and only lift your arms to the point where you can keep your front ribs stable rather than jutting forward. On an exhale, begin to bend your knees and shift your hips back, coming into Chair Pose. Work to keep your spine lengthened as you draw your upper arms back a little further back behind your ears. Maintain length in your neck by looking directly ahead or some people like to look up. Stay here for 8 breaths. On an exhale, firm your legs to straight and stand up. Lower your arms by your sides.
ADVERTISEMENT
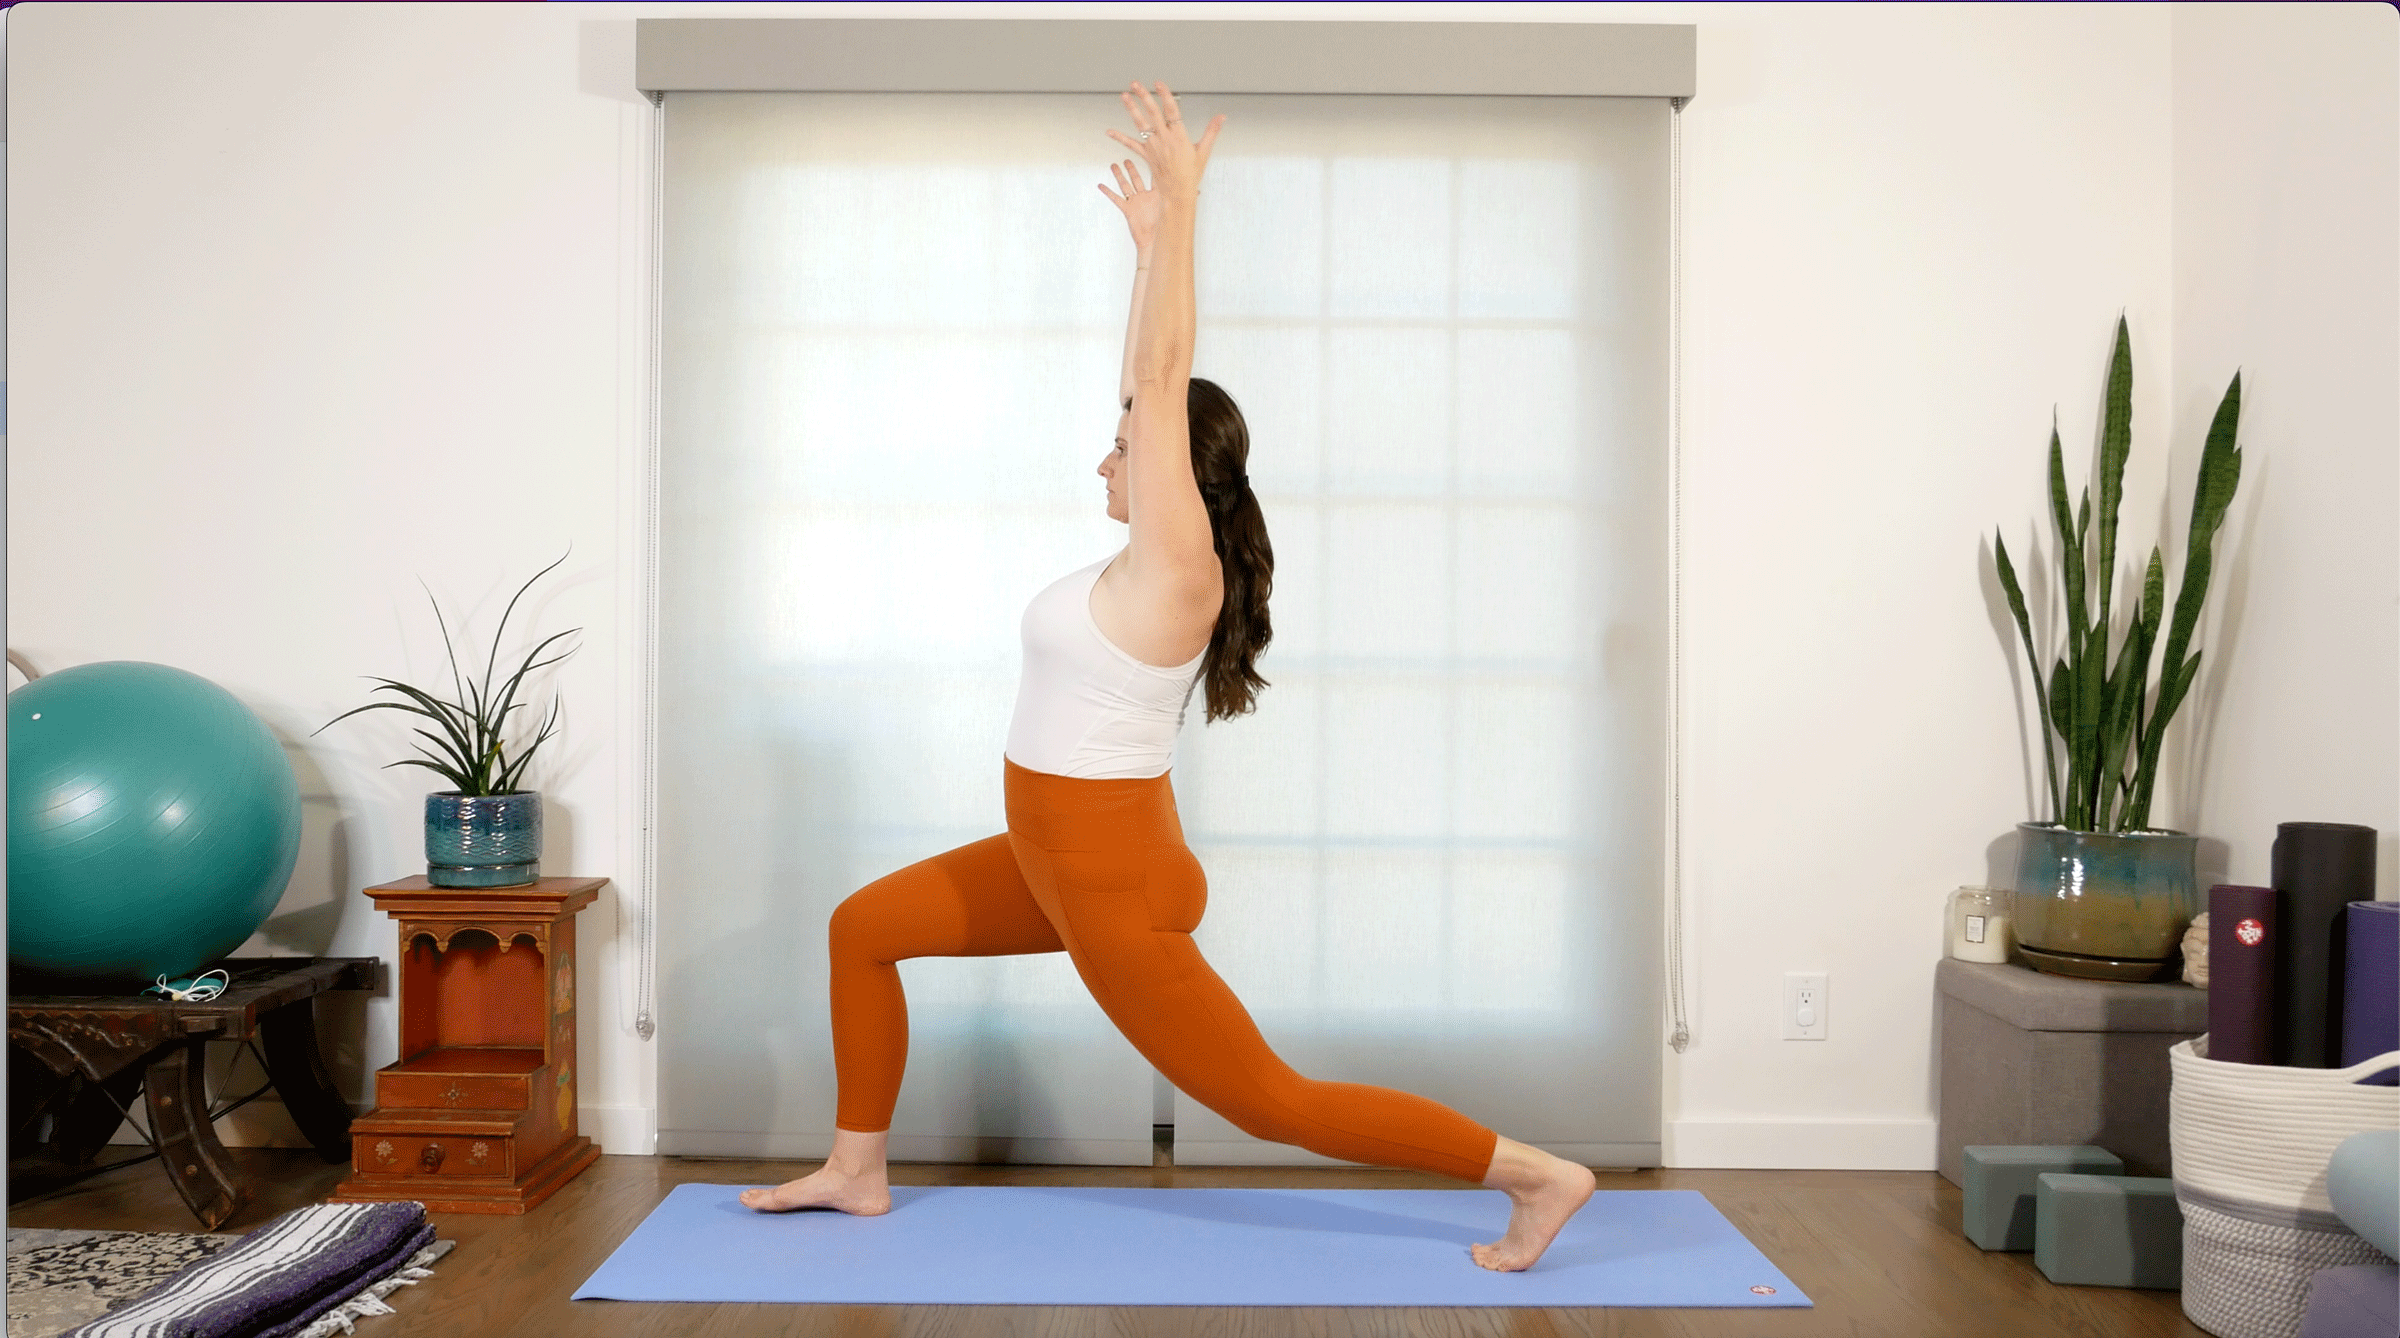
High Lunge
Despite our anatomical focus being the upper body, the lower body is still pivotal to our peak. One critical action is the ability to keep our pelvis neutral (even from side to side and back to front), when we lift our leg to kick up, otherwise we may end up kicking sideways. Anjanayasana is a great place to practice that as both feet are on the floor. It’s also a lovely hip flexor opener, which will hopefully make swinging that back leg up (at least, a little) easier.
How to: Return to Downward-Facing Dog however you like. (Many of you like taking “vinyasas” (as in Chaturanga to Upward Facing Dog to Downward Facing Dog and some of you will prefer to come into it from Tabletop.) Inhale your right leg back into Three-Legged Dog, working a neutral pelvis so both hip bones point down. On an exhalation, step your right foot as close to the top of the mat as you can. If you need to take a couple steps or maneuver it with your hand the remainder of the way after your first step, that’s perfectly fine.
Bend your front knee until your front thigh is parallel to the floor. Make sure your back foot is in its own lane, so the feet are about hip-width apart. Your back knee is lifted off the floor and your back leg is active. On inhale, lift your trunk upright coming into High Lunge. First, reach your arms directly in front of your chest (option to hold a block for more intensity). Next, on an inhale, begin to lift your arms overhead, without disturbing the length in your spine too much. Find an appropriate height for your arms, where you are both able to wrap your outer upper arms forward (external rotation) and keep your upper back muscles from bunching up to your ears. Stay here for 10 breaths. On an exhale, lower your hands to the floor on either side of your front foot. Return to Downward-Facing Dog however you would like and set up for side two.
ADVERTISEMENT
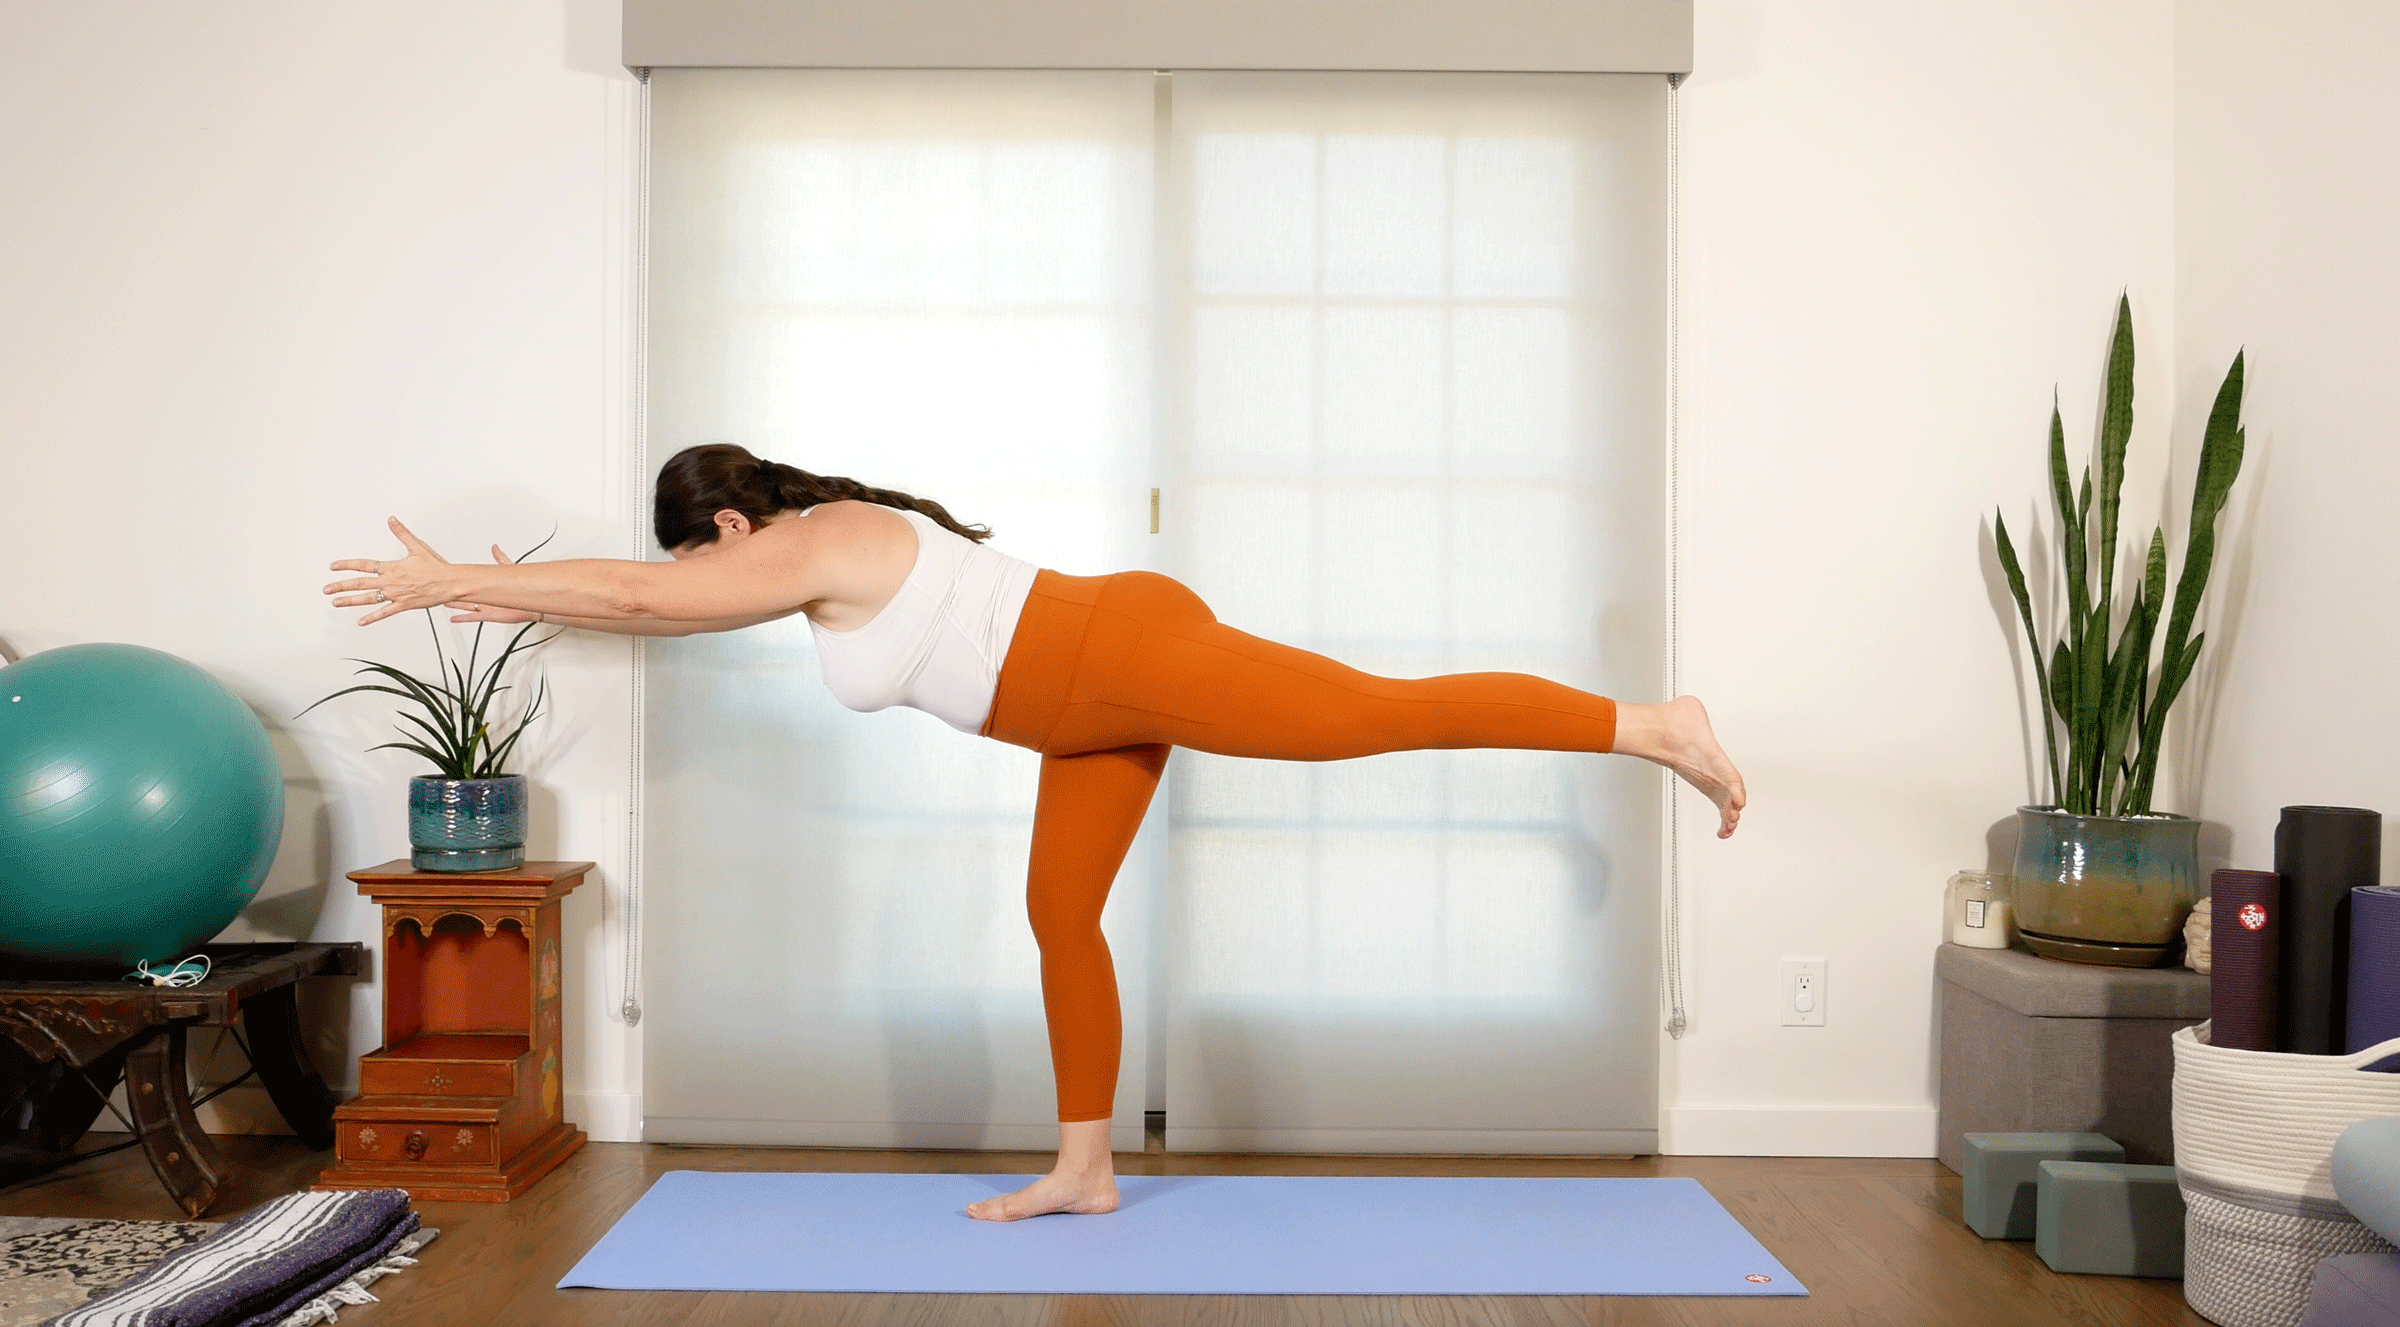
Virabhadrasana III (Warrior 3)
This is definitely a peak pose in and of itself and could be a great place to stay and explore if you’re using this sequence for beginner classes. Feel free to use the wall, either for your hands or lifted leg foot, or take blocks under both hands for assistance balancing. Just as we practiced maintaining our alignment in increasingly more physically challenging postures, now we practice these actions in a balancing pose, where all bets are off if we start to falter. This is a safe place to train our brain to stay focused when we face fear.
How to: From Downward-Facing Dog, inhale your right leg up and back into Three-Legged Dog. On an exhale, step your foot between your hands. Keep your back toes curled under and knee lifted, so your lower body is in a runner’s lunge, and bring your hands to your hips. Push off your front leg and lift your back leg into the air, coming into Warrior 3.
Adjust the pelvis first, as it’s helpful for both balance in this shape and our final peak, by rolling your left outer hip down toward the floor, so if you were to look back you would see your toes pointing straight down. Draw your front ribs up into your body, supporting your abdominals. When you feel steady, inhale your arms alongside your ears. Spin your outer arm toward the floor and your inner arm skyward. Keep your arms either shoulder width or wider if your upper back feels like it’s bunching and your neck feels compressed. Look straight down to the floor (just ahead of your mat), so your neck can lengthen. Try to stay here for 8 breaths. Slowly inhale as you bring yourself to standing with both feet together. Pause before returning to Downward-Facing Dog. Repeat on your second side.
ADVERTISEMENT
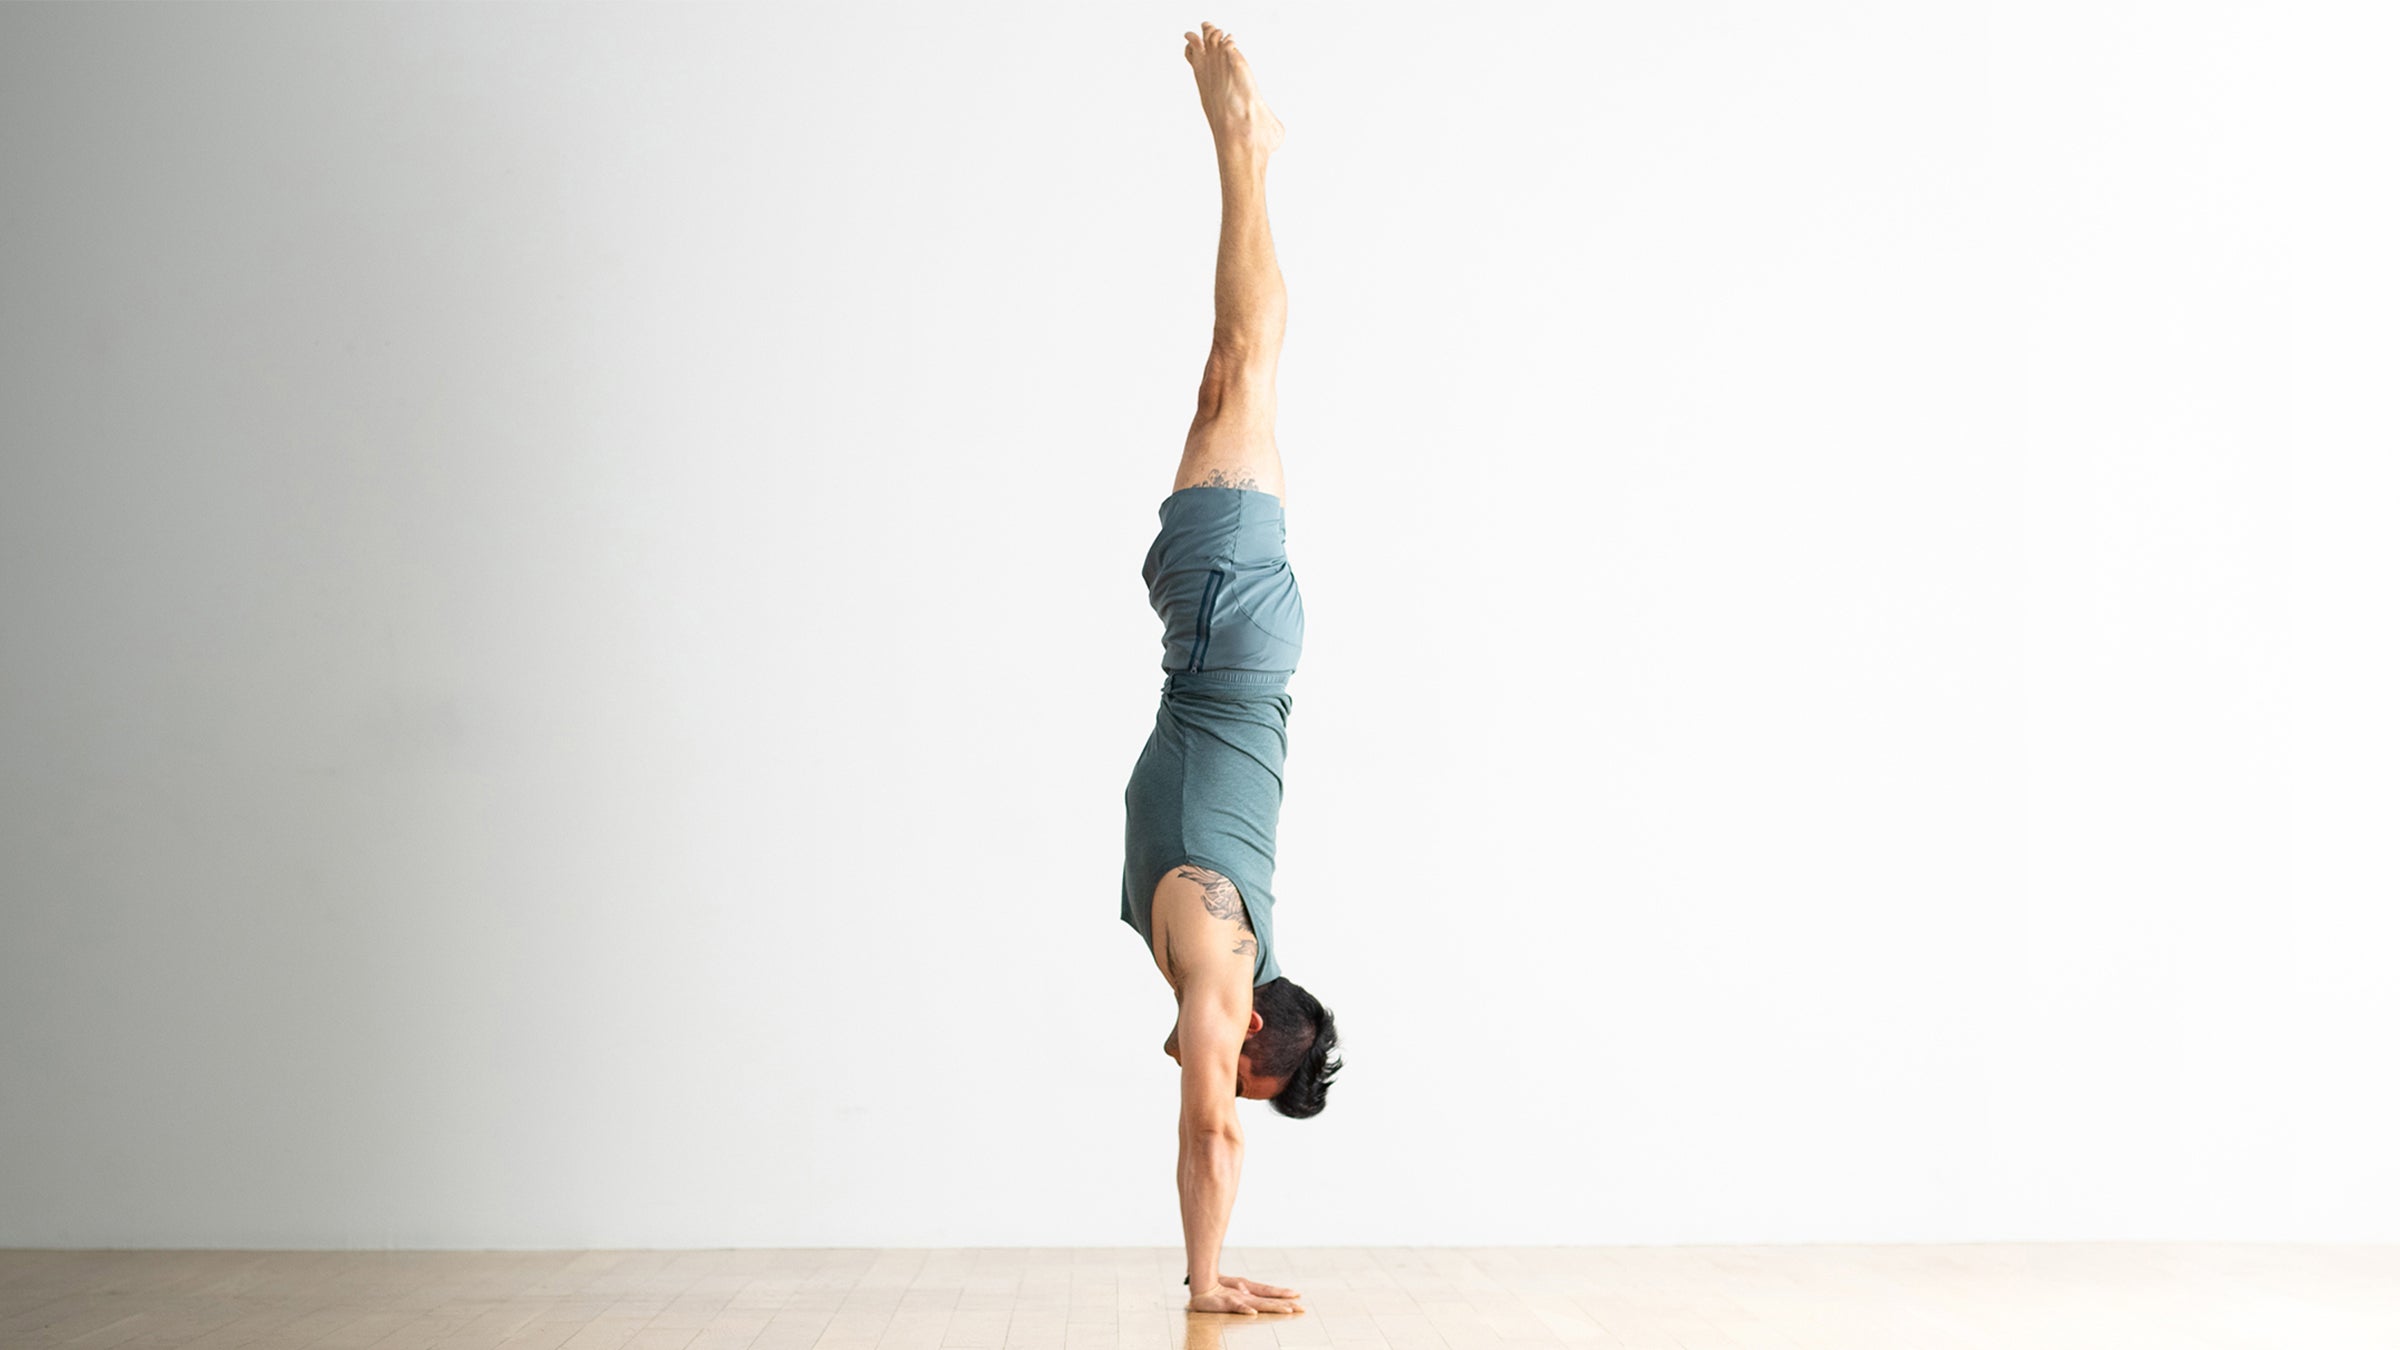
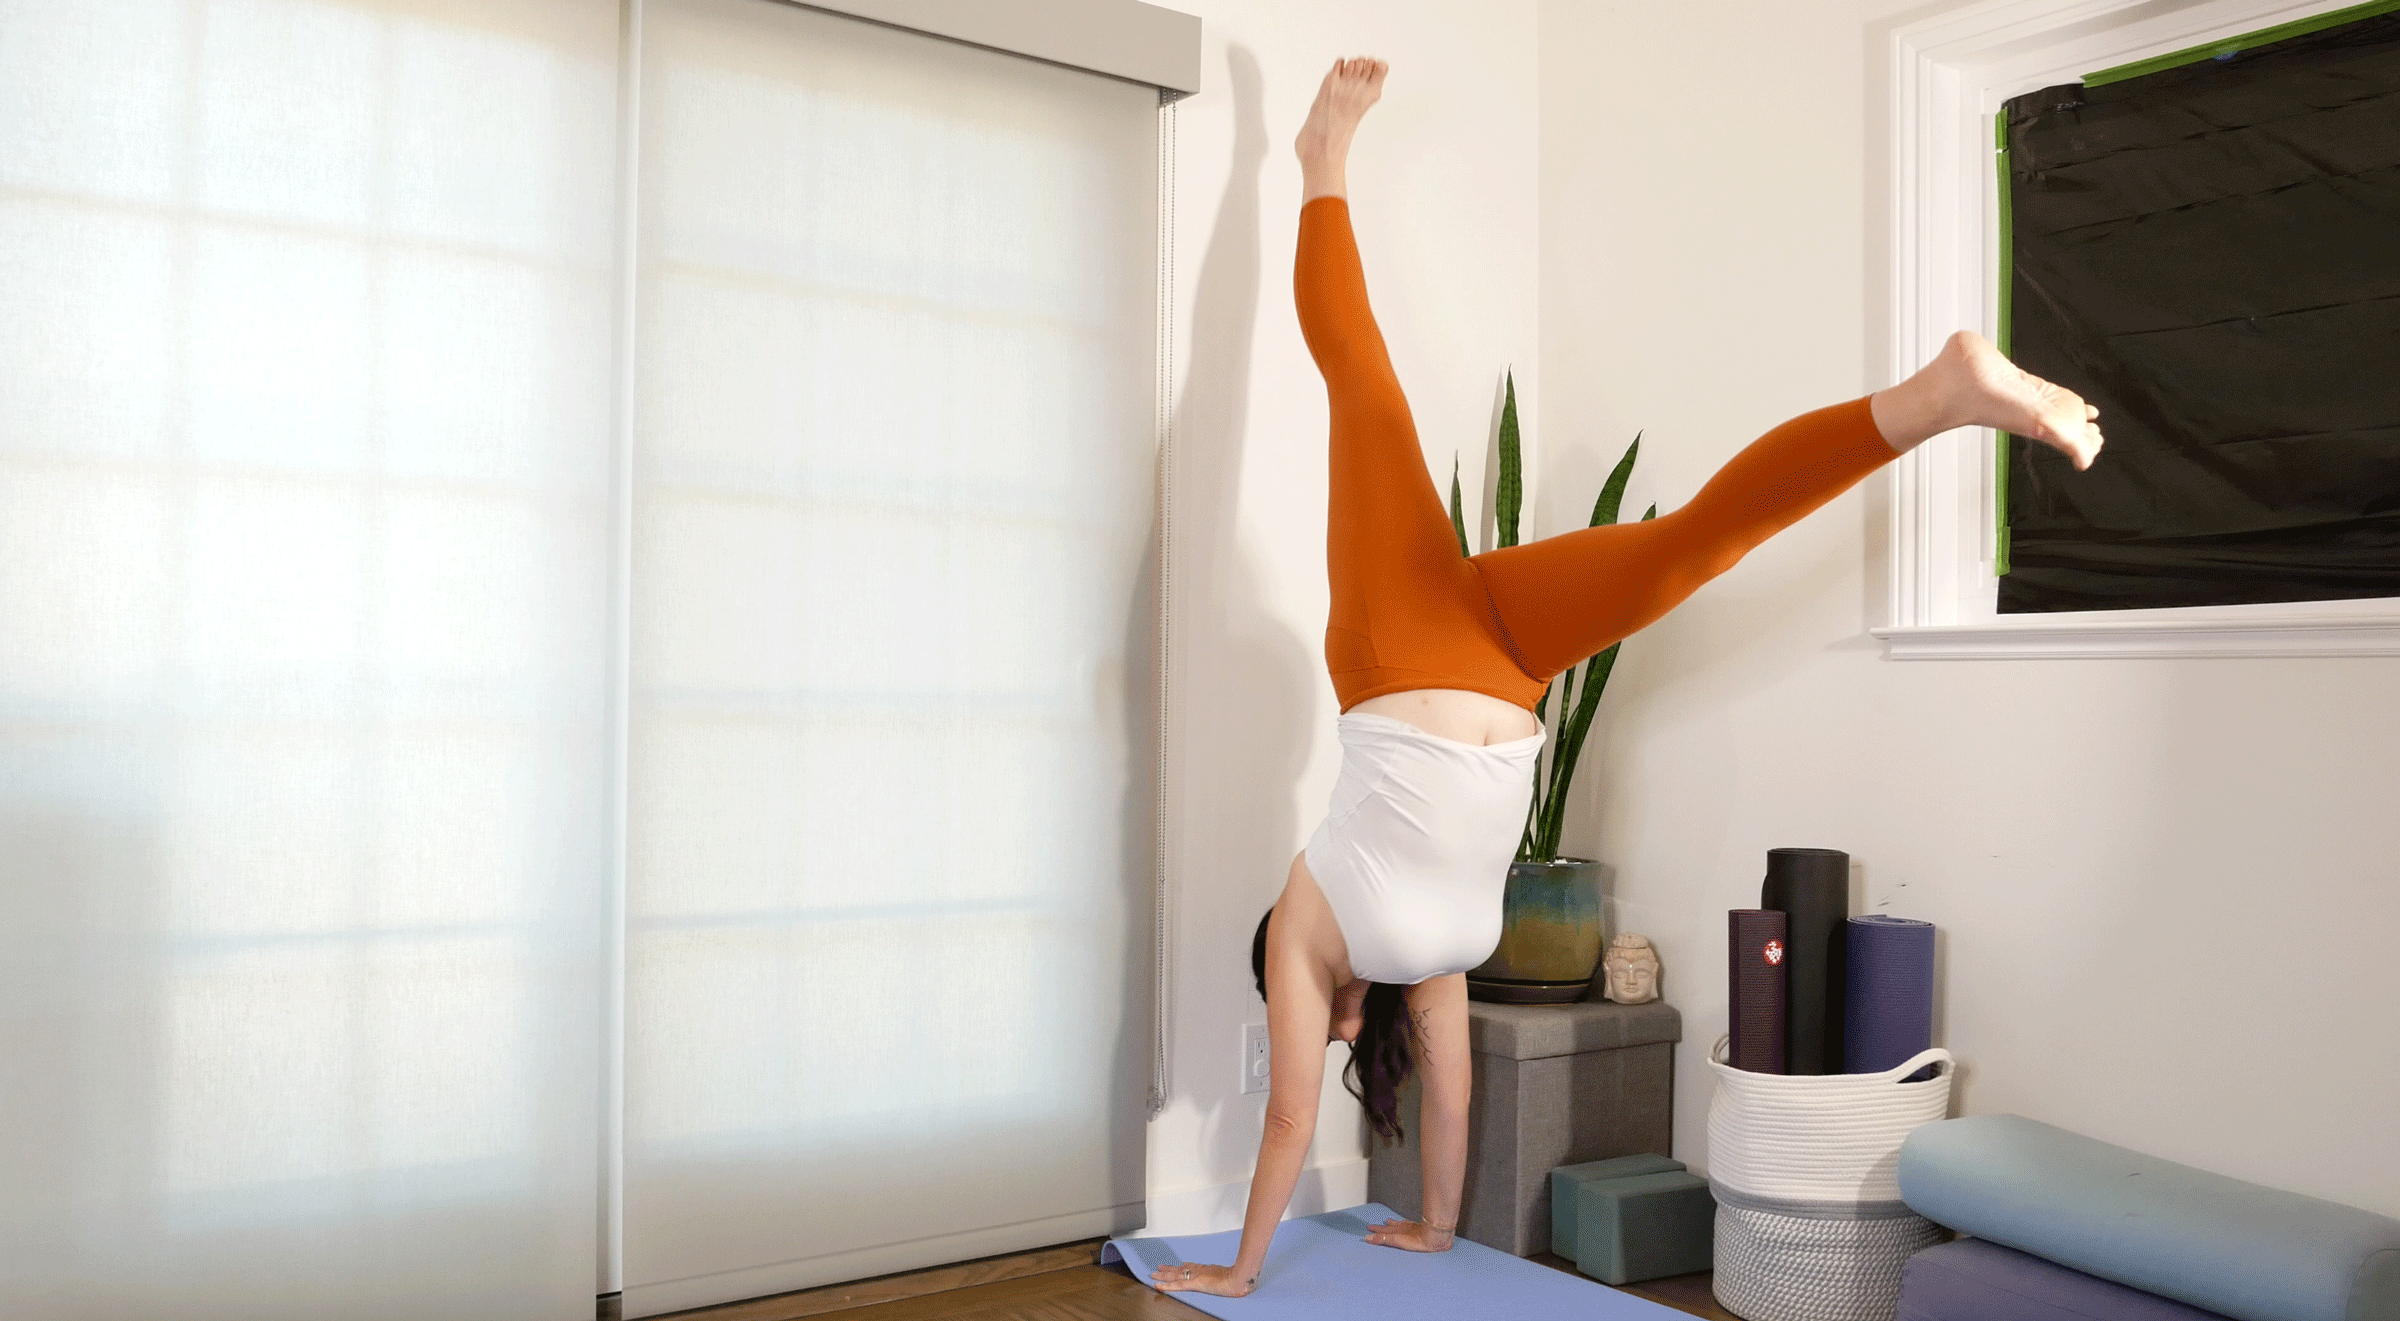
Adho Mukha Svanasana (Handstand)
Just because this is our “peak” pose doesn’t mean it’s the be-all and end-all of our work. In twenty-plus years of practice, I have never been able to do this without the aid of a wall, and even with a wall, there are many days I don’t make it into Handstand. The pose is in the practice and not the outcome. Play with it. If today’s not the day, then try again tomorrow.
How to: Bring the short of your mat to the wall. Come into Downward-Facing Dog with your fingertips about 6 inches away from the wall. On an inhalation, shift your shoulders forward over your wrists. Look toward the wall and keep your bum lifted. Step one foot in and lift your opposite leg from the inner thigh, keeping your pelvis stable. On an inhale, push off your bent leg foot and think of touching your lifted thigh to the wall. Try a few times and if you don’t get up today, repeat the previous pose. If you are able to get up, pause and review the actions we have been focusing on today. Wrap your upper arms away from the wall and toward your nose. Roll your inner thighs toward the wall and lengthen your tailbone to your heels. Reach up with your legs. If you want to play with taking one leg away from the wall or both, gaze forward at the baseboard. This tends to help with balance. Remain for five breaths. Comeing down, lowering one leg at a time and returning to Downward Dog. Pause before repeating once or twice more.

Reclining Figure 4
Many of the postures we did today were symmetrical poses, meaning the sides of the body were doing the same thing. When counterposing, it is always nice to move the body in the opposite direction. As such, Reclining Figure 4 is not only asymmetrical, but it is an externally rotated posture in the top leg, a movement we have not yet done during class, but that can be essential when releasing the outer hips, which worked hard to stabilize the pelvis and core when we were kicking into handstand.
ADVERTISEMENT
How to: Lie on your back. You can take a Surya Namaskara A (Sun Salutation A) to get there or simply lie down. Bend your knees with your feet and legs hip-width apart. Cross your right ankle over your left thigh. Pull your left thigh toward your torso with both hands or use a strap or towel. Keep your head and upper back on the floor. Consider staying here for 15 breaths if you have the space and time. Maybe even close your eyes. When you’ve finished your first side, place your feet back onto the floor and switch sides.
Supta Baddha Konasana (Supine Bound Angle)
Holding your arms overhead can be tiring. There’s also something incredibly comforting about returning to the floor after a balance-pose and inversion-heavy sequence. You can totally prop this pose and make it a full restorative posture by taking a bolster under the spine and a cinched strap looped around the pelvis and inner thighs). Or you can simply lie flat onto the floor.
How to: Remain on your back. Bring the soles of your feet together and pull your heels toward your hips. If your inner groins are tight, you can prop your outer shins and thighs with a block on either side. Place one hand on your heart and the other hand on your tummy. Close your eyes, cover them, or simply gaze softly at the ceiling. Maybe you got up into Handstand today, maybe not. Our work today was less about a specific pose and much more about the steadying of the mind that focusing on a few simple actions can create. Some yogic texts call this deep focus ekagra, which means one-pointed attention. Remain here for three to seven minutes. At the end roll to a side and pause before coming up to seated.
About our contributor
Sarah Ezrin is an author, world-renowned yoga educator, popular Instagram influencer, and mama based in the San Francisco Bay Area. Her willingness to be unabashedly honest and vulnerable along with her innate wisdom make her writing, yoga classes, and social media great sources of healing and inner peace for many people. Sarah is changing the world, teaching self-love one person at a time. She is also the author of The Yoga of Parenting. You can follow her on Instagram at @sarahezrinyoga and TikTok at @sarahezrin.