Published November 8, 2022 02:31PM
Go-To Yoga Sequence for Coming Into Pigeon Pose
There's a science and an art to preparing your students' bodies for Pigeon Pose. Here's how.

(Photo: Sarah Ezrin)
You know those days where everyone in your yoga class seems to be low energy? Those are the days that I lean into that quietness and teach my “go-to” sequence leading up to One-Legged King Pigeon Pose. The posture is an intense hip opener, as we all know, but it’s also a deep forward bend that invites us to indulge that subdued mood and turn inward.
I find that King Pigeon is an appropriate posture for many different levels of students. You can prop it up to make it more accessible or add in some more complex moves to make it more challenging. The main anatomical actions we emphasize are external rotation of one hip at a time (turning the leg outward in the socket) while keeping the pelvis stable.
Go-to yoga sequence for coming into Pigeon Pose
The breath lengths are simply suggestions. Follow what feels right at the moment.
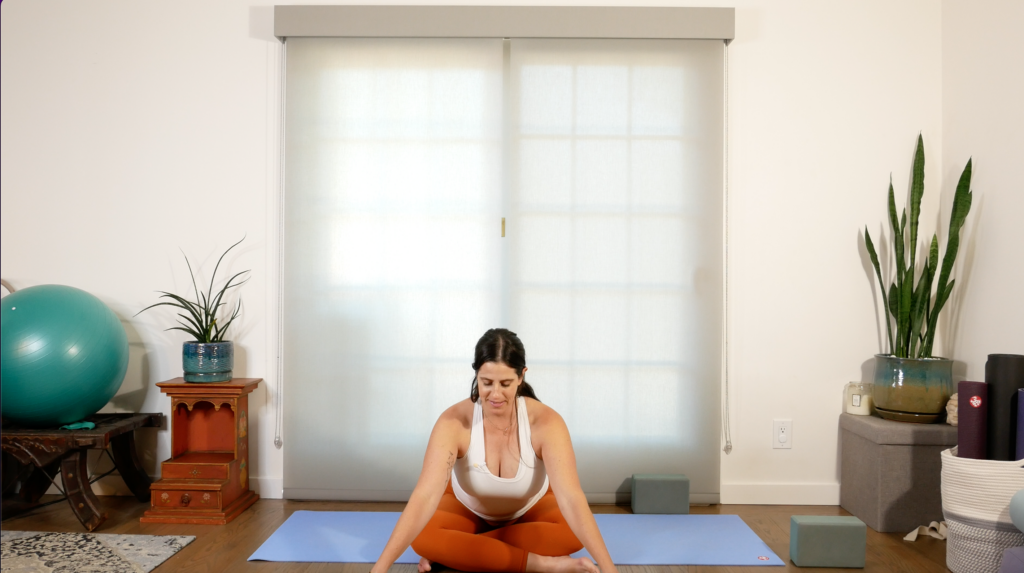
Sukhasana (Easy Pose) Variation
I’ve always found the English translation of this pose to be rather ironic because there’s actually nothing easy about it! Sukhasana requires a lot of attention to the ankle and knee joints, and if you have sensitivity in those areas, it can be downright uncomfortable. Consider using a blanket under your ankles for cushioning. All that said, once you add a forward bend and find a comfortable position in this variation, you’ll understand why this pose is sometimes called Sweet Pose.
How to: Sit on a folded blanket. Cross your right shin in front of your left shin. Stack your ankles and knees. If your knees are lifting and higher than your hips, you may need to sit on more height, like a bolster or block, and add blankets or a block beneath your back thigh as well. On an inhale, reach both arms up to the sky and on an exhale, bend forward over your legs. You can keep your back straight or, if you prefer, you can allow it to round. If your body allows you, rest your forehead on the floor, a block, or even your fists. Unless you’re using your hands for support, extend your arms forward alongside your ears. Stay here for 10 breaths. Come up to sit slowly. Switch the cross of your legs and repeat on your left side.
ADVERTISEMENT
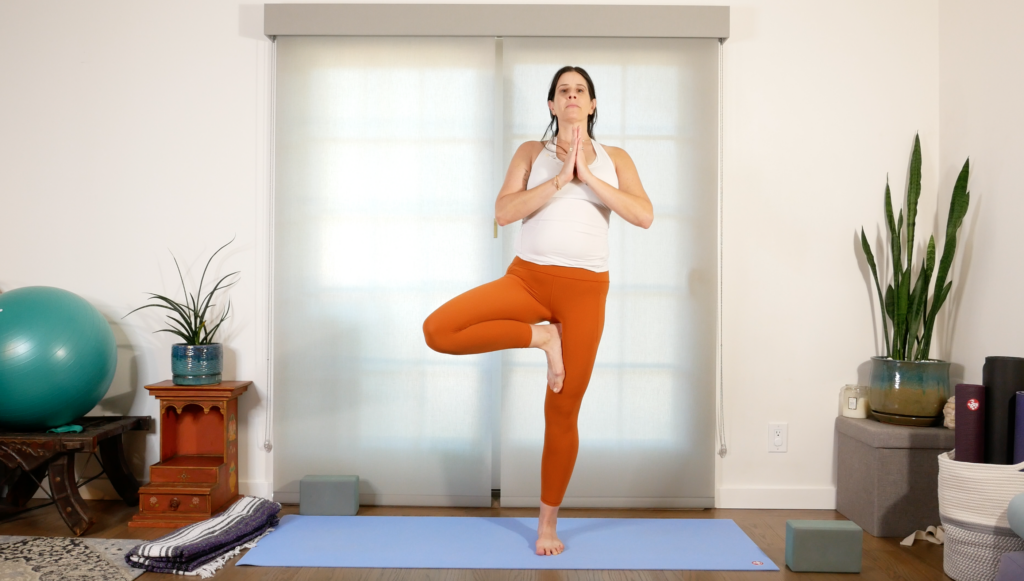
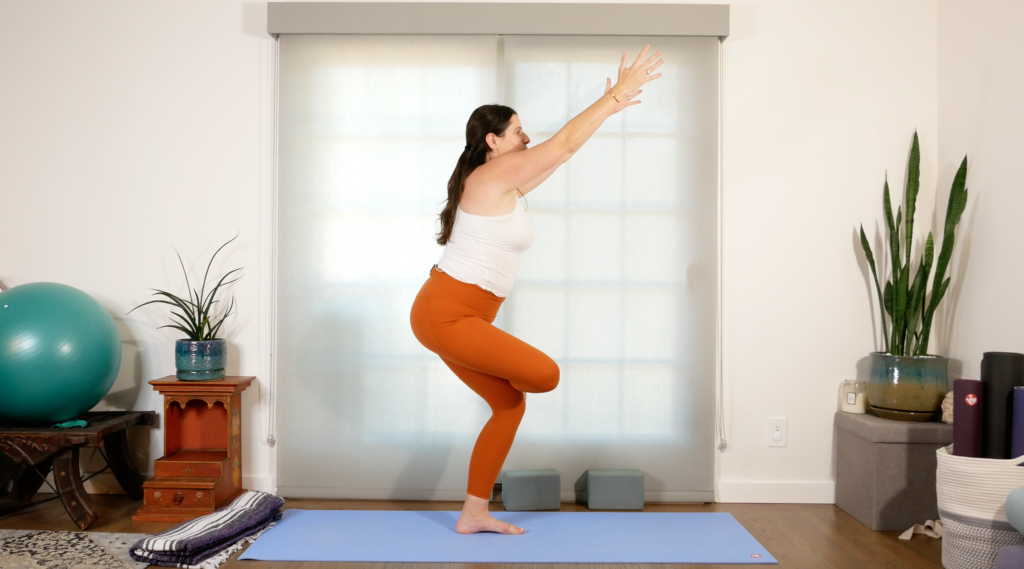
Vrksasana (Tree Pose)
Tree Pose allows us to observe the relationship between the hip joint and the pelvis. Our bodies tend to compensate for lack of flexibility by moving where we are most mobile and resisting where we are tightest. This is how we get into unhelpful habits that become risk factors for overuse injuries. If the inner thigh of our lifted leg is tight, our movement will be limited in poses that ask us to externally rotate the hip, as we do in Tree Pose. As a result, we compensate by shifting our entire pelvis rather than just the hip joint and thigh. To explore our true range of rotation, we need to keep our pelvis as stable as possible.
How to: From Sukhasana, come forward to Tabletop, curl your toes under, and lift your hips back to Down Dog. After a few breaths, walk your hands to the rear of your mat and slowly come up to standing. Feel free to stand alongside a wall for help with balance. Come to Tadasana (Mountain Pose), bend your right knee, and open your inner thigh away from your midline. Use your hand to place your right foot as far up your left leg as it can safely go. Some of us will have our foot at our left ankle, others on the calf, still others all the way up near the groin. Bring your hands on your hips and observe your pelvis. Level it from side to side to keep it from tipping toward the bent knee side. Now bring your right hip forward slightly, as the hip of the lifted leg tends to roll back. Once your pelvis is fairly steady and even, reach your arms overhead. Your gaze can be on the floor, straight ahead, or upward. Stay here for 8 breaths. Bring your hands back to your hips and slowly lower your right leg. Pause in Tadasana to reset before repeating on your left side.
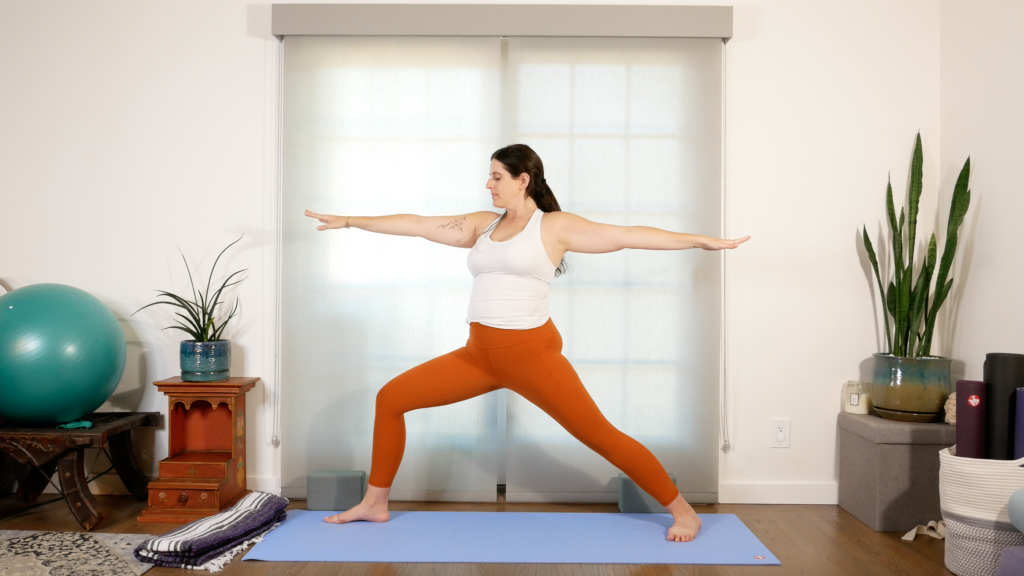
Virabhadrasana II (Warrior 2 Pose)
During classes in which you focus on external rotation, the classic shapes of Warrior 2 Pose and Extended Side Angle are pretty much musts. They are both excellent at warming up the inner thigh muscles and strengthening that same side’s outer hip, both of which are key elements to external rotation work. Also, both poses are more accessible than Pigeon and allow you to have an opportunity to observe how powerful it can feel to hold the poses.
How to: From Tadasana, turn to face the left long side of the mat. Step your feet apart about 3-4 feet and align your front heel with your back heel. Turn your right leg out from your hip, externally rotating your thigh so your right foot points toward the front of the mat. Angle your back foot and hip slightly inward to make space for your lower back. Inhale your arms wide like a “T” and, on an exhalation, bend your front knee to come into Warrior 2. Lengthen your front inner thigh toward your knee and your outer knee back toward your hip. This little engagement loop encourages deeper external rotation. Press your left thigh back strongly. Stay here for 5 breaths.
ADVERTISEMENT
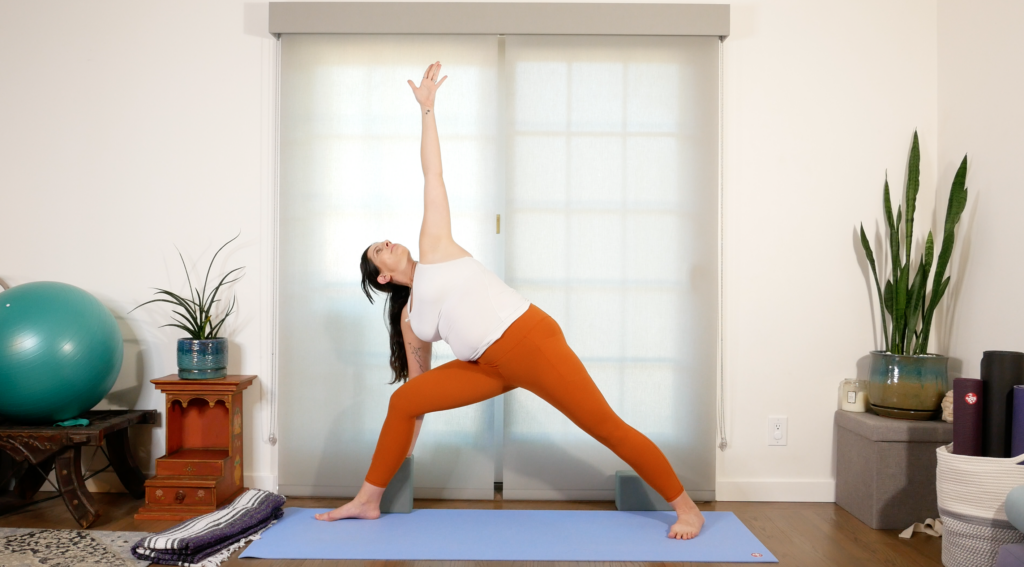
Utthita Parsvakonasana (Extended Side Angle)
I like to practice this pose as a set with Warrior 2.
How to: From Warrior 2, on an inhalation, reach your right arm toward the front of the room. Exhale, lean forward over your front leg as if you were tipping your pelvis and place your right hand on the floor or on a block placed beneath your shoulder or rest your forearm on your thigh. Reach your left arm up toward the ceiling or alongside your ear. This is Parsvakonasana (Side Angle). Continue to work the looping action of your front thigh, which will also help to keep your knee stable. Firm and straighten your back leg. Take 5 breaths here. On an inhale, lift your trunk upright. Bring your hands onto your hips and straighten your front leg. Parallel your feet and repeat Warrior 2 and Extended Side Angle on your left side.
Utkatasana Variation (Chair Pose Variation)
This pose is sometimes called Figure-4 Chair. It’s like Pigeon and Chair Pose had a baby. Similar to Tree Pose, it’s a truth-teller–a great place to observe the relationship between the pelvis and the hip. In this case, the top leg (the leg that’s turned out) often appears lifted when the pelvis is stable, especially if you have limited range of motion in your hip and your top leg doesn’t turn all the way out. What a lot of us do to compensate is tilt the opposite hip lower, which makes the lifted thigh appear to be more open than it actually is. Don’t worry about how high or how far open your lifted knee points. Be more interested in how level you can make your entire pelvis.
How to: From Tadasana, separate your feet as wide as your hips. On an exhalation, bend your knees as if you were coming into Chair Pose. Shift your weight to your left foot, lift your right foot, and cross your right ankle over your left thigh. Observe your pelvis as you do this and try to keep it as neutral as possible (which means level from side-to-side, front-to-back, and forward and back), even if it means your right inner thigh doesn’t open, or externally rotate, as much as you’d like. Add your arms in line with your ears and find a point to look at that is straight ahead. Hold for 8 breaths. For more intensity, you can keep your knees bent in Chair while switching sides. For less, stand up and take a few breaths in Tadasana first.
ADVERTISEMENT
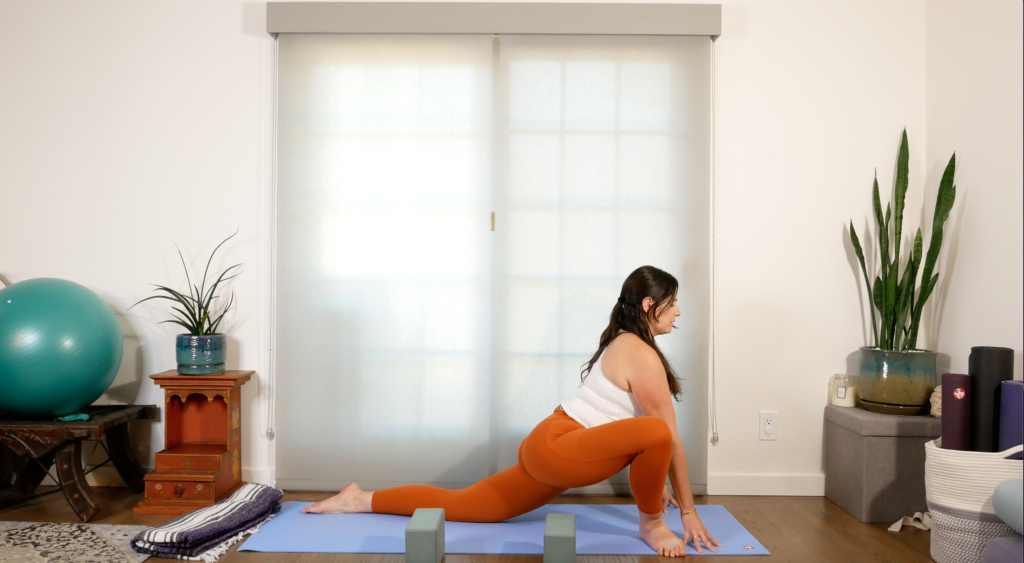
Anjaneyasana (Low Lunge) Variation
This is a playful variation of runner’s lunge because you can explore how high or low your pelvis is and, in so doing, entirely change the experience of your front leg. It’s also a great way to literally see the effects of external rotation, as you watch your front leg rotate out. I recommend not turning your leg out to 90 degrees like a ballerina or figure skater. Even 45 degrees can be enough for most of us. Keep your back leg as straight as possible to lengthen the hip flexors, which are important component parts to warm-up for our peak pose.
How to: From Tadasana, find your way back to Downward Dog or Tabletop. On an inhalation, lift your right leg. As you exhale, step your right foot between your hands (or as far forward as it will go and inch it forward). Bring both hands to the inside of your front foot in Low Lunge. Lift your right toes and pivot on your heel to angle your right toes, shin and knee away from your midline for external rotation in your hip. Let your hips sink toward the mat as you press firmly into your hands, keeping your chest lifted. Stay here for 8 breaths (or longer!). Come back to a Low Lunge by angling your foot and knee forward and step back to Down Dog or Tabletop. Repeat on your left side.
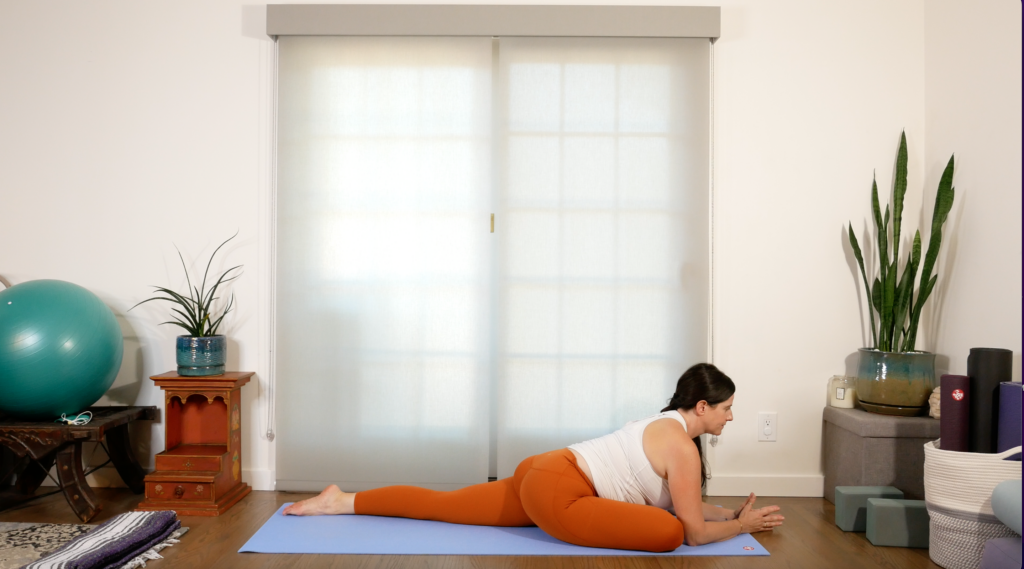
Eka Pada Raja Kapotasana (One-Legged King Pigeon Pose)
Just as a reminder, any time we are practicing a “peak” pose, it doesn’t matter if you are able to come into the actual pose. The most important part is practicing the steady awareness of one or two alignment points. If you have any knee issues or pain, come back to Low Lunge and stay there longer. Or come onto your back in Figure-4 as an alternative. Conversely, if you are extremely comfortable in this shape and want to play, you can bend your back knee and try to grab that leg, either reaching both arms overhead or one or both arms back in extension. Do what works for you.
ADVERTISEMENT
How to: From Tadasana, return to Downward Dog anyway that you would like. If you prefer you can do this pose from Tabletop, too. On an inhalation, lift your right leg. As you exhale, step your right foot between your hands or as far forward as it will go and inch it forward. Lower your left knee to the floor, starting in a Low Lunge position. Heel-toe your right foot toward your left hip. Be less concerned with the common cue of getting your front shin parallel to the short side of your mat (which may tweak your pelvis) and instead try to keep your pelvis as neutral as possible (which means level from side-to-side, front-to-back, and forward and back). If your right thigh, knee, or shin lift away from the floor, slide a blanket or bolster horizontally beneath it for support. Some people like having a blanket under their back thigh and knee as well. Come onto your fingertips and puff your chest for a big inhalation. On an exhalation, walk your hands forward and start to lower your chest toward the floor as much as is comfortable. If possible, rest your head on the floor, a block, or the backs of your hands. Soften and breathe for 10 full breaths. Come out by walking your hands beneath your shoulders, then curl your back toes under and bring yourself into Three-Legged Dog or Tabletop. Repeat on your left side.
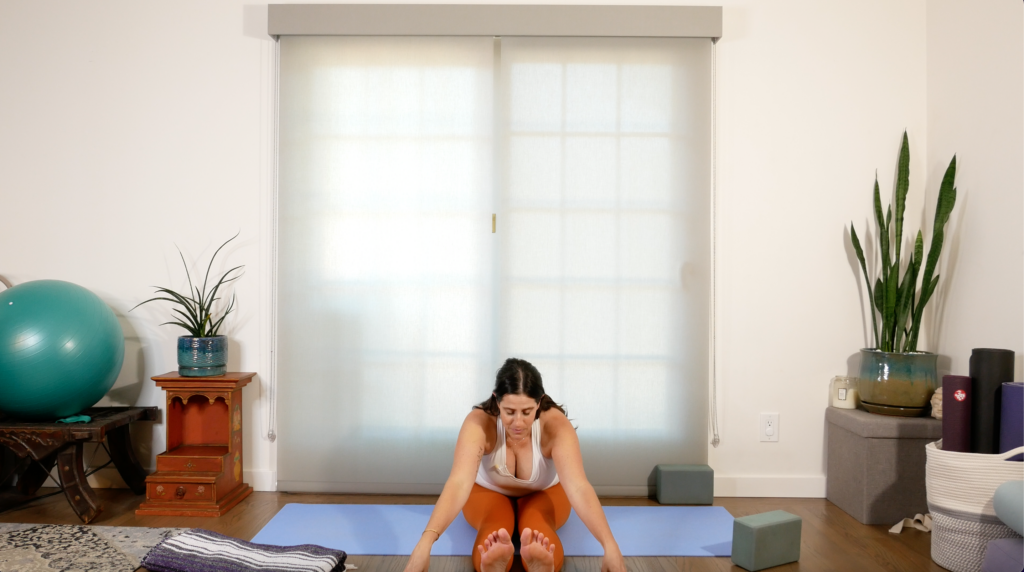
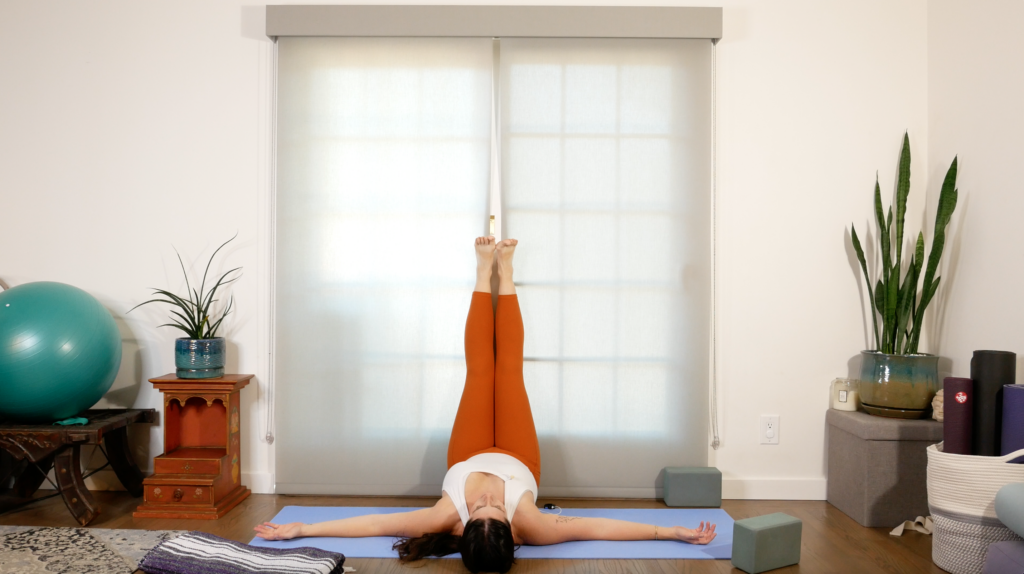
Paschimottanasana (Seated Forward Bend)
Wind down by doing a few shapes that bring your hip joints back to neutral. With these more mellow poses, feel free to stay as long as you like. I include different variations below for all bodies, although visit our Pose Library for more options if none of these work for you.
How to: From Down Dog or Tabletop, find your way to sitting. You can jump your legs through your hands or simply come to sit on the floor. Grab your blanket and sit on it, with both legs straight out in front of you. Check in with your lower back and, if you are rounding in your lower spine or experience tightness, add an additional blanket or bend your knees as much as is comfortable. On an inhalation, reach your arms toward the ceiling. As you exhale, bend forward over your legs. You can grab the outer edges of your feet or lasso a strap or towel around the bottom of your feet or rest your hands alongside your thighs. And sometimes remaining fairly upright feels best. Press your thighs down into the mat. Lengthen through your spine and lift your chest slightly. Stay here for 8 breaths. Walk your hands back to sitting.
Viparita Karani (Legs Up the Wall)
After any leg-heavy practice, I love to do Legs Up the Wall. Many studies have found that elevating your legs above your heart can reduce inflammation and swelling and some say that it can also lessen lower back pain, all of which are common reactions from standing or sitting all day. Also, there’s something very soothing about having your legs up and being fully supported by the wall and floor. This posture is common in restorative yoga, which research has shown to reduce blood pressure and calm the nervous system.
How to: Come to a wall. You’re welcome to bring your mat or leave it where it is. If you do use your mat, you will have the short end right up against it. Sit sideways against the wall and lie on your back. Slowly swing your legs up the wall and rotate your body until your sit bones are facing the wall. If your lower back is rounded, you may need to slide a few inches away from the wall or place a folded blanket or skinny bolster under your sacrum . Rest your arms alongside your body, on your chest, or bend your elbows to come into a cactus shape. If it’s comfortable, close or cover your eyes. This is your Savasana, so feel free to stay as long as you like. I recommend a minimum of 3 minutes, but if you’re able to, stay here for 7 minutes or longer.
When you’re ready to come out, slide your feet down the wall, bending your knees into your chest. Roll to one side and use your hands to press yourself up to seated. Find a comfortable seat, maybe returning to Sukhasana and simply observing the effects of today’s practice.
ADVERTISEMENT
About our contributor
Sarah Ezrin is an author, world-renowned yoga educator, popular Instagram influencer, and mama based in the San Francisco Bay Area. Her willingness to be unabashedly honest and vulnerable along with her innate wisdom make her writing, yoga classes, and social media great sources of healing and inner peace for many people. Sarah is changing the world, teaching self-love one person at a time. She is also the author of The Yoga of Parenting. You can follow her on Instagram at @sarahezrinyoga and TikTok at @sarahezrin.