Published June 15, 2015 11:51PM
Challenge Pose: 4 Steps to Master Pasasana
Find energetic and physical balance
as you deepen your twist and move
step by step into Noose Pose (Pasasana).
Find energetic and physical balance as you deepen your twist and move step by step into Pasasana.
PREVIOUS STEP IN YOGAPEDIA 3 Prep Poses for Noose Pose (Pasasana)
SEE ALL ENTRIES IN YOGAPEDIA
Benefit
Builds leg and hip strength, stretches your ankles, opens your shoulders and chest, and deepens your twist; teaches patience as you learn to balance effort and ease, grounding and lifting
Step 1

Start with your right side a few inches from a wall and squat with your feet together. Allow your heels to lift. Revolve to your right, reaching your left arm across your right thigh and placing both hands on the wall for balance. Press your palms into the wall. Inhale; exhale to leverage a deeper twist. Push your left arm against your right thigh and your right hand into the wall. Begin to drive your heels back and down.
Learn more aboutChair Pose (Utkatasana)
ADVERTISEMENT
Step 2

When you have mastered the wall (gecko) variation, come away from the wall and place a folded blanket under your heels. Grab a strap in your right hand. From Malasana, prep, or a modified squat with your feet together, reach your left arm as far down the outside of your right leg as you can, initiating a deeper twist. Gently bend your left elbow and draw the forearm across both shins. Inhale to elongate your spine and reach your right arm up, then back. Bend your right elbow and reach toward your left hand. With both hands, hold the strap, pulling to open your shoulders and chest.
Learn more about binding
Step 3

Your shoulders and chest will eventually open enough to release the strap. Grasp the left hand or wrist with your right hand. Then press your heels down, roll your right arm and chest back even more, and breathe smoothly.
ADVERTISEMENT
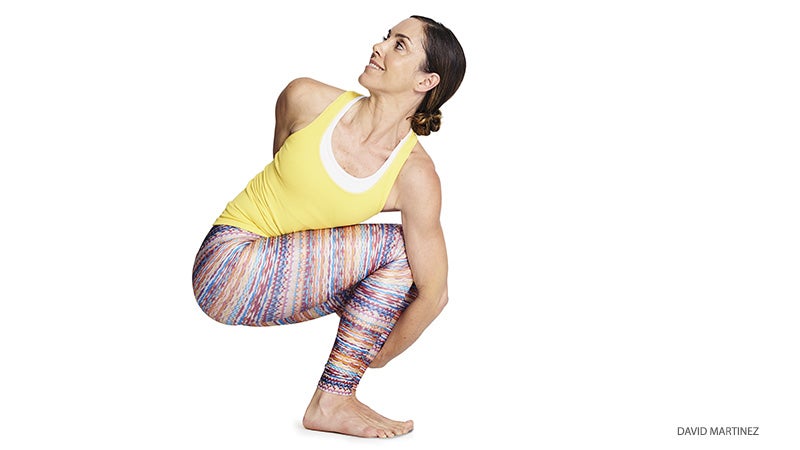
Step 4
")
When ready, remove the blanket and drive both heels back and down, evenly; this will lift your hips slightly. Keep pulling both thighs back. (You may need to more vigorously suck the left one back as well as draw the right one down, to balance your hips.) Try to deepen and slow your breath, lengthening your spine on your inhales and deepening your twist on the exhales. With a good grip on your wrist, bend your elbows more to pull your arms back and open the right shoulder. Feel your right chest expand, and look back over your right shoulder with a soft and sweet gaze. Try to hold here for 3–5 breaths. On an exhalation, gently release the bind and unwind before starting over at the wall and slowly moving into Pasasana on the left side.
Stay Safe
Be patient! For most yogis, Pasasana is more of a pilgrimage than a destination. Take your time to build the necessary strength in your legs to align and support your knees. Slowly deepen your twist over months (and years!) rather than force yourself into a pose that might torque your sacrum or lower back. You may not feel the strain while practicing, but rather the next day, so be willing to take gradual steps and work methodically. Enjoy the journey!
Our Pros
Teacher Annie Carpenter is the creator of SmartFLOW Yoga, a marriage of mindful movement with compassionate, wakeful alignment. California based, she teaches globally and is the author of RelaxDEEPLY, a CD of restorative yoga, and Yoga for Total Back Care, a DVD produced by Yoga Journal. Learn more at anniecarpenter.com. Model Tiffany Russo is an LA–based SmartFLOW yoga teacher and trainer, and has assisted Carpenter with teacher trainings since 2010.