Updated January 20, 2025 10:42PM
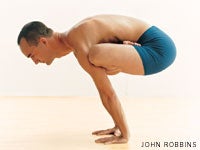
Asana Column: Urdhva Kukkutasana (Upward Cock Pose)
Not long ago, one of my yoga students came up to me after class and asked, “How often do you practice?”

With a little grin, I gave her the same answer I always give to that question: “I haven’t missed a day in about 33 years.”
She looked a bit surprised. “Oh, so you do asana every day?”
“No, but I do practice,” I replied.
Patanjali, the author of the Yoga Sutra, tells us in the 12th verse that a primary way in which we can work toward the experience of yogathe experience of “stilling the vacillating waves of thought”is through abhyasa, or “practice.” He goes on in the next verse to define abhyasa as “effort toward steadiness of mind” or, as a more poetic translation puts it, “the continuous struggle to become firmly established in the stable state of the True Self.”
When we say we practice yoga, most of us usually mean that we do asana. But that way of looking at practice gives only a partial view. If yoga practice, as Patanjali tells us, means making an effort to keep the mind steady, then it is a lot more than simply a struggle to open our hips or get both feet behind our head.
In truth, there can be many kinds of practice, not just asana. There can be sutra practice (studying sacred texts), mantra practice (repeating sacred phrases), Pranayama (breathwork) practice, meditation practice, kirtan (devotional chanting) practicein fact, there can be unlimited other kinds of practice, even changing-diapers and chopping-carrots practice. Practice means the constant effort to steady the mind, 24/7, no matter what you are doing. The point of practice is to get your mind into the present.
If you are doing asana and checking out the person on the mat next to you to see if his pose is better than yours, then you aren’t making much of an effort to keep your mind steadyand it ain’t practice; it’s simply exercise. However, if you are chopping carrots and paying attention, it is practice. So when I say that I haven’t missed a day of practice in more than 30 years, it’s because I have known since I started yoga that learning to pay attention is what yoga is all about. And, of course, if we approach asana practice in this way, it can take us from the bahiranga, the “outer limbs” of the ashtanga (eight-limbed) path of yoga, to the antaranga, the “inner limbs” that culminate in dharana (concentration), dhyana (meditation or sustained concentration), and samadhi (ecstasy or unified consciousness).
Training the Mind Through Asana
With Patanjali’s view of yoga practice fresh in our minds, let’s take a look at how an advanced posture like Urdhva Kukkutasana (Upward Cock Pose) can lead us toward dharana, dhyana, and samadhi.
It takes a lot more than strength and flexibility to do this posture. You certainly need flexible hips to move into Padmasana (Lotus Pose) in midair, and coming down with control into Urdhva Kukkutasana from Tripod Headstand requires powerful abdominal strength as well as substantial strength in the shoulders, chest, and arms. But the pose is about the mind too. Urdhva Kukkutasana demands all of our attention. In any posture, of course, we have to concentrate to get the finer points. But this posture especially requires us to focus and consciously direct prana (life energy). Such a pose demands that we combine asana, or proper posture; pranayama, or breath and energy control; and pratyahara, a turning of the senses inward, as well as dharana and dhyana. Urdhva Kukkutasana is a living, breathing example of how asana practice can serve as an aid to meditation, because it requires a progression from the gross physical aspects of mastering the pose to the more subtle elements of training the mind.
To help you use the practice of Urdhva Kukkutasana to journey along the path from asana to dhyana, I have selected a sequence of four preliminary postures, each requiring just a bit more concentration and equilibrium than the previous one. These four postures are Gupta Padmasana (Hidden Lotus Pose), Urdhva Padmasana in Sarvangasana (Upward Lotus Pose in Shoulderstand), Sirsasana II (Headstand II, also called Tripod Headstand), and a modified Urdhva Kukkutasana with the head on the floor.
ADVERTISEMENT
To prepare for the work described in this column, I recommend that you spend at least 20 to 30 minutes warming up. You can do this through standing postures or Surya Namaskars (Sun Salutations) and other flowing pose sequences, but whatever you choose for a warm-up should be effective at heating your body. Ujjayi Pranayama (Victorious Breath), Mula Bandha (Root Lock), and Uddiyana Bandha (Upward Abdominal Lock) are all powerful aids to the intensification of heat within the body; if you are familiar with them, it’s really valuable to use them throughout your practice. If you are not, simply breathe in the manner recommended by your teachers.
Since the ability to do Padmasana with ease is such a fundamental requirement for Urdhva Kukkutasana, you might also want to include hip-opening postures in your preparation. After all, Padmasana demands very close to full range of motion from the muscles that release to allow external rotation of the hip. Baddha Konasana (Bound Angle Pose), Eka Pada Rajakapotasana (One-Legged King Pigeon Pose), and Ardha Baddha Padma Paschimottanasana (Seated Half Bound Lotus Forward Bend) are just a few of the many hip openers you might choose.
Open the Hip Flexors
But a strong, easy Padmasana is only one step toward Urdhva Kukkutasana. Once Padmasana comes easily, you will also need to be able to completely flex the hip joint so you can bring your knees into your armpits while in full Lotus.
Gupta Padmasana is an excellent position for stretching the hip flexors, which over time makes it easier to contract them strongly in Urdhva Kukkutasana. Also, unless you are completely comfy holding a full Lotus position while facedown on your mat, you will see that even a fairly passive posture like Gupta Padmasana can require considerable concentration. Learning to focus your mind and use your breath to release ever more deeply even while maintaining this fairly uncomfortable position will help train the mind for more challenging tasks, like lowering into Urdhva Kukkutasana from Tripod Headstand.
To come into Gupta Padmasana, begin by assuming regular Padmasana. Sit on the floor with your legs straight out in front of you and your spine erect. On an exhalation, bend your right knee, externally rotate your right thigh, and cradle your right shin with both hands. Externally rotating the right thigh as much as you can, draw your right heel toward the lower left part of your belly, aiming to place your right ankle and the top of the foot as high up on your left thigh as possible. Flex the heel to push the foot into the abdomen just inside the hip point. Inhale again, and on your next exhalation, repeat these actions with the left leg.
ADVERTISEMENT
Once you’re in Padmasana, place your hands on either side of your hips. Leaning slightly forward and pushing down with your hands, lift your buttocks and roll over your knees. Your chest and belly will now face the floor, and you’ll be on your hands and knees with your legs still in Lotus. While breathing mindfully, slowly walk your hands forward, stretching the front of your body. Use your arms to support your weight until you can bring your whole torso down to the ground. To give the hip flexors time to release deeply, it’s a good idea to hold this pose for quite a while. At first, your maximum might be 10 breaths. Eventually, it might be as long as 10 minutes. However long you stay, relax and focus on your breathing. Use each inhalation to breathe energy into the places that feel constricted, and use each exhalation to release tightness and dissipate discomfort.
Invert Your Lotus
Now that you’ve worked on opening the hip flexors in Lotus, it’s time to invert the pose. Urdhva Padmasana in Sarvangasana has many benefits, but the primary reason for using this posture as a lead-up to Urdhva Kukkutasana is to give you the opportunity to practice putting your legs into Lotus position without using your handsand while you’re upside down.
ADVERTISEMENT
Begin by lying on your back with your arms at your sides and your legs and feet together. Take five breaths here to let your body release. Then, as you inhale, lift your legs up into the air, raising your hips off the floor as the legs move past vertical; as you exhale, continue taking your feet over your head until they reach the floor. Keeping your arms stretched along the floor behind your back, interlace your hands. Leaning slightly to your right, draw your left shoulder in closer to your centerline, then lean to your left to draw your right shoulder under. Press the arms into the floor and externally rotate the upper arms.
To protect your neck, it’s very important that your weight be on your shoulders, the back of your head, and your arms not on your neck. The bones of the cervical spine (neck) should be completely off the floor, so that someone kneeling at your side could slip her fingers under your neck, and someone kneeling at your back could slip a finger under your neck the whole way up to the back of your skull. If you can’t achieve this, use one or more firm blankets folded to support your arms and shoulders: Practice the pose with your torso positioned on the blanket so that when you lift to vertical, your shoulders come very near the edge and your neck and head extend off it.
Once you’re sure you’ve protected your neck, release the clasp of your hands and place them on your back with the fingers pointing up. On an inhalation, lift one leg at a time or both legs at once up into Sarvangasana. Press down through your arms, your shoulders, and the back of your head, and lift your spine, hips, legs, and feet straight up toward the ceiling.
ADVERTISEMENT
To come into Padmasana, begin by externally rotating your right leg. Then, as you exhale, bend the right knee and sweep the right foot and ankle as far up your left thigh toward the hip as you can; you may have more success if you draw your left leg slightly back behind you. Once your right foot nears your left thigh, flex the left hip so the thigh comes forward and catches the foot. To get as far into Lotus as possible, you may need to wiggle a bit, rotating the left thigh in and out and squirming the right foot up the thigh. You may not look elegant in the process, but your aim is to create as deep a Lotus upside down as you can on the floor.
Once you’ve snuggled your right foot up as far as you can, inhale to straighten your left leg and right thigh back up toward the ceiling. Then, on an exhalation, begin to work your left leg into Lotus.
When you first try coming into Lotus in Shoulderstand, you may need to release one hand from your back to help you draw the feet into position. (If you do this, be very careful not to twist your neck or collapse down onto it.) Using your hands is fine, but try to wean yourself from doing so as soon as you can. Remember, you won’t be able to use them when you’re in Tripod Headstand.
ADVERTISEMENT
Once your legs are in Lotus, check to make sure you’re still grounding through your arms, your shoulders, and the back of your head; lengthening your spine; and lifting your hips up toward the ceiling. Then bring your thighs parallel to the floor and reach up, moving one arm at a time, to support your knees with your hands. If the weight of your hips is not far enough toward your head, you’ll tend to roll down onto your back. When you’re positioned correctly, you should be able to completely release the weight of the legs into the straightened arms, and the pose will feel almost effortless.
Keeping your attention focused on your breathing, gaze at your heart and hold the pose for five to 10 breaths. Then return your hands to your back and unravel your legs to lift back up into full Shoulderstand before repeating the inverted Lotus, this time bringing your left leg in first. Hold for five to 10 breaths, then finish by coming back into Shoulderstand, lowering your feet back onto the floor overhead, releasing your arms to the floor, and rolling slowly down onto your back.
Build Your Base
Now that you’ve practiced much of the work you’ll need in the hips and the legs in Urdhva Kukkutasana, turn your focus toward Sirsasana II, so you can practice the necessary upper body work. This Headstand variation is actually a bit easier to balance than Sirsasana I, in which the hands are clasped around the back of the head. Consequently, beginning students who lack the neck strength to do the basic Headstand properly will often start with this posture instead. I strongly caution you against taking this approach. In Sirsasana II, there is quite a bit more weight on the head than in Sirsasana I, so you actually need to have good neck strength and alignment to practice the Tripod Headstand safely. Unless you can do Sirsasana I confidently in the middle of the room without wobbling or falling, you should not attempt Sirsasana II.
ADVERTISEMENT
Begin on your hands and knees. Place your hands on the floor about shoulder width apart, then place your head on the floor so the crown of the head and the centers of the palms form an equilateral triangle. Your forearms should be perpendicular to the floor and your upper arms parallel to the floor, and your elbows should be directly above your wrists, not splayed out to the sides.
Next, tuck your toes under, lift your knees off the floor, and walk your feet on tiptoe toward your elbows. Unless your hamstrings are tight, you will be able to bring your hips a little back past the vertical line of your head and shoulders. At this point, instead of fighting gravity and struggling to muscle the legs into the air, you can counterbalance to lift your toes almost effortlessly off the floor. As you feel this lightness and ease, it’s not uncommon to get a little overenthusiastic, so be careful to avoid bringing your hips too far back, letting your legs go flying up, and tumbling over. Instead, practice taking your feet just a few inches off the ground. Then, slowly and with control, raise your legs to vertical, so your ankles, knees, hips, shoulders, and the crown of your head form a plumb line. If you move slowly and attentively, you’ll notice that your weight shifts more and more toward your back as your legs lift, requiring you to shift your counterbalancing hips back onto the plumb line.
Once you’re up, make sure you’re not letting your weight sag. Instead, ground firmly through your base, putting much of your weight into your hands but also pressing the crown of your head firmly into the floor. At the same time, lengthen the rest of your body upward: Draw the shoulder blades toward the hips, lift the hips up, and push the legs and feet up toward the ceiling. Make sure that your elbows aren’t splayed out to the sides; to do this, you’ll probably need to consciously draw them toward your centerline, but don’t bring them past the point where the upper arms are parallel to each other. Continuing to focus attention on your breathing, gaze out along the floor and hold the pose for five to 10 breaths.
ADVERTISEMENT
If you are still feeling strong, you can move from this pose directly into Urdhva Kukkutasana. But if you are feeling any pressure in your neck or are at all shaky, come down and rest in Balasana (Child’s Pose). To come out of Sirsasana II, simply reverse the steps you used to go into it, again relying on counterbalance and subtle control rather than on raw muscular strength. When you feel sufficiently rested and renewed, come up into Tripod Headstand again.
Gather Your Energy
To move from Tripod Headstand into Urdhva Kukkutasana, first bring your legs into Lotus position, just as you did in Shoulderstand. Hopefully, you have practiced this action enough so that it is now fairly easy for you.
Once you’re in Padmasana, draw your knees up to the ceiling. Then make sure your base is sound. Ground through your hands and head, and work to keep the elbows directly above your wrists; at the same time, rise away from those actions, lifting your hips and lengthening your spine. Use Mula Bandha and Uddiyana Bandha to stabilize the core of your body; if you’re not familiar with these practices, draw your tailbone long and your lower abdomen lightly back toward your spine to accomplish a similar stabilization.
ADVERTISEMENT
Then, slowly and with control, firmly engaging your core, flex at the hips, drawing your legs in Lotus toward your torso and aiming your knees toward your armpits. To get the knees there, you will need to let your spine round, but the more deeply you can fold yourself while keeping your spine lengthened and perpendicular to the floor and your hips directly over your shoulders, the easier it will be for you to draw the knees deeply into the armpits (or at least higher up on the backs of the arms). Once you land your knees on the arms, you may be able to slide or shimmy your knees farther up toward your armpits.
Take two to five breaths in this position to focus your attention and gather your energy. Draw your shoulder blades down your back, push your elbows away from you while squeezing them inward, and ground through your hands. At the same time, use the power of your hips and your core to drive your knees toward your armpits. These actions are crucial to lifting your head off the ground and coming into full Urdhva Kukkutasana.
Liftoff!
There’s no doubt that lifting into Urdhva Kukkutasana requires strength. But most practitioners can develop this strength if they practice as Patanjali recommends: steadily, over a long period of time, and with dedication. And the pose actually requires less strength than many practitioners think. The key lies in steady effort, determination, focusand a little courage and counterbalancing.
ADVERTISEMENT
To lift up, continue working all the actions of the pose strongly. Then, in one bold movement, accelerate all of your efforts and drop your buttocks a little toward the floor. Let the momentum of that movement help you draw your shoulder blades down your back, lift your sternum forward and up, lift your head from the floor, extend your spine, and push your arms straight. When you first try this, you may have moments when you’re sure you’re going to fall over backward or forward. And you may topple over a few timesfortunately, it’s not a big falluntil you get the hang of it and find the rhythm of counterbalancing that lets you lift. When you finally do, you’ll find you can push your knees even farther into your armpits, and the pose will feel more and more as though it supports itself.
Hold Urdhva Kukkutasana for as many breaths as possible, keeping your gaze straight in front of you. To come out of the posture, you can bend your elbows and lower your buttocks to the floor, but the traditional method is to lower the crown of your head back to the floor gently and with control, and then unravel the legs and lift them back into Sirsasana II. If you feel strong enough, you can then come back into Urdhva Kukkutasana with the left leg moving first into Lotus; if not, make sure to do it that way the next time you practice the pose.
From Asana to Meditation
Once you have finally lowered onto the floor from either Urdhva Kukkutasana or Sirsasana II, and have spent a few moments in Balasana, come into Padmasana. Close your eyes and turn your attention to the breath. Since you have probably been working fairly hard to master Urdhva Kukkutasana, a demanding posture, your breath and heart rate will most likely be a bit elevated. Whether you’re using Ujjayi breathing or not, gradually let the breath become slower, smoother, and quieter until your heart rate returns to normal.
ADVERTISEMENT
As you watch your breath, see if you can experience, for even a moment, a glimpse of the path that will take you to the hyperconscious state known as samyama. Samyama is explained in the first verses of chapter III of the Sutra as the continuous practice of the three innermost limbs of yoga: dharana, dhyana, and samadhi. Each limb is a stage in the gradual process of samyama. When we can direct our mind to a particular object, fixing it on the object (dharana); keep it there for a long time without distraction (dhyana); and then separate the material aspect of the object from the essence of the object itself, retaining the essence alone in the mind (samadhi), this is samyama. Through samyama, we are said to experience prajnaloka, the “luster of wisdom,” which means that the truth of the object on which we practice samyama becomes known to us.
For most of us, success in coming into Urdhva Kukkutasana demands at least a few moments of this kind of focus. Without it, we simply can’t do the pose. Poses like this give us a chance to practice this degree of commitment and concentration. They can also prepare us for more advanced levels of yoga study, in which the object of our meditation is not a pose but rather brahman, the Absolute Divine Consciousness. In this way, the classical ashtanga methodology can lead us from asana to pranayama and pratyahara, and on to dharana, dhyana, and samadhi. And to think that it can all start with learning to bring your big toes together in Tadasana (Mountain Pose) in your first asana class!
Beryl Bender Birch has been teaching yoga for 30 years and is the author of Power Yoga and Beyond Power Yoga. When not teaching, she loves to train and race her team of Siberian huskies.