Published December 13, 2021 05:15PM
If you buy through our links, we may earn an affiliate commission. This supports our mission to get more people active and outside.Learn about Outside Online's affiliate link policy
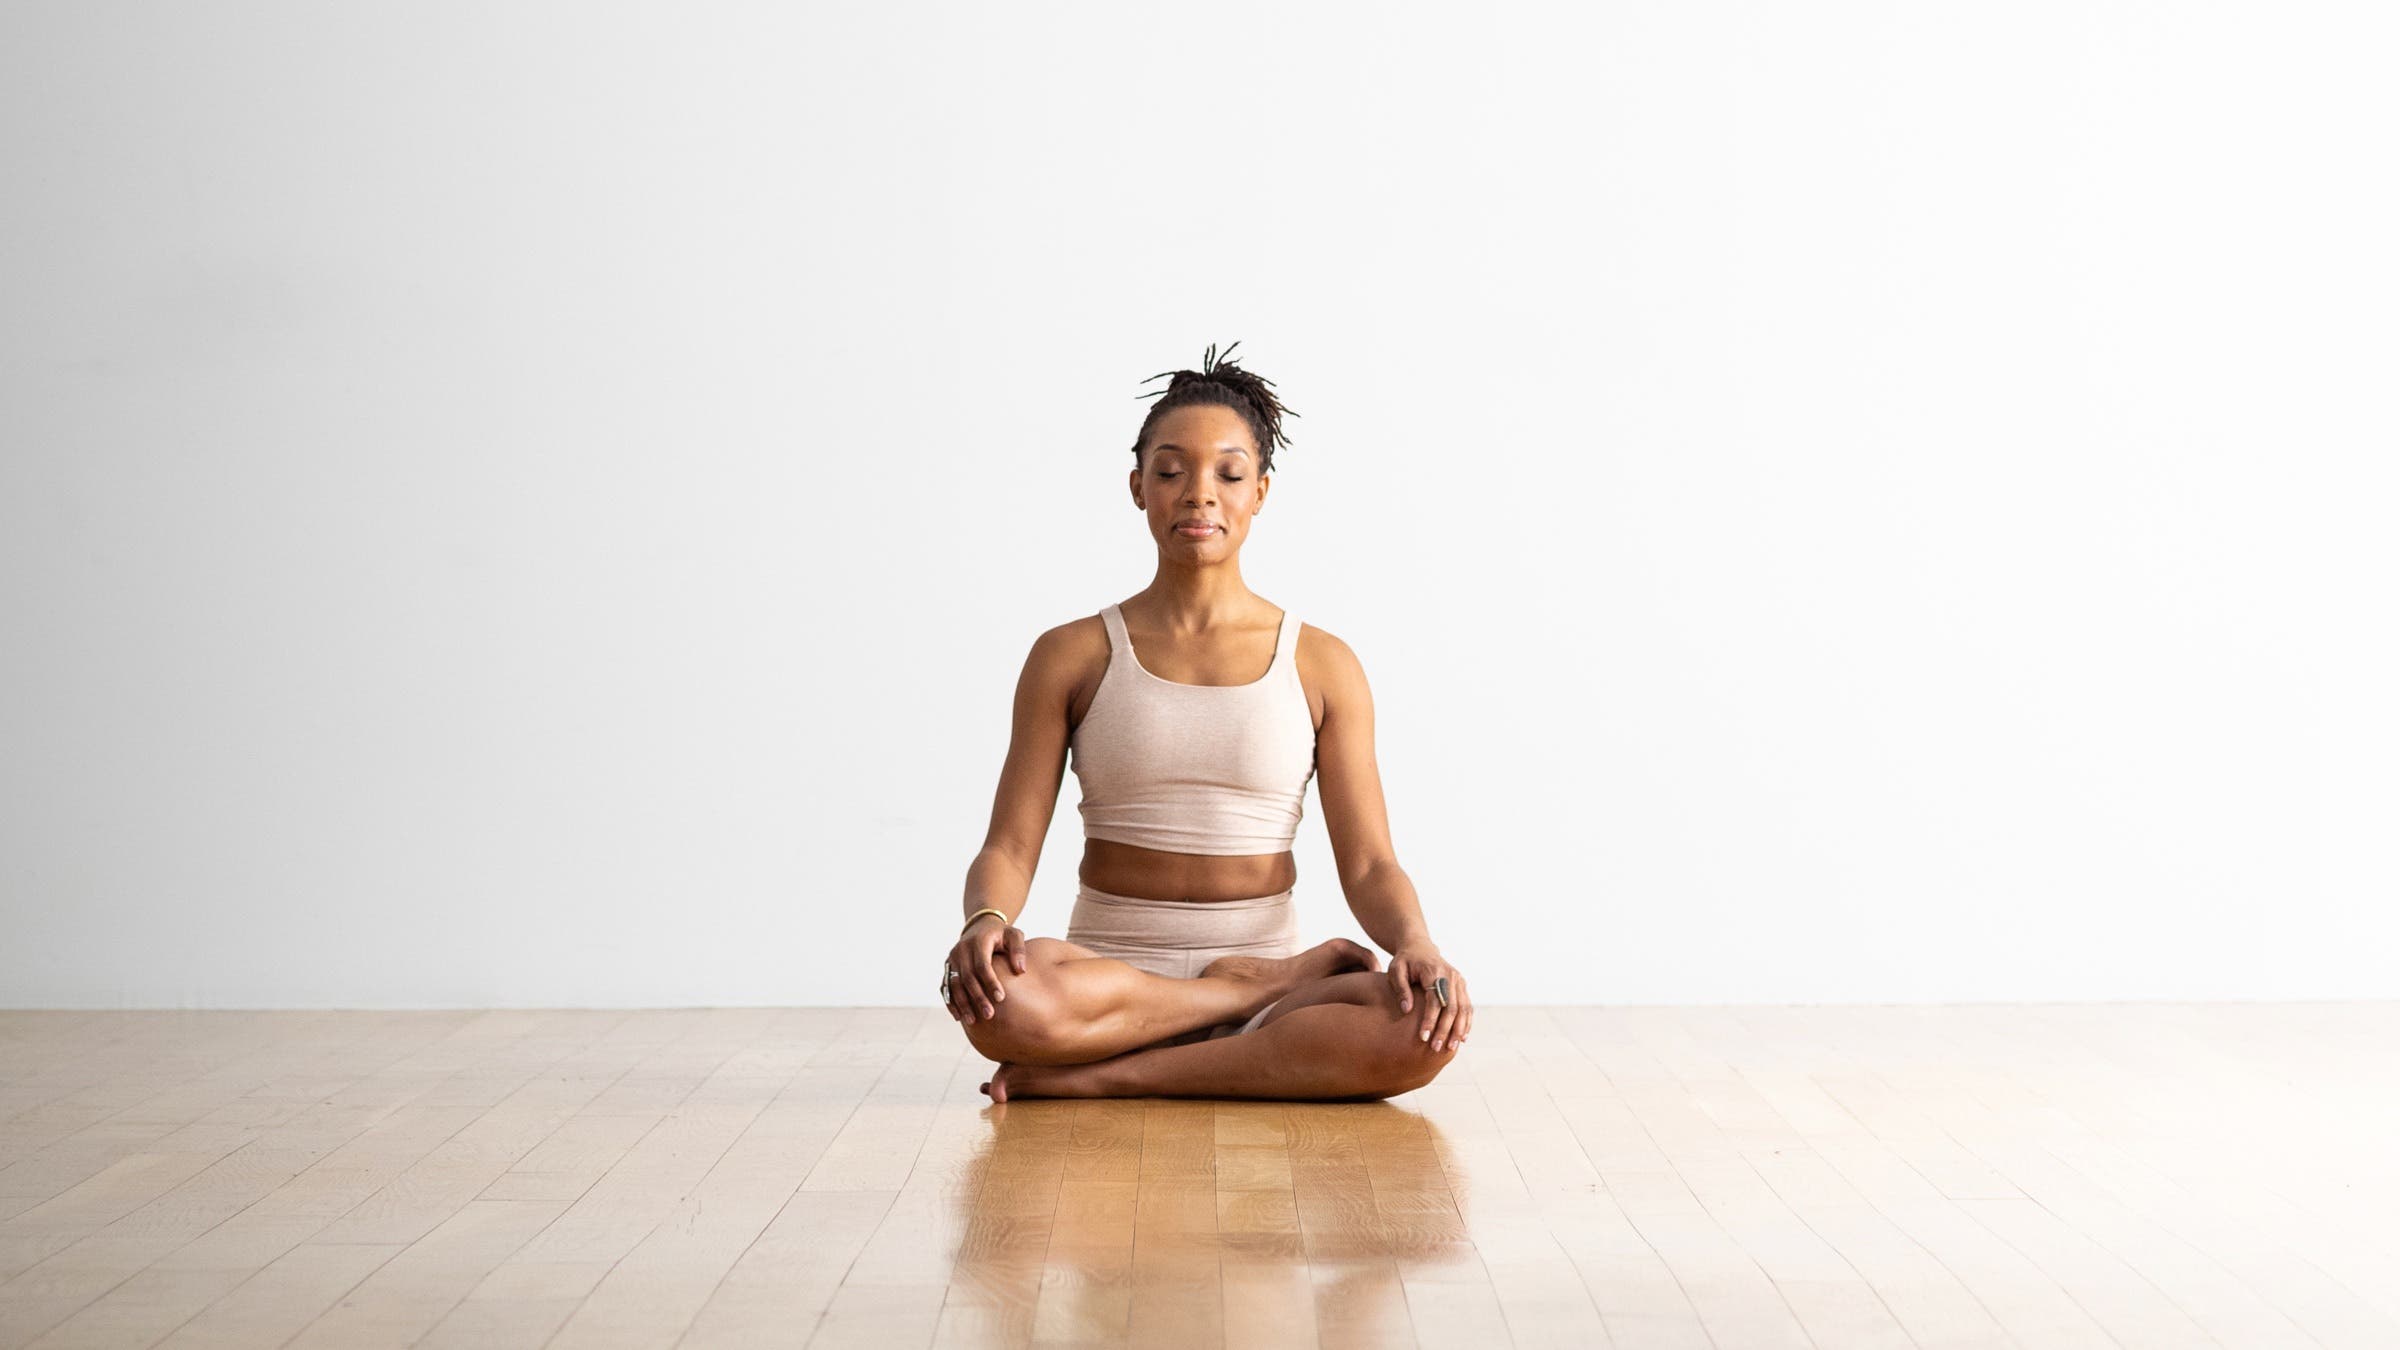
Lotus Pose
Padmasana creates an essential foundation for meditation practice, while stretching the front of the thighs and ankles.
There is strong symbolism behind Padmasana (Lotus Pose). “A lotus is rooted in the mud, and when it grows, it blooms into a beautiful flower,” says Richard Rosen, director of Piedmont Yoga Studio in Oakland, California. It literally derives its strength and beauty from first having experienced and transcended what could be perceived as unwanted circumstances.
The lotus is often found in Hindu iconography, associated with many powerful deities. Lakshmi (the goddess of abundance) is often shown sitting on an open lotus and holding another in her hand. The same is true of Ganesha, the elephant-headed destroyer of obstacles, and Lord Vishnu, who is said to represent the principle of preservation in the universe. And lore has it that wherever the Buddha walked, lotus flowers bloomed.
As important as the lotus flower is in Hindu imagery, Lotus Pose is an important foundational pose in yoga practice. This seated posture boasts many physical and energetic benefits: it can help improve circulation in the lumbar spine, stretch the ankles and legs, and increase flexibility in the hips. “What is unique about Padmasana is that it’s both a grounding and a profoundly expansive pose,” says ParaYoga founder Rod Stryker, who has been teaching yoga since the late 1980s. “The grounding happens in the body, but energetically it directs our awareness toward the spine and the higher centers.”
Practice the pose to whatever extent your body allows, and don’t get caught up in achieving a “perfect” pose.
ADVERTISEMENT
Sanskrit
Padmasana (pod-MAHS-anna)
padma = lotus
How to
- Sit on the floor in Dandasana with your legs extended. Bend your right knee out to the side, and cradle your knee and your foot in your hands. Rotate your leg from the hip (not the knee) and guide your foot into your left hip crease.
- Bend your left knee, rotating the thigh outward from the hip and, just as you did on the right. Lift your shin slightly and guide the left foot over the right, and bring it to tuck into the right hip crease.
- Settle the tops of your feet against your upper thighs and release your knees towards the floor. Try not to let the ankles sickle.
- Sit up tall, lift your sternum and lengthening your spine. Sitting on a folded blanket may help keep the spine from rounding.
- Take slow, deep breaths and stay in the pose as long as is comfortable.
ADVERTISEMENT
Lotus Pose variations
Half Lotus Pose
If the full expression of this pose is too intense, sit cross-legged and use the support of your hands to slowly lift one leg on top of the other; stop if you feel any knee pain, and try another meditative posture like basic cross-legged Sukhasana (Easy Pose).
Half Lotus with props
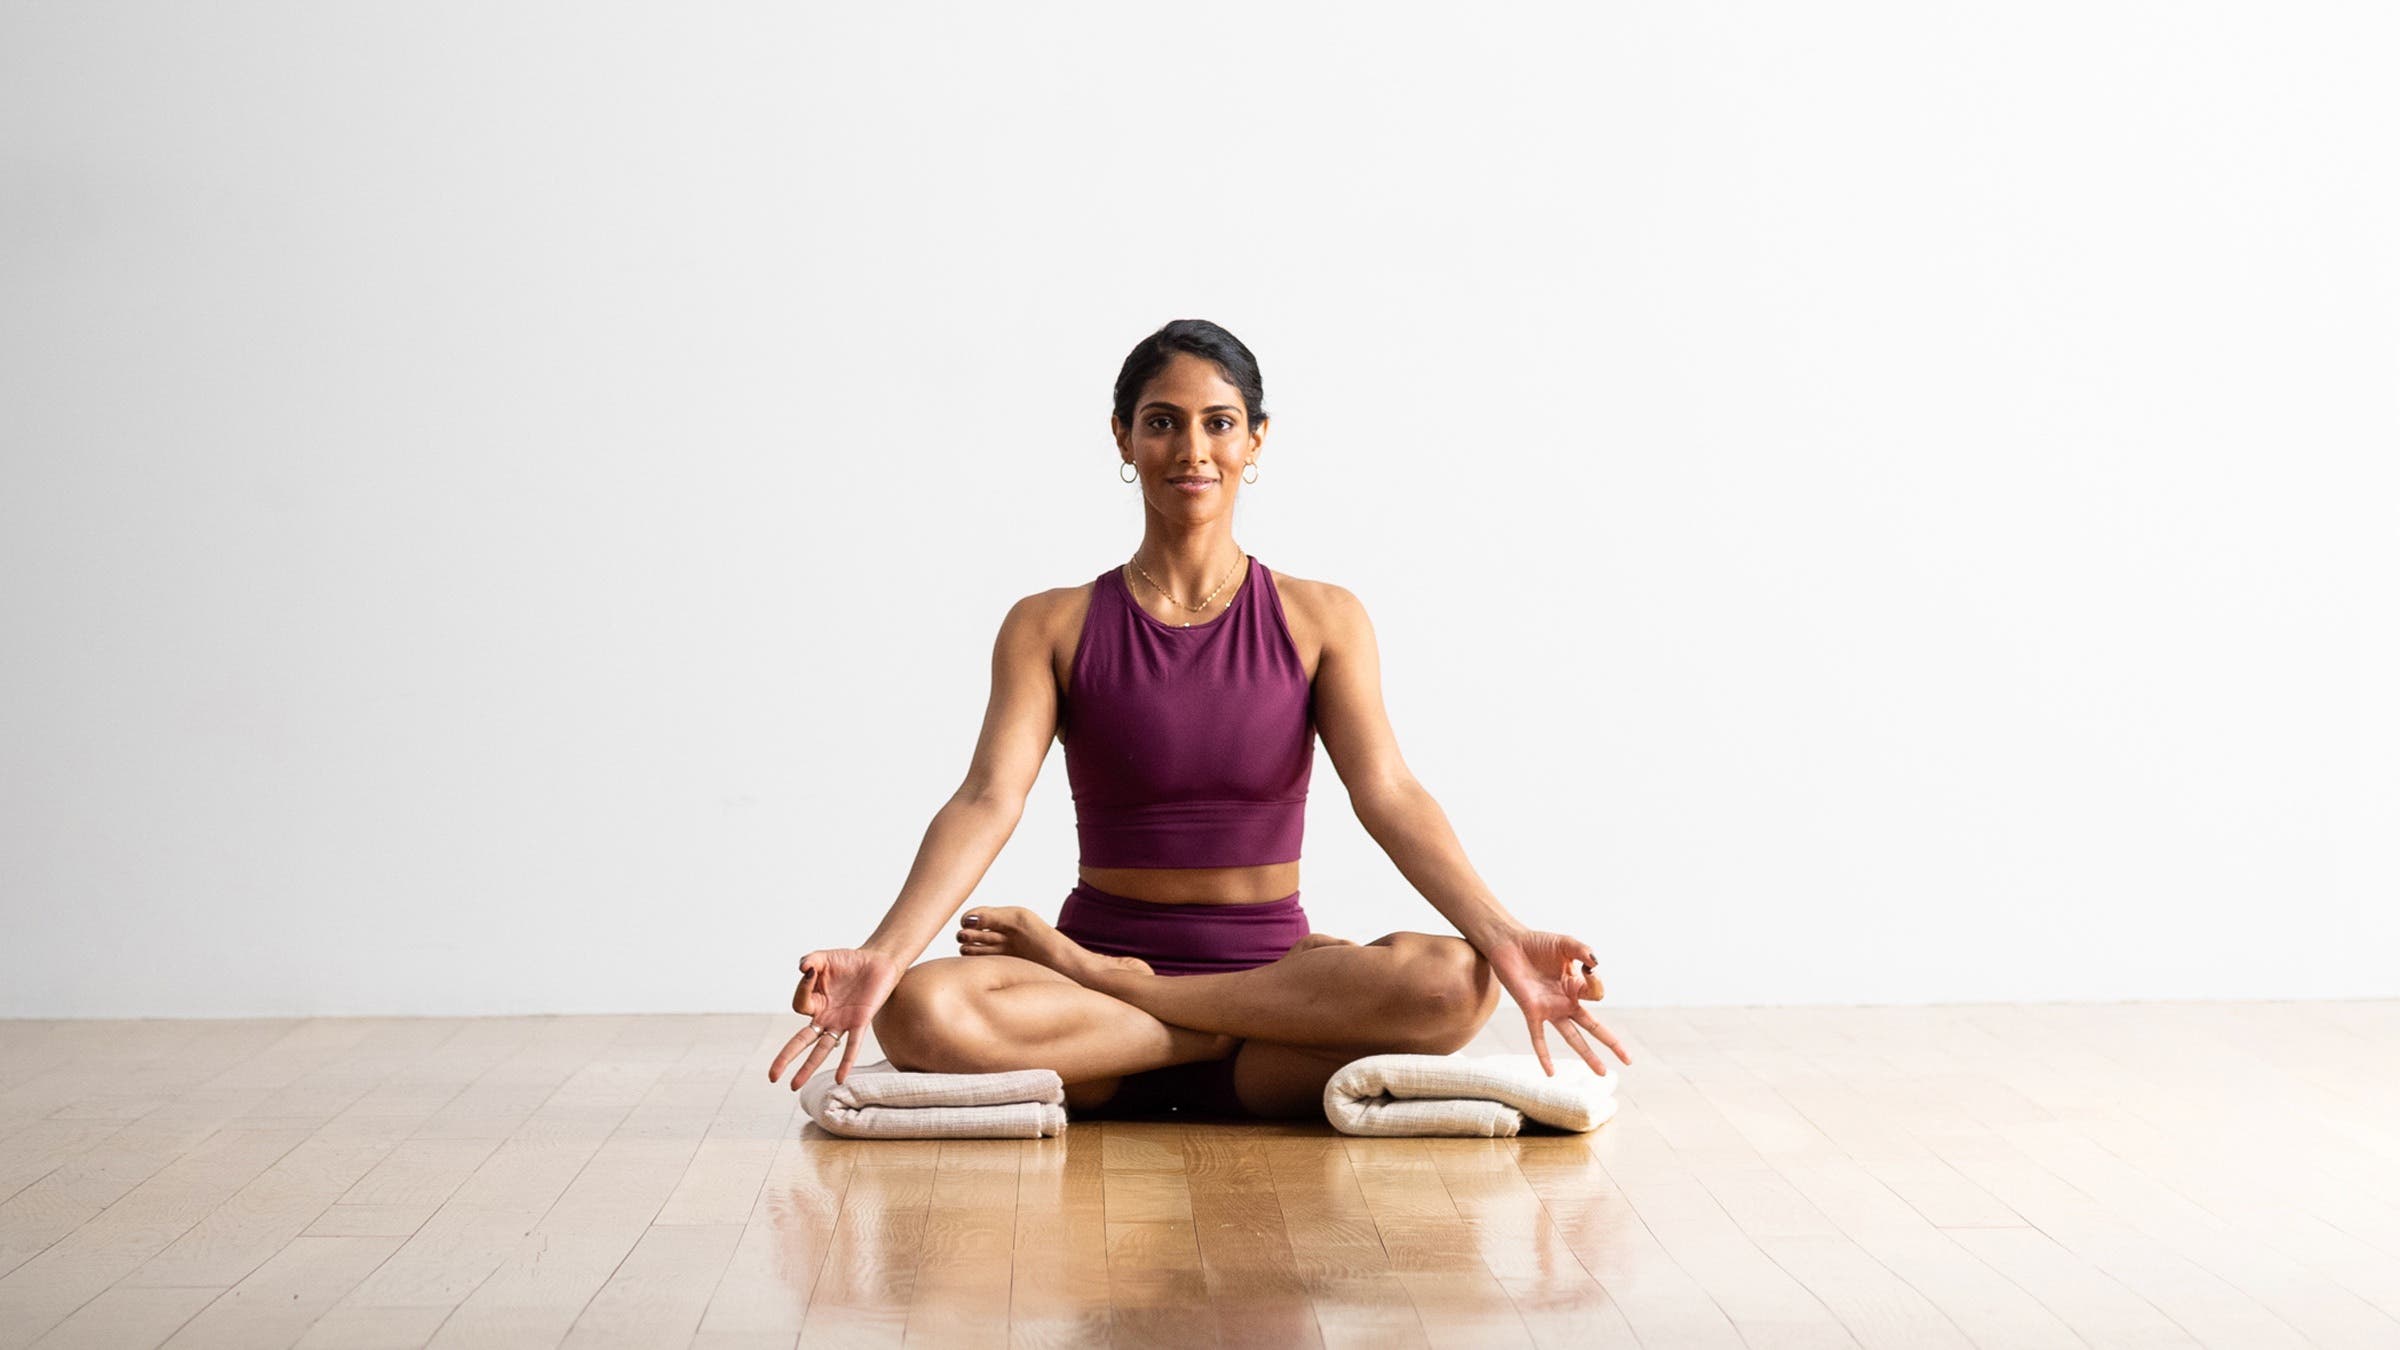
Sit cross-legged, and use the support of your hands to slowly lift one leg on top of the other; stop if you feel any knee pain and try another meditative posture like basic cross-legged—Sukhasana (Easy Pose). Rest your thighs on blocks or folded blankets. Find support with props to avoid pressure on the hip and knee joints.
Lotus in a chair
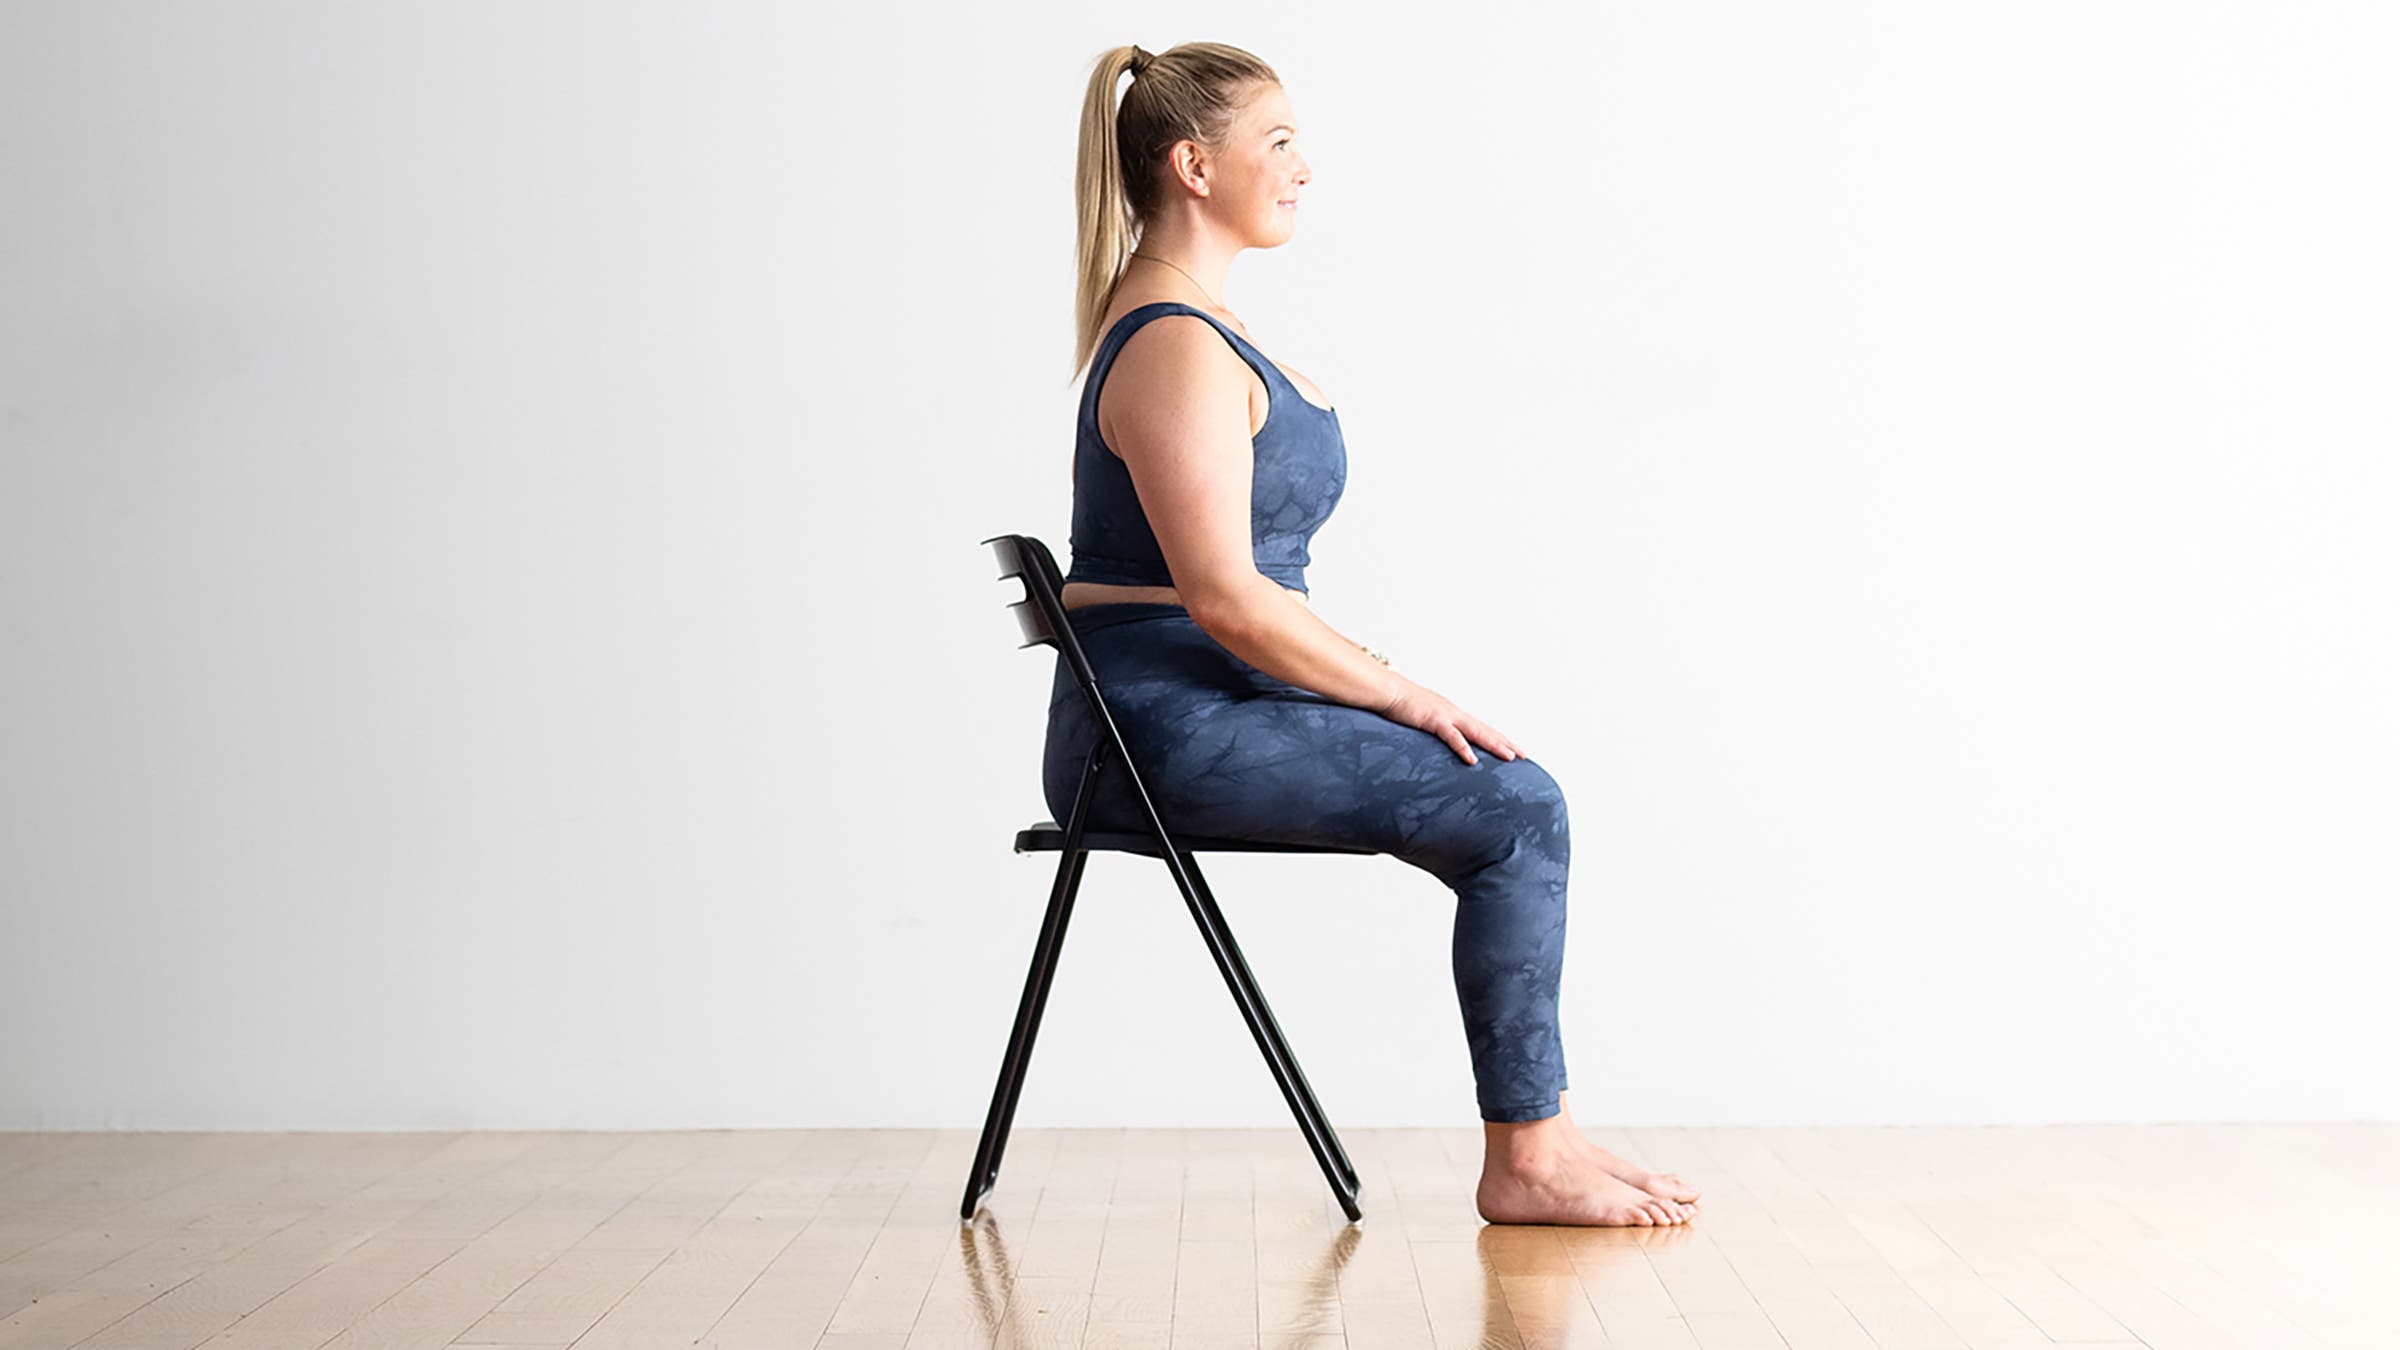
Come to a comfortable seated position in a chair with your feet directly under your knees, allowing a 90-degree angle. If you are taller, consider also sitting on a folded blanket. If you are shorter, try placing blocks under your feet to bring your knees in line with your hips. If accessible, sit forward in the chair with a neutral spine. Feel the crown of your head lifting upward, avoiding slouching while lengthening your spine into a neutral curve. If needed, you can use the back of the chair for support. If needed, place a pillow behind your back for support.
ADVERTISEMENT
Lotus Pose Basics
Pose type: Seated
Benefits: Lotus Pose creates a foundation for meditation practices. It can help manage stress, and when done in a relaxed manner, activates the relaxation response (parasympathetic nervous system) and deactivates the stress response (sympathetic nervous system).
Other Lotus Pose perks:
- May help lower or regulate blood pressure
- Stretches the front of the thighs (quadriceps) and ankles
ADVERTISEMENT
Beginner tips
Getting into Lotus requires both thighs to rotate outward, moving from the hip sockets. The hip is a ball-and-socket joint with a circular range of motion that varies greatly from person to person, so this pose is a breeze for some people, less so for others. Don’t judge and don’t force the pose.
When you bring your foot across toward the groin, maintain an even stretch of the inner and outer ankles in both feet. Don’t allow one side of your feet or legs to feel overstrained.
Explore the pose
When you bring your foot across your body and onto your opposite inner thigh, maintain an even stretch of the inner and outer ankles in both feet. Don’t allow one side of your feet or legs to feel overstrained or taxed. Adjust or use a prop, such as a block or blanket, if you are feeling strained.
ADVERTISEMENT
Be mindful!
When using Padmasana as a seat for meditation or pranayama, there’s a tendency to cross your legs in the same exact way day after day. Eventually, this can cause imbalances in your hips. If you regularly use this pose as a platform for meditation, alternate the cross of your legs daily. One simple method to help you remember to do this is to bring the right leg in first on even-numbered days, the left leg first on odd-numbered days.
Why we love this pose
“Whenever I’m cued to ‘come into a seated position’ during my yoga classes, I often opt to come into Lotus,” says Ellen O’Brien, Yoga Journal‘s staff writer. “This pose makes me feel grounded and at ease. Yet, at the same time, it’s a fantastic hip opener that really preps for my hips for a practice.”
Teacher tips
These cues will help protect your students from injury and help them have the best experience of the pose:
- Offer supportive props. If your student’s knees hover above the ground, tuck a block or folded blanket under each one to relieve any strain on the knees.
- If you regularly use this pose as a platform for meditation or formal breathing practices, be sure to alternate the cross of the legs midway between your practice.
ADVERTISEMENT
Preparatory and counter poses
Your ability to come into Lotus Pose is enhanced when you practice other hip openers prior to attempting it.
Preparatory poses
Baddha Konasana (Bound Angle Pose)
Janu Sirsasana (Head-of-the-Knee Pose)
Ardha Matsyendrasana (Half Lord of the Fishes Pose)
ADVERTISEMENT
Counter poses
Paschimottanasana (Seated Forward Bend)
Adho Mukha Svanasana (Downward-Facing Dog Pose)
Supta Padangusthasana (Reclining Hand-to-Big-Toe Pose)
ADVERTISEMENT
Anatomy
Padmasana is one of the most advanced of the hip-opening poses. It is a continuation of Sukhasana (Easy Pose), with the hips flexing, abducting, and externally rotating. Your feet are brought up onto your thighs and a bandha is formed where the lower legs cross.
Achieving Lotus safely requires great flexibility in your hips. The hip is a ball-and-socket joint that is designed to rotate. Therefore, you must lengthen the tensor fascia lata and gluteus medius muscles (the internal rotators) to take the rotational forces of this pose into your hips. Never force your feet into Lotus position as this can injure your knees. Take as long as necessary to gain the required flexibility first.
ADVERTISEMENT
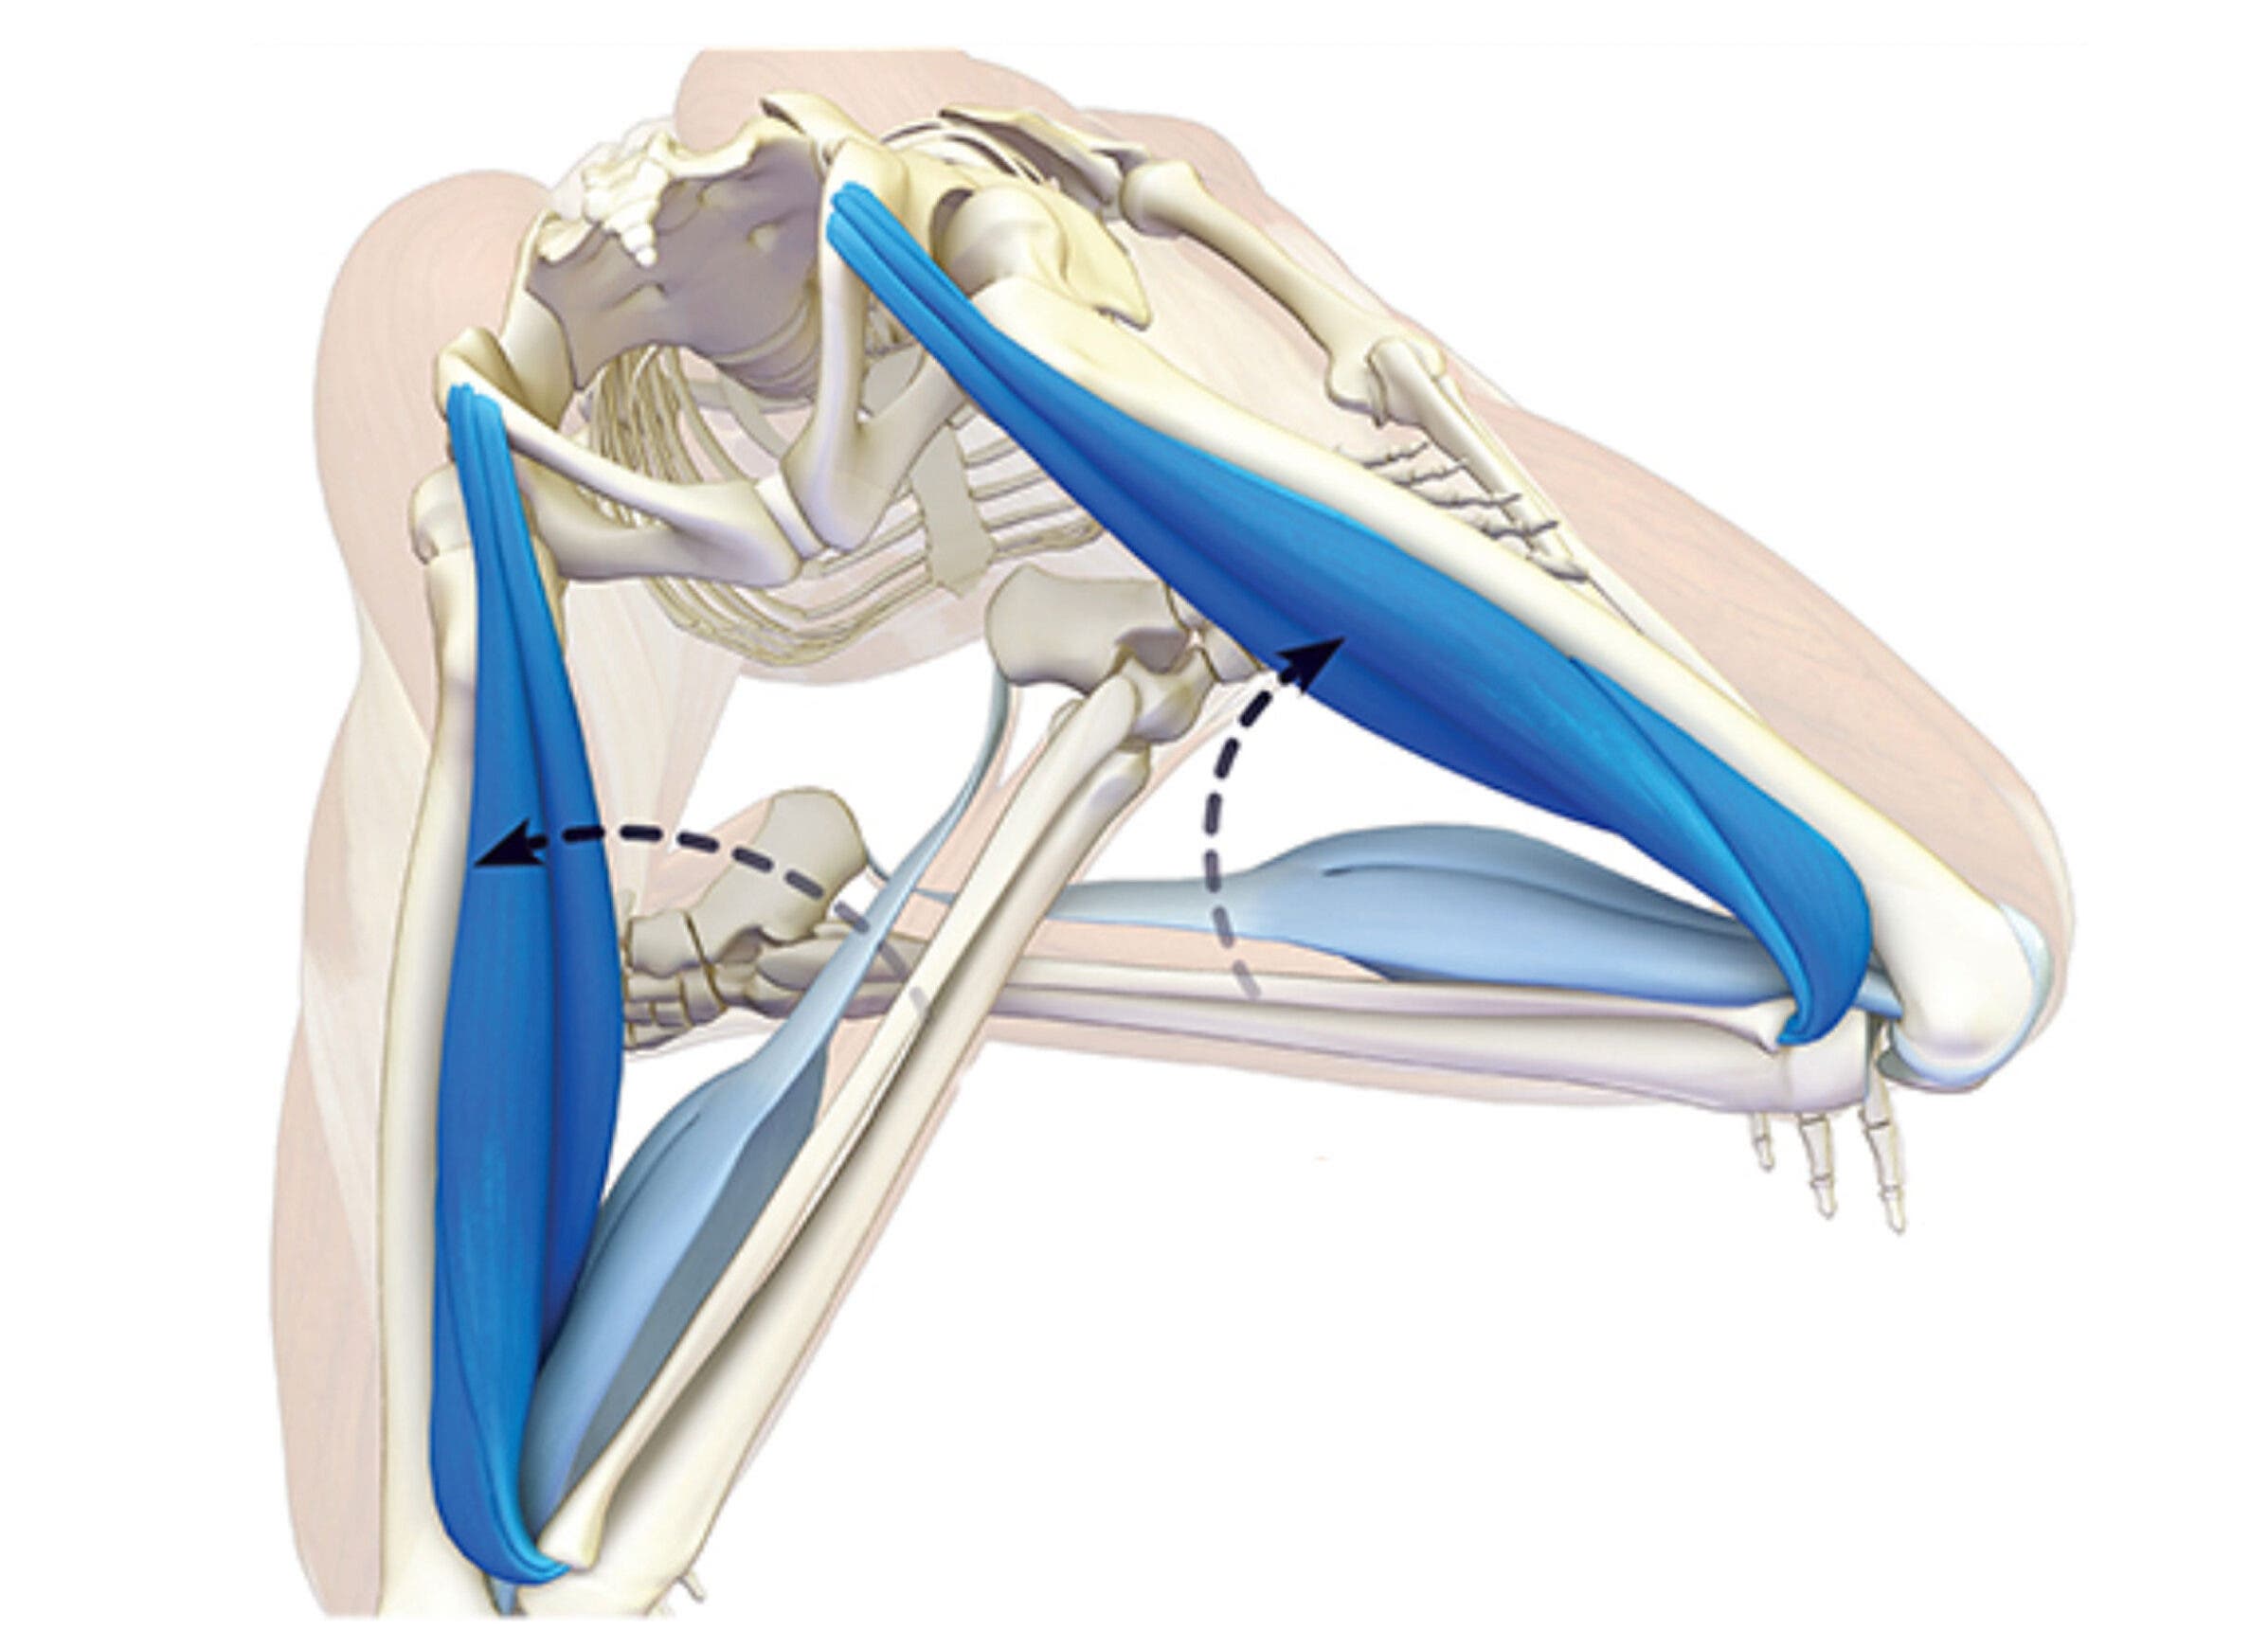
In the drawings below, blue muscles are contracting. The shade of the color represents the force of the stretch and the force of contraction. Darker = stronger.
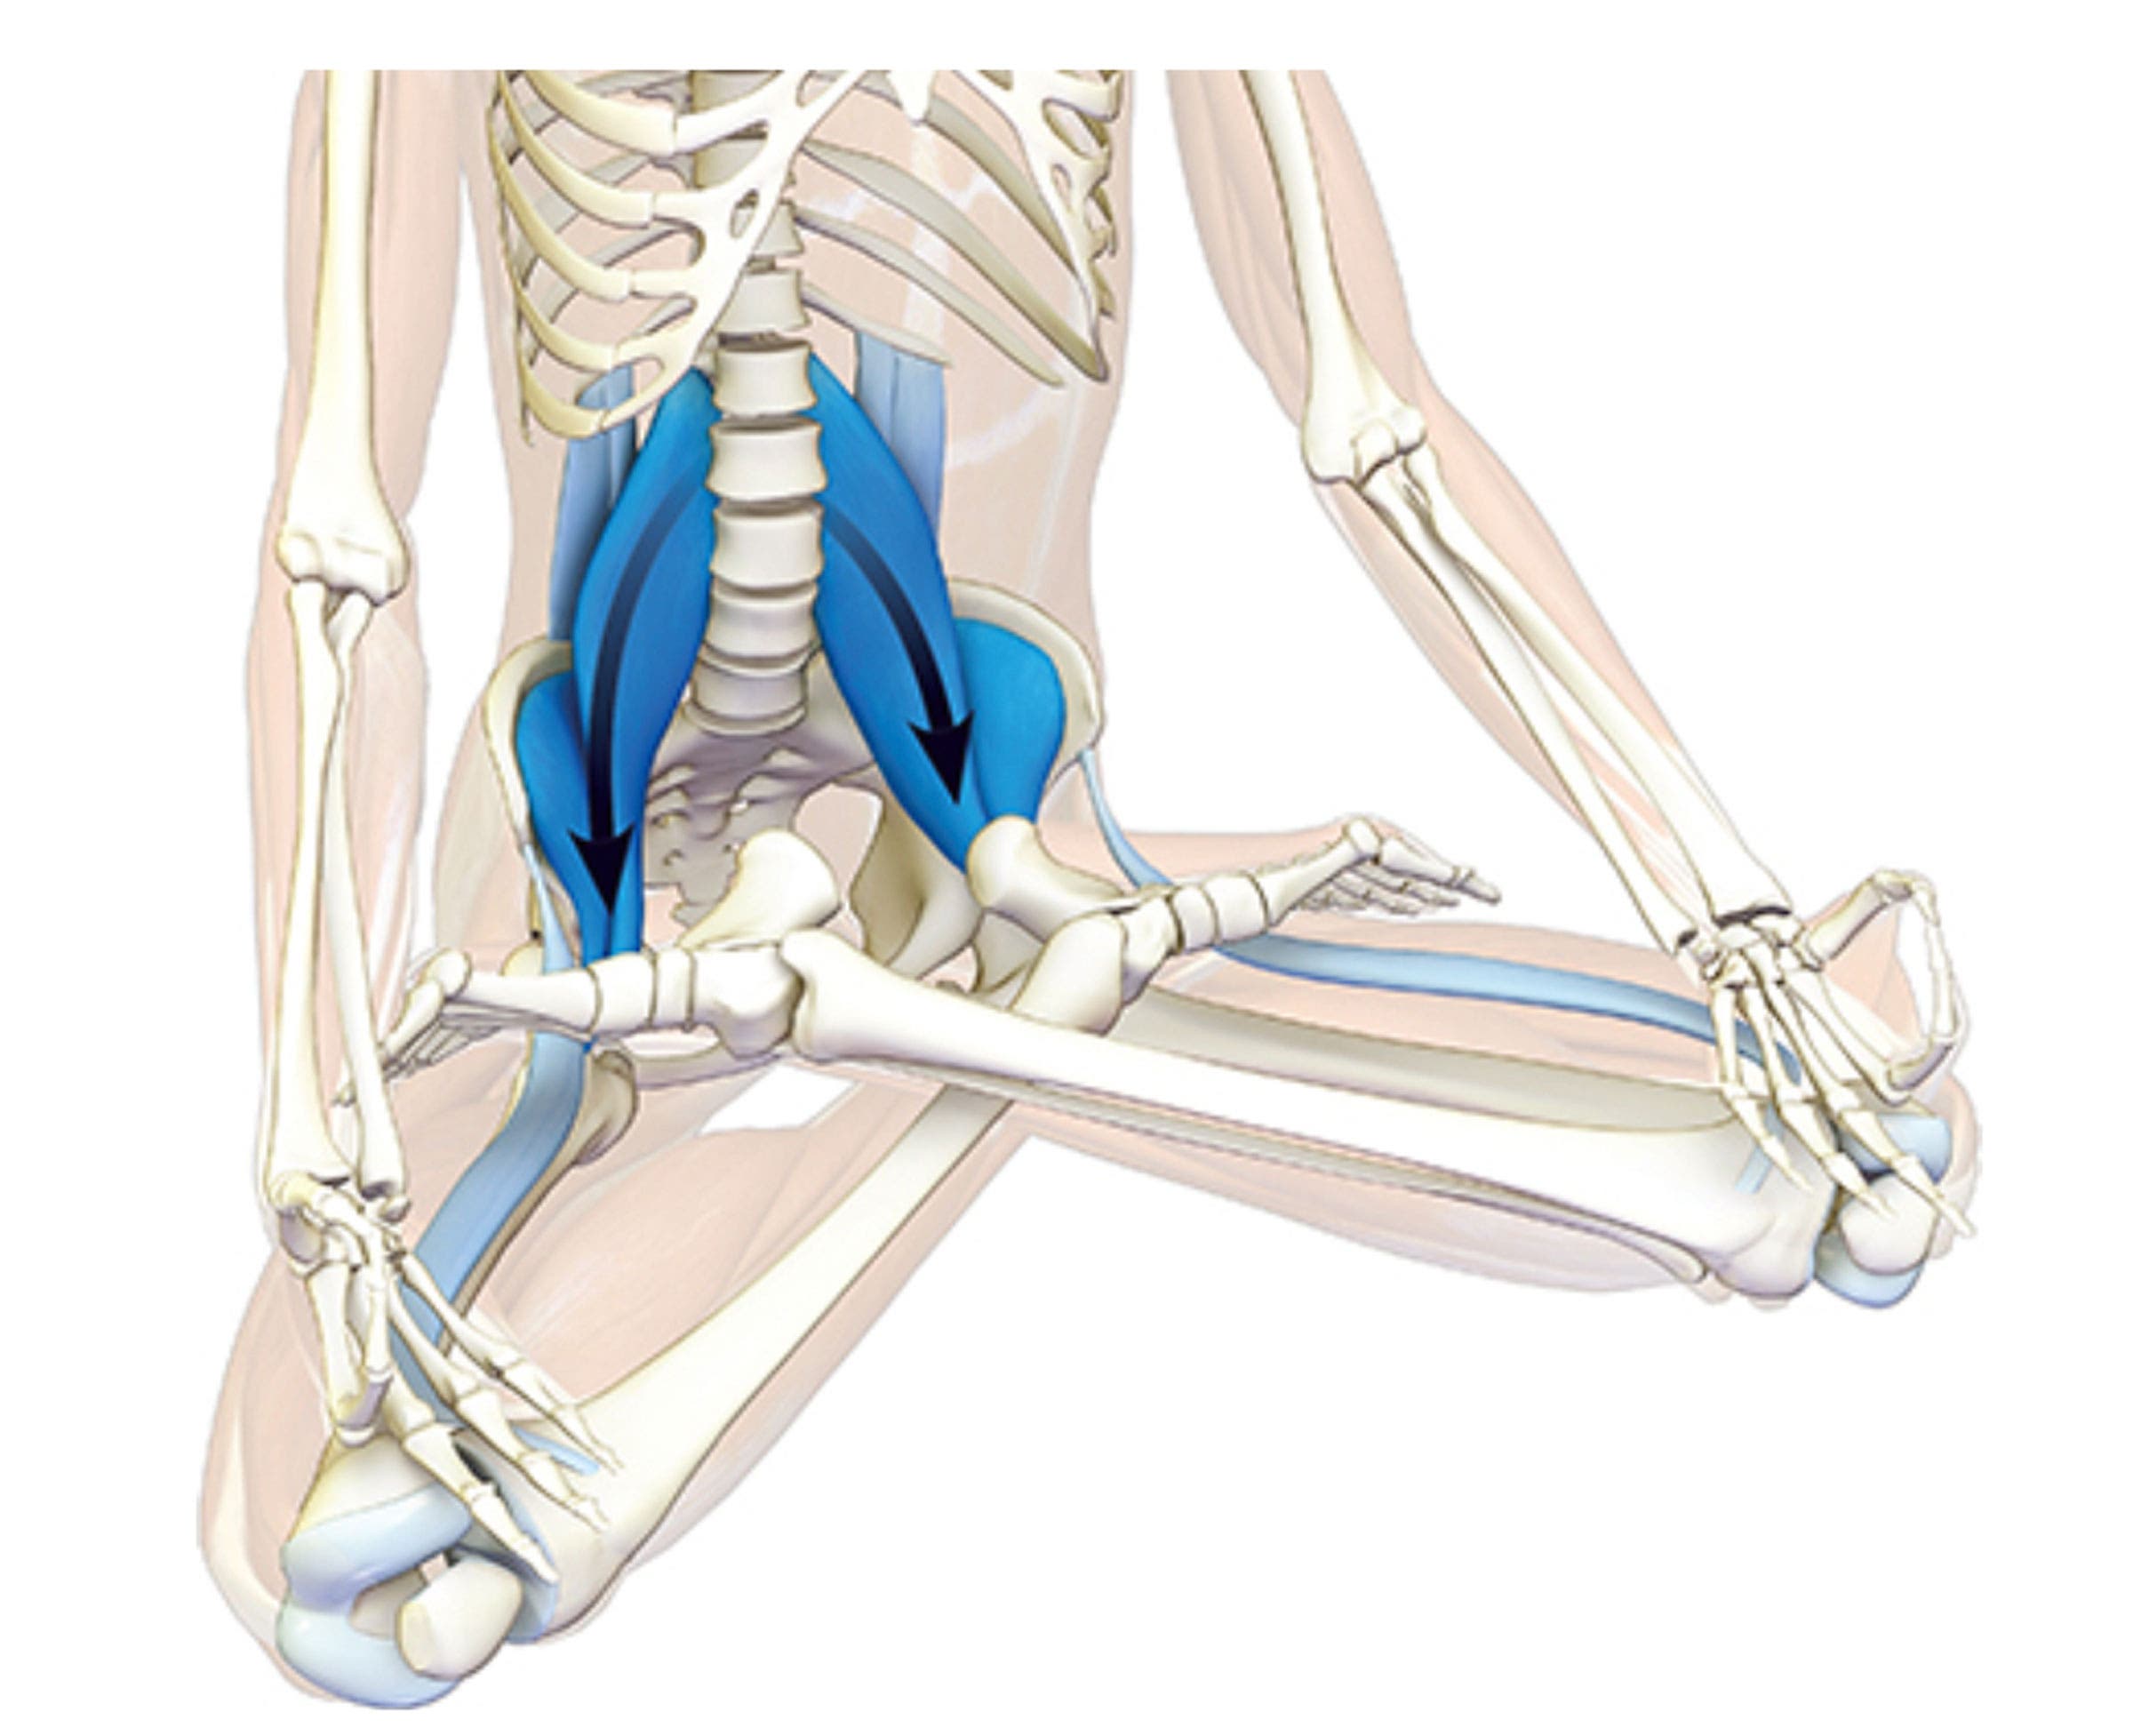
When you sit in Lotus Pose, your hips flex. This happens as a result of engaging the psoas muscle. A cue for this is to press your palms into your thighs and gently attempt to lift up into your hands. This activates the psoas. As a consequence, the pelvis tilts forward and the lumbar spine lifts and extends. The sartorius muscle, running from the anterior superior iliac spine to the inside of the knee, synergizes the tilt of the pelvis while aiding to abduct and externally rotate the hip.
Engage the hamstrings in Lotus Pose. These are muscle stabilizers of the knee (along with the quadriceps). Activating them in a pose like Padmasana helps maintain joint congruency so the knee retains its hinge quality. This helps protect the ligaments and cartilage. Pressing the ball of your foot forward can also be used to stabilize the knee joint, as this activates the gastrocnemius muscle, which by virtue of crossing the knee is also a muscle stabilizer.
Dorsiflex the foot at the ankle to hook it on the thigh. The tibialis anterior activates to create this action. Slightly evert the ankle as well by contracting the peroneus longus and brevis muscles on the lower side of the leg. This protects the ligaments on the outside of the ankle from overstretching.
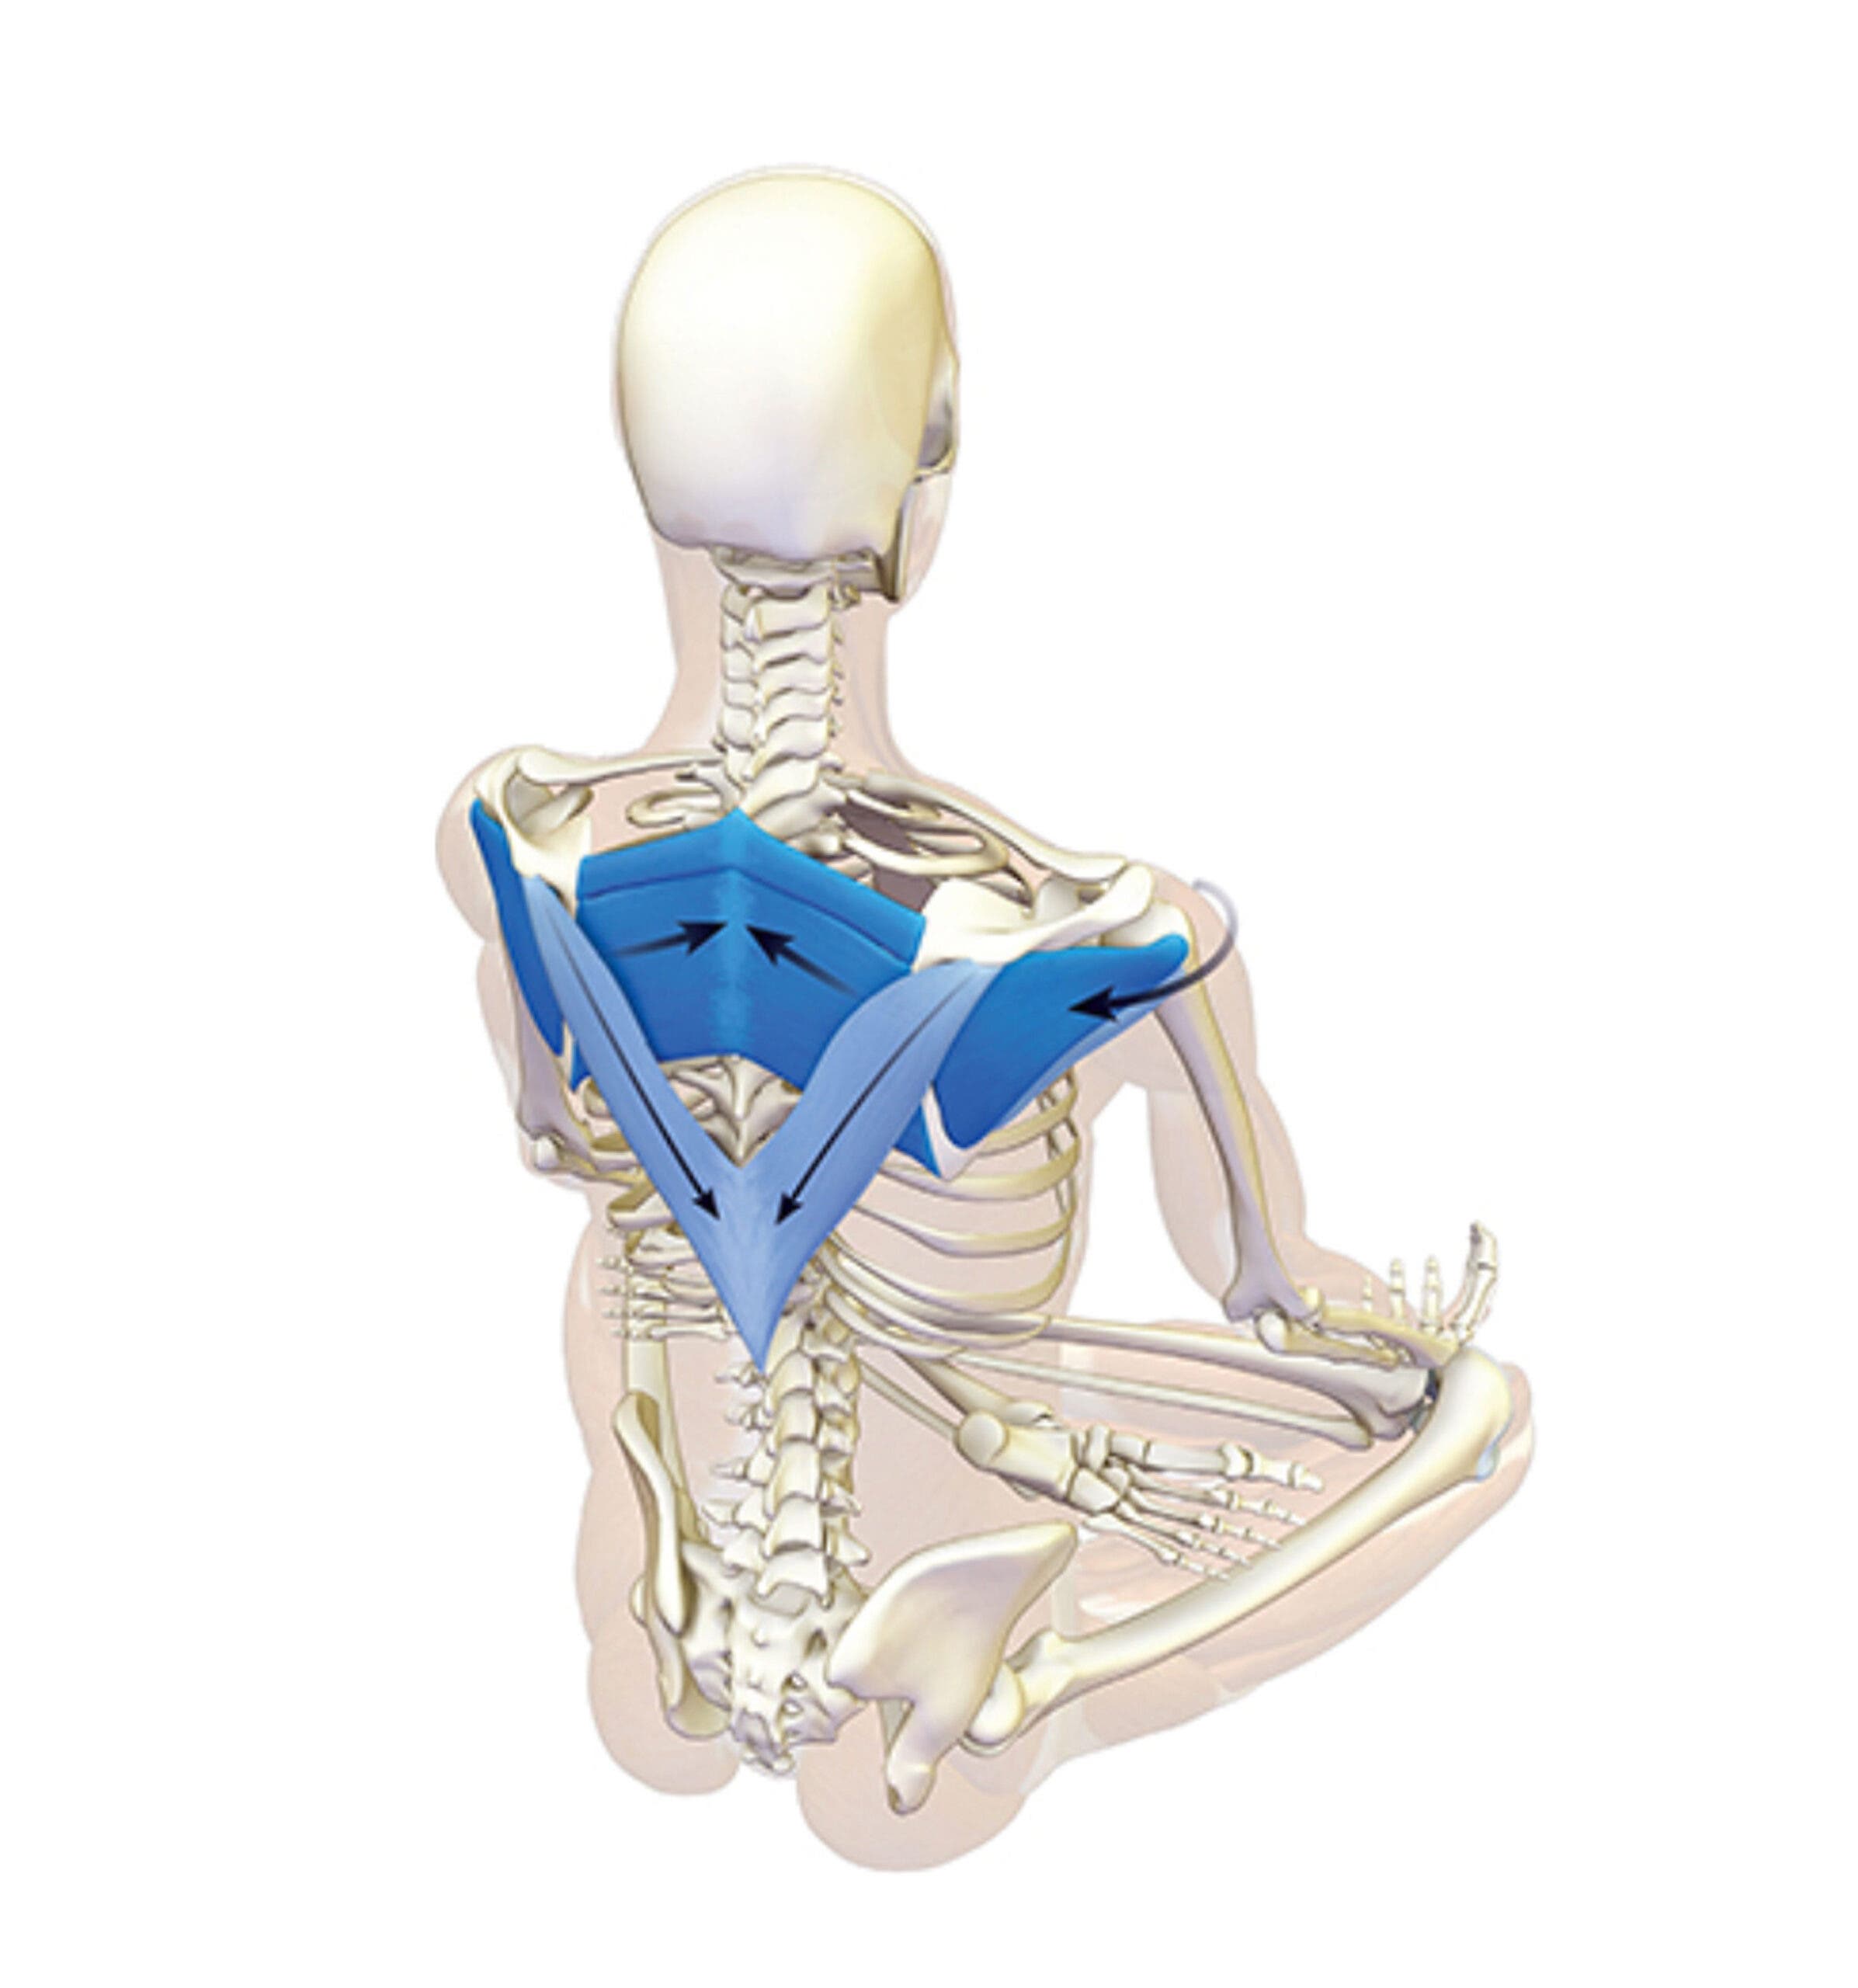
Externally rotate the shoulders by engaging the infraspinatus and teres minor muscles of the rotator cuff. Press your hands into your knees and rotate your hands slightly outward to activate these muscles. Draw your shoulders away from your neck by contracting the lower third of the trapezius. Then adduct the scapulae toward the midline with the rhomboids. Hold the shoulders in this position.
Attempt to roll your shoulders forward. They won’t move, but the force of the action will engage the pectoralis minor and lift the ribcage. Expand your chest out to the sides. This contracts the serratus anterior muscles on the side of the ribcage. Visualize pushing your hands outward into a door frame to feel these muscles contract.
Excerpted with permission from The Key Poses of Yoga and Anatomy for Hip Openers and Forward Bends by Ray Long.
ADVERTISEMENT
Put Lotus Pose into practice
3 Hip-Openers to Prep for Lotus Pose
How to Protect the Knees In Lotus and Related Postures
A Yoga Sequence to Celebrate the Summer Solstice
ADVERTISEMENT
About our contributors
Teacher and model Natasha Rizopoulos is a senior teacher at Down Under Yoga in Boston, where she offers classes and leads 200- and 300-hour teacher trainings. A dedicated Ashtanga practitioner for many years, she became equally as captivated by the precision of the Iyengar system. These two traditions inform her teaching and her dynamic, anatomy-based vinyasa system Align Your Flow. For more information, visit natasharizopoulos.com.
Ray Long is an orthopedic surgeon and the founder of Bandha Yoga, a popular series of yoga anatomy books, and the Daily Bandha, which provides tips and techniques for teaching and practicing safe alignment. Ray graduated from the University of Michigan Medical School and pursued post-graduate training at Cornell University, McGill University, the University of Montreal, and the Florida Orthopedic Institute. He has studied hatha yoga for over 20 years, training extensively with B.K.S. Iyengar and other leading yoga masters, and teaches anatomy workshops at yoga studios around the country.