Updated January 14, 2025 10:07AM
Get Fired Up to Fly
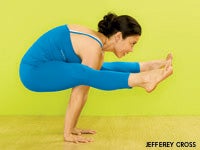
Bring a sense of adventure and engage your whole body to float like a firefly.
Yoga Journal MASTER CLASS JUNE 09
The arm balance Tittibhasana provides a fun opportunity to explore both physical and mental integration. Also called Firefly Pose, this asana requires you to balance oppositional forces: It invites you to support yourself on your hands while you lift your legs like wings, and to soften into the quietness of a forward bend while hovering above the earth and holding on tight.
But you are not alone if the word “fun” doesn’t come to mind when you see this pose. Maybe you think, “That’s crazy!” or “How could I ever do that?” Those two thoughts are actually a perfect starting place to move toward Tittibhasana. The first response signals you to use caution, while the second nudges you to explore. When you combine them, you’re left with a balanced mindset that integrates old ideas with new possibilities. You may think that you need to be totally open hearted to try something new, or completely courageous, or superstrong and stretchy. But you can come as you are, bringing the very body you have today, with equal doses of skepticism and eagerness, right onto the mat with you.
When you begin to investigate Tittibhasana, it might appear that the secret to doing it is core strength. When you look again, it might seem to be all about long hamstrings; perhaps you need robust arms, or maybe just a sense of adventure. Of course, the pose requires you to integrate all of the above. Combining a forward bend, an arm balance, and a hip-opening pose, Tittibhasana is a tall order. But when you get it, you will have the experience of both flying and landing.
ADVERTISEMENT
The preparatory poses in the following sequence will help you understand, both conceptually and physically, how Tittibhasana works. As the sequence builds, you take what you learn from one pose into the next, until you eventually integrate the calmness of Child’s Pose with the victorious strong arms and legs of Vasisthasana, the wide sacrum of Gomukhasana, the flexible wrists of Garudasana, and the open hips of Prasarita Padottanasana.
Finally, the flickering firefly is a reminder that both light and dark, activity and receptivity, are needed to find a workable balance in any given situation. Real integration occurs when two or more energies become interdependent, each one supporting and interacting with the other, leading to a new and alive experience. Integration means never rejecting anything and instead viewing all of your feelings, emotional and physical, as the sacred ingredients for a rich and positive life. A life that flies, flickers, lands, and arrives fresh in every moment.
Balasana (Child’s Pose)
Begin this sequence with a quiet pose to create a calm ground of spacious awareness. Forward bends invite you to drop down into your bones, to let go and rest in appreciation for the support of Mother Earth. When you are able to relax in forward bends, the brain and the sensory organs get a rest. The abdominals get a massage, the hips and shoulders unwind, and the strong, often overused muscles of the back body begin to softly spread and relax.
ADVERTISEMENT
Roll up a towel or a thin blanket and place it on the floor next to you. Sit on your shins with your knees together in Vajrasana (Thunderbolt Pose). Press the heels of your hands down on the very top of your quadriceps, way up high on the leg, where the leg and hip create a crease. Now do an action similar to what cats do when they “knead dough.” This pressing movement will soften your quadriceps, releasing these large, hard-working muscles down onto your femurs, or thighbones. Do this kneading action a few times, moving from the top of the thighs down to the knees and back up. This simple exercise also releases apana, the downward-moving energy of the body, which has an earthy, grounding effect. Notice if you experience any feelings of letting go, a sense of ahhhh.
Now place your rolled-up blanket at the very top of your thighs. Separate your knees about shoulder-distance. Use one hand to lift your abdominal muscles and flesh up, making space for the blanket to tuck right into the tops of your hips. Then hold on to the ends of the blanket, pulling them back as you exhale and fold over into Child’s Pose. If your head does not comfortably touch the ground, place a cushion or block underneath your forehead. Let your shoulders fall forward so your chest hollows and your back rounds. Stay here for several breaths, allowing yourself to settle. Observe your breath. Observe your mind. Let your thoughts come and go, like clouds passing across a big blue sky.
When you feel that the energies of your body, breath, and mind have gathered together, bring your attention to your back. With your mind, place a hundred imaginary nostrils all over your back, from the very bottom of your sacrum all the way up your neck to the base of your skull. Breath by breath, begin to deepen your breathing, imagining that you are drawing breath in and out of those imaginary nostrils. Start at the lower back, eventually breathing all the way to the top, and even breathing into your scalp. Take your time. Try to feel every single part of your back as you do this. If you notice that your mind has strayed, that’s no problem. Just rewind to where you spaced out, and take a fresh start from there. Notice which areas of your back feel alive and which feel shut down.
ADVERTISEMENT
Vasisthasana (Side Plank Pose)
Vasisthasana is a great pose for feeling how the arms and legs (known in yoga as the organs of action) support the spine. From Child’s Pose, slowly roll up to a seated position, feeling every vertebra along the way, as though your mind were walking up the steppingstones of your spine. Maintain the relaxing effect of your Child’s Pose by having your head be the last thing to come up. Remove your blanket and shift onto your hands and knees.
In a tabletop position, touch your inner left wrist with your right index finger. Press the wrist down. From there, use your finger to trace a line of energy up the inner arm, then tuck the tip of that line into the front of your armpit, creating a sense of the chest scooping open. Do the same on the other arm, exploring the relationship of the downward-moving inner wrists and the upward-moving lift in the front of the armpits, as if your inner arms just grew longer. This will come in handy when you start to stand on your hands.
ADVERTISEMENT
Extend your legs and come into Plank Pose. Bring your feet all the way together and engage your legs firmly, as though you were zipping them together. See if you can feel how this strong activity supports your spine. As you stay in the pose for a breath or two, resist the impulse to let your back or your front be the boss of this pose. Move the quads and the hamstrings toward each other and do the same with the abdominal wall and the shoulder blades, so that the abdomen moves up toward the ceiling and the shoulder blades move down the back and into the body.
Shift your weight onto the right hand and the outside of your right foot. Be brave and stack your left foot directly on top of your right foot, as though you were standing in Tadasana. Zip your inner legs together, the way you did in Plank. Lift your right inner thigh up, up, up and notice how that lifts the pelvis. You might even start to get a feeling of lightness.
Let the press of the right hand into the earth create the upward reach of the top hand. Take a look at your left fingers and see what they are doing. If your fingers are widely splayed or hardened like a karate chop, you will counteract all the work you have done in Child’s Pose. If you focus that much effort in the extremities, you will lose the connection with your center. Think of extending up through the tiny spaces between each finger and feel the upward reach originate at your left shoulder blade. You’ve now organized the relationship between your wrists and armpits, inner thighs and spine, front and back body, with a lot of precision and care. See if you can relax your mind here for a few more breaths, letting your attention spread throughout your whole body like a tea bag infusing a cup of hot water. When your mind strays, come back to the sensations of the hand on the floor, the active feet, the full breath. This is how you can develop clarity and sensitivity within a very athletic endeavor.
As you shift back to Plank Pose, try to stay integrated with all the work you’ve just completed so that you can gently replace your left hand on the floor without going plop. If you want to challenge yourself, put your left hand on your waist while you are still in Vasisthasana and keep it there while you come to a one-armed Plank Pose. Then slowly, softly, place your hand on the floor. Come back onto your hands and knees.
ADVERTISEMENT
Gomukhasana (Cow Face Pose), variation
Slide your right leg forward and slip your right knee over your left, crossing the thighs all the way at the top. Sit back, and if your sitting bones don’t easily touch the floor, then sit on a blanket or a yoga block. If your legs just do not cross in this position, then you can straighten the bottom leg or try the pose lying on your back.
With your legs in Gomukhasana, place your thumbs on your outer hip creases and draw them back and down. Do you remember doing this action with the blanket in Child’s Pose? This action grounds your thighs and deepens your breath, creating mental and physical space.
ADVERTISEMENT
Flex your feet as strongly as if you were still in Vasisthasana, letting your soles be wide and bright. Press your hands into the soles of your feet as you press your feet out into your hands. These opposing energies will help you activate your legs. Even when you are seated, your arms and legs are still the workhorses of the body, actively assisting your spine to rise up out of your pelvis.
Extend your arms in front of you. Reach through your fingers sensitively, just as you did in Vasisthasana, while feeling the upper arm bones moving back toward the shoulder blades. Cross your right arm under your left arm and continue this spiral action by wrapping your forearms around each other and pressing your hands together in Garudasana (Eagle Pose). If your hands, wrists, or fingers are contorted in this position, uncross the wrists and place the backs of the hands against each other so the energy moves from the elbows through the fingers.
Remember all those imaginary nostrils on your back? They’re still there! The position of your arms and legs has created a broadness in your back. Send your breath into that broadness. Sit quietly. Notice whether it is possible for you to feel soft in your front—your belly, chest, throat, face, and eyes. Explore how it feels to be soft without feeling diminished.
ADVERTISEMENT
In yoga we often talk about how opening the chest also opens the heart, but in this position the heart-opening quality comes from the spaciousness of the upper back and the tenderness of the front. Sometimes opening means doing less and cultivating receptivity. This pose, which is active in the arms and legs but receptive in the front and back of the torso, creates the conditions for you to explore a sense of opening and resting in “not knowing,” through observation, patience, and an appropriate amount of exertion.
Prasarita Padottanasana (Wide-Legged Standing Forward Bend)
Now the fun really begins! Unwrap your arms. Lean forward slightly and place your hands on the floor in front of you, shifting your weight onto your feet. Begin to walk your hands to the left, lift your hips off the floor, and swivel around on your feet. Keep going until you’ve unwound your legs and—ta da!—you’re standing on your two legs in a wide-straddle forward bend.
The previous pose broadened the back and combined the letting-go quality of Child’s Pose with the active arm and leg work of Vasisthasana. Try to keep all those elements alive as you begin to organize Prasarita Padottanasana.
ADVERTISEMENT
Take a look at your legs, ankles, and feet. Touch each inner heel and nudge it downward. Then draw a line up your inner legs all the way to the groins, just the way you did with your inner wrists and armpits. Tuck your thumbs into your outer hip creases once again, making space in the front of your hips. Now, unfurl your spine like a party favor, bringing it parallel to the floor. Place your fingertips on the floor or on yoga blocks.
Inhale and bend your knees slightly, reaching your pubic bone back between your thighs. This will create a mini-backbend feeling. As you exhale, straighten your legs, inviting the tailbone to drop toward the pubic bone. Repeat this several times. As you inhale, reach your pubic bone up toward the tailbone, and as you exhale, scoop the tailbone a bit toward the pubic bone. This conversation between the tail and pubis creates strength and awareness in the pelvic floor.
On your next exhalation, fold all the way forward over your legs. Your forearms and upper arms will be at a 90-degree angle—much like a Chaturanga Dandasana arm. Let your head dangle, and if it doesn’t touch the ground, place a yoga block under it. Your spine will round slightly here, but lift your shoulder blades away from the floor so that your neck is soft and long. Even though your legs are wide apart, activate the zipper feeling in your inner legs and notice how that might allow your forward bend to deepen.
ADVERTISEMENT
Stay in the forward bend for several breaths. Place imaginary nostrils wherever you feel the need for more energy or less tension. Prasarita Padottanasana is a very active standing pose and, at the same time, a major release. In certain cultures a bow this low indicates tremendous respect, a total letting go of ego. Can you find a way to let go of what you don’t need without collapsing? Can you open to what you do need without grasping?
Now repeat the whole sequence, making sure that you switch sides for Vasisthasana and the Gomukhasana variation. Bring your feet together and come down to the floor for Child’s Pose. Note with interest how the sequence feels different the second time.
Tittibhasana (Firefly Pose)
After you’ve done Prasarita the second time, bend your knees just slightly and heel-toe your feet closer together. When your feet are shoulder-width apart, bend your knees more. Dip your right shoulder under your right knee and take a couple of breaths here. Undip, coming back to your bent-kneed forward bend. Dip the left shoulder under the left knee and breathe here a few times. Undip. Come down into a squatting position for a moment, and rest. If dipping the shoulders felt stressful, then place two yoga blocks directly behind your feet.
ADVERTISEMENT
Come back to the bent-kneed forward bend. Make sure that your feet are no wider than shoulder-distance apart. Dip your right shoulder behind your right knee and place your right hand on the floor below your right shoulder. Do the same on the other side. If you can’t place your palms flat onto the floor, put them on the blocks.
Your arms will be bent in this position, similar to how they were in Prasarita Padottanasana. Snuggle them under your thighs as far as you can, working your legs up your arms toward your shoulders. During this process, your back will naturally begin to round the same way it did in Child’s Pose.
Now you are ready to put weight on your arms. Remember the work of the inner arms: Reach down with the inner wrists and lift up in the inner armpits. Even though your back is curved, your collarbones are still broad, and your head is up. Look out in front of you. Take in the world and breathe.
ADVERTISEMENT
Begin to shift your hips back in space so that you start to sit on your upper arms. At this point, your pelvis might feel massively heavy, and you may be thinking there is definitely no way you are going to lift your legs off the floor or balance on your arms. Let that thought go; come back to your immediate experience. The heavy feeling in this position is partly due to the tucking under of the tailbone. In order to achieve liftoff, you need to rebalance the pelvis by shooting the pubic bone back between the thighs. Don’t even try to lift your legs yet. Just repeat the pelvic tilting and tucking action, the conversation between pubic bone and tailbone that you imprinted in Prasarita Padottanasana.
At a certain point—maybe today, maybe next year—you’ll find the pubic bone reaching back in that mini-backbending action, and your sitting bones will tilt skyward. This will naturally lighten the load, and your pelvis will start to go up. To keep it up, use your legs. Work the oppositional relationship of inner ankles reaching away and groins drawing up and in to the body. Lift your head. See what’s going on in front of you—how amazing that you are doing this! And even if you aren’t doing it yet, it’s amazing that you would even consider trying it, really!
Finishing Your Practice
Lie on your back with your arms outstretched and your knees pulled into your chest. Drop your knees to the left, coming into a supine twist. Stay for five breaths, then do the other side. From there, place your feet flat on the floor, heels in line with sitting bones. With your arms alongside your body, lift into an easy Setu Bandha Sarvangasana (Bridge Pose). After five breaths, roll down. Come back into Bridge, but this time place a block under your sacrum. Draw your knees into your chest, one at a time, then extend both legs straight up to the ceiling for a relaxing variation of Sa-lam-ba Sarvangasana (Supported Shoulderstand). Stay here for one minute, then release your knees to your chest and your feet to the floor, lift your hips, remove the block, and rest in Savasana (Corpse Pose). After Savasana, sit quietly for a few minutes and observe the effects of your practice.
ADVERTISEMENT
You’ve practiced everything you need in order to do Tittibhasana. You’ve incorporated the round back of Balasana, the zipper legs and inner arms of Vasisthasana, the flexible wrists of Garudasana, the wide sacrum of Gomukhasana, the openness of the inner legs and hips of Prasarita Padottanasana. And yet, you may not get up into Tittibhasana right away.
It’s not uncommon for students to get all set up and then grunt, grunt, grunt—nothing happens. So what? Try to let go of any agenda, of how you think things should be, or how you wish you could do this or that. That will only get in your way. Become aware of your process so that you can figure out what your obstacles are and how to transform them. This is how your Tittibhasana will grow and fly. This is how your practice will develop and how you will develop. Maybe it will even be fun.
Before you begin:
Sit in a comfortable cross-legged position. Breathe in for six counts and out for six counts. Repeat this 10 times.
Do three medium-paced Sun Salutations. Do two more Sun Salutations that incorporate Virabhadrasana I and II (Warrior Pose I and II).
A longtime hatha yoga and Tibetan Buddhism practitioner, Cyndi Lee created OM Yoga in 1998. She has written several books
and teaches around the world. For more information, visit omyoga.com.