Published April 7, 2009 03:09PM
Challenging Backbends Are Within Reach
Approach advanced backbends with skillful sequencing, working the key components, and you'll feel the benefits.
There is an old saying in Tibetan Buddhism: “Knowledge must be burned, hammered, and beaten like pure gold. Then one can wear it as an ornament.” This concept applies to yoga as well—you can learn about yoga from your teachers, but it isn’t until you’ve worked with the practice, over time, that it becomes your spiritual “gold.” By engaging with yoga’s teachings in a discerning way, you’ll go deeper into the practice of revealing your true Self. An ideal setting for this deep engagement is at home, on your yoga mat, alone. When you take a class, the sequence may not address your specific needs, but at home you learn to adapt your practice to yourself. In solitude you can learn to accept where you are open and where you are closed. You have freedom to explore in an uninhibited way. You can experiment with the full range of sensations and emotions that arise.
Smart Sequencing
Eka Pada Rajakapotasana (One-Legged King Pigeon Pose) is a great pose for self-practice because there are many ways to prepare for it. To create a safe and effective warm-up for the series of poses presented here, there are a few common home practice guidelines that you can follow.
Choose an opening pose that’s quieting and will start to prepare your body for the final pose. In this case, you might want to try Virasana (Hero Pose) to release the quads; also, the actions in the torso and hips relate to the final pose. A shoulder opener such as Gomukhasana (Cow Face Pose) would be nice, too, since the top arm mimics the arm movement in Eka Pada Rajakapotasana.
ADVERTISEMENT
As you sit in your opening pose, let your breathing become smooth and come into the present moment. Set an intention to connect to something larger than just the physical practice. Then, consider the actions that make up the component parts of Eka Pada Rajakapotasana. Prepare your body by doing poses that warm your shoulders, upper back, hips, and groins. Try asanas that have actions and alignments similar to the ones in the final pose. As you practice, play with the poses and compare the different shoulder and chest openings you’ll get from poses like Salambhasana (Locust Pose), Dhanurasana (Bow Pose), Adho Mukha Vrksasana (Handstand), or Pincha Mayurasana (Forearm Balance).
Deeply explore the poses—be fascinated by them!—and you’ll be better able to access Eka Pada Rajakapotasana. Once you’ve warmed up on your own, try the sequence I’ve created and then move into a gradual cooldown of your own choosing and end with Savasana (Corpse Pose).
For the sequence that follows, you’ll need a chair, a block, and two straps. You’ll also need to keep an open mind. Even if you are stiff or are more of a beginner, there are still parts of the pose that you can do. For example, you can work on opening your upper back by doing the chair backbends, or you can learn Eka Pada Rajakapotasana’s pelvic actions by practicing Ustrasana (Camel Pose). If the poses challenge you, develop an attitude of curiosity; treat your time on the mat as though you were a scientist in a laboratory, and experiment.
Benefits:
- Opens chest and shoulders
- Opens the hips
- Opens the groins
- Uplifts the spirit
- Improves breathing
- Strengthens the hamstrings
Contraindications:
- Low-back injury
- Sacroiliac joint injury
- Sacrum injury
- Shoulder injury
- Neck injury
- Extremely tight hips
Chair Backbend
Deep backbends can cause a tightening of the breath, and, if your upper back isn’t open, your lower back and sacrum will take the brunt of your backbending. By working with props, you can get support to help you relax and fine-tune your breathing. This chair backbend isolates the upper back, which needs to be open for you to move into deeper backbends.
ADVERTISEMENT
Set your chair with its back to a wall, about two feet from the wall. Take a strap and place it around the front legs of the chair; you’ll need it later. Sit backwards on the chair, with your legs through the back opening. Bring your feet to the wall, with your knees bent. Place a second strap, hip-width, around your midthighs.
Lie on the seat of the chair so that the lower edges of your shoulder blades touch the chair’s front edge. Lift your buttocks up and extend them toward your heels to avoid compression in the lumbar region. Now, press your feet into the wall and slide the chair away from the wall until your legs are straight. Holding the back of the chair, press into the seat with your elbows and allow the upper back, head, and neck to completely release.
Keep pressing your feet into the wall, emphasizing the heel and big-toe mound. If your thighs are pressing into the belt, they’re rotating out too much; rotate them in, and you’ll notice that the belt will loosen. Hold the back legs of the chair, and pull on them to open the chest. Move the shoulder blades and upper back deeply into the chest.
ADVERTISEMENT
Work your legs: Strongly press the tops of the thighs down and extend your inner heels to the wall. Now, extend the arms overhead and rotate the upper arms toward the ears. Hold this position for a few long breaths. Then bend the elbows and reach for the ends of the first strap. Draw the elbows in to shoulder distance; keep them from splaying out. Open the chest by drawing the shoulders away from the ears and moving the back ribs and shoulder blades into your body. If you need to support your neck, place a block or some blankets under your head.
To come out, reach for the back of the seat and place the soles of your feet on the floor. Bring your chin to your chest or, if you are more experienced, keep your head back. In either case it’s the lift of the chest that takes you up. Press your feet into the floor and your elbows into the chair; inhale and come up.
Ustrasana (Camel Pose), variation
This wall variation will teach you to continue to move the curve of a backbend up the back. For some people, this is harder than simply practicing Ustrasana.
ADVERTISEMENT
Start on your shins at the wall, with the belt strapped around your midthighs and your knees an inch or two away from the wall, hip-width apart. Place a block between your feet, so that it is touching your big toes and inner heels. Reach your arms straight up the wall, hands shoulder-distance apart, palms on the wall.
Move your outer ankles toward the block and press the inner heels away from it. Extend your big toes straight back and spread all the other toes on your mat. Press the tops of the feet and shinbones firmly down into the mat—this is the foundation of your pose. Ideally, there should be no space between the floor and the shins and feet.
Move the inner thighs away from the wall and the outer thighs toward it. Firm the muscles in the backs of your legs and drop the buttocks flesh away from the lower back. As you take the center of the buttocks toward the wall, move the tops of the thighs away from the wall.
ADVERTISEMENT
Climb the frontal pelvic bones, torso, and arms up the wall. Create length in all sides of the torso. Move the shoulder blades and back ribs into the body. Lift the sternum, but keep the front ribs from jutting forward. As the pelvic bones rise, release the front ribs toward the navel to encourage the backbend to be more even throughout your spine.
Now, bend the elbows and slide the hands down by the chest. Press into the wall with your palms and slowly begin to peel your chest from the wall. Move the chest up, rather than away from, the wall. Stay present with your foundation: Glue your feet and shins down. Keep the frontal pelvic bones to the wall at all times. Stay here for at least five breaths.
Then, keeping those actions in the legs and torso, take your hands off the wall and press the buttocks away from the lumbar area. If you can keep the lower back long, walk your hands down toward the backs of the knees. As you rotate the thighs in, wrap your pelvic bones toward the navel to keep the buttocks and sacrum wide.
ADVERTISEMENT
Save energy to exit the pose mindfully: Press down with your feet and shins, then inhale and lift the chest to come up.
Kapotasana (Pigeon Pose), variation
Begin this variation on your shins, facing away from the wall. Your distance from the wall will depend upon your flexibility and size. In the full pose the arms will straighten and will be parallel to the ground. Set up the belt and block as you did in Ustrasana.
Bring your hands to prayer position, with the base of the thumbs at the bottom of the sternum, fingers together. Pause for a few breaths and connect to the feelings and sensations that emerge. Now, press your feet and shins down to lift the chest up. Open the chest, climb the sternum up, and look for the wall behind you. Do this a few times to warm up. There should be no tension in the lower back; keep the legs active.
ADVERTISEMENT
Draw the outsides of your thighs and hips toward your midline. Notice how this lifts the core of the body and lightens the pose. Continue this line of energy into your sternum.
Keep your hands in prayer position. Without letting the elbows splay out, reach your hands to the wall. Place them shoulder-width apart, fingers pointing down, arms straight. Don’t let your head drop; keep the upper arms in line with the ears and rotate them toward the ears.
If you feel compression in the lower back, come out. This means that your chest and back ribs are not ready to lift the weight off your lumbar spine. Try moving closer to the wall, and don’t take the arms as far down the wall.
Resist the urge to clinch the buttocks. Rotate the legs in to widen the sacrum, as in Ustrasana.
ADVERTISEMENT
Increase the curve in your upper back. Feel as though your chest were suspended from the ceiling. Lift the back ribs up, as the front ribs soften. From the lift of the back ribs, take the sternum higher and let the head release.
To come up, press your shins and feet down, lift the chest, and inhale. Sit on your block in Virasana. Notice if there is any residue in the lower back from this pose. If the pose is done correctly—within your personal physical limitations—there should be none.
Dwi Pada Viparita Dandasana (Two-Legged Inverted Staff Pose), variation
The shoulder position in this pose foreshadows the shoulder alignment you’ll use in Eka Pada Rajakapotasana. You’ll work on opening the shoulders here in an integrated way—without compromising the ribs and torso. Don’t be obsessed with going deeper than is comfortable. Instead, focus on the process of expanding with your breath.
ADVERTISEMENT
Begin by lying down, with the top of your head touching the wall for the first stage of the pose. Place your feet two inches in front of your sitting bones. Put your hands flat on the floor, beside your ears. Rotate your thighs in from the top of your inner thighs, not from the knees. If this is hard to access, use a belt as you did in Ustrasana.
Press your feet down and lift into Setu Bandha Sarvangasana (Bridge Pose). Keep your knees directly over your heels. Extend the buttocks toward the backs of the knees. Lift the center of the buttocks up. Press your hands into the floor to take the curve up your back. Continue to lift and open the chest.
Inhale and come to the top of your head. Move your wrists, forearms, and elbows to the wall. Form a right angle, with the hands under the elbows and forearms parallel to each other. Lift the arm bones up and put them deeper into the shoulder sockets. Use the contact with the wall to move the back ribs into the body. Take a few breaths here.
ADVERTISEMENT
For the second stage of the pose, bring your elbows to the floor against the wall. Clasp your hands together, with the base of your thumbs touching the back of your head. Keep the elbows at shoulder width. Press down with your forearms and elbows to lift the chest. Rotate the upper arms in. You can work with your head down or lifted.
Resist forcing your chest toward the wall. You want height in the chest and length between the elbow and shoulder. When the shoulders are open, the chest will naturally and safely move to the wall.
To keep the lower back from jamming, resist taking the buttocks toward the wall. Creating space in the back of the body is more important then getting the chest to the wall. As the back ribs move into the chest, the buttocks move away.
Without collapsing, put the sequence in reverse. Bring your hands to the floor. Press down with your hands and feet, and lift the head up. Tuck the chin. Lower down slowly.
ADVERTISEMENT
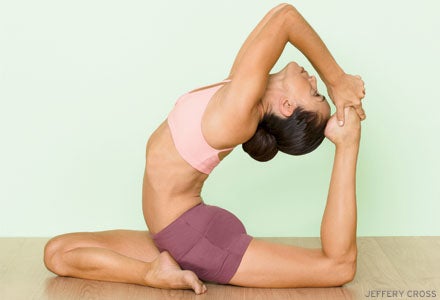
Eka Pada Rajakapotasana (One-Legged King Pigeon Pose), variation)
Eka Pada Rajakapotasana is aesthetically gorgeous and physically exhilarating. As you do this pose, honor your body’s messages and approach it as a process to learn from, not as a goal to achieve. As you work this way, you’ll be practicing your own alchemy, turning asana instructions into yogic gold.
If you can’t do the final variation, there are several ways to experiment. You can keep the back leg straight or press your ankle or shin into a chair behind you. When you see what’s most challenging for you, use that to inform your next practice, so you can build a preparatory sequence to make the pose more accessible.
ADVERTISEMENT
Keep the hips level and the torso upright in all variations of this pose. Distortion in the hips during backbending is not safe for your lower back or sacroiliac joint. You can use a blanket to level the hips. Place it under your front sitting bone.
For the first stage of the pose, make a small loop with a belt around your left ankle; hold it with your left hand. Take the right leg forward into Pigeon Pose. Have the right heel in front of the left pelvic bone. The right foot is relaxed, not pointed or flexed. The knee should be slightly to the right of your navel.
Reach your left leg straight back; keep the foot in line with the hip. Curl the toes under and lift your knee, extending it away from the thigh to lengthen the groins. Rotate the left leg in to keep the sacrum wide; be on the center of the thigh. Press the top of the foot down to keep the knee lifted as you square and level your hips: Bring the right hip back and left hip forward.
ADVERTISEMENT
Next, point the foot, spread your toes down, especially the baby toe. Draw the outer ankle in and extend the big toe straight back.
Come up onto your fingertips. Bring the left side of the body forward until the shoulders and torso are even. As you press down into the sitting bones, lift the navel and sternum. Now peel your frontal pelvic bones up and away from the right thigh; do not let them pitch forward. Soften the front ribs. If you can’t sit upright with a level pelvis, use a chair in front, with your elbows on the seat for support.
Reach the left arm up until it’s straight and the belt is taut. Take a few breaths here. Keep an even weight in the right sitting bone and the center of left thigh.
ADVERTISEMENT
Next reach for the belt with both hands. Use the belt to sit upright. As the elbows and arms lift up, move the back ribs into the chest. Lift the sternum and chest to take the gaze up. Use your breath to cultivate the uplifting energy that comes from opening the chest and upper back. Unwind out of the pose slowly.
To go further, start in Pigeon with the right leg forward. Adjust the hips and legs as above. Hold the belt, looped around the left ankle, with your left hand; keep the right hand down for support.
Extend the left knee away from the hip, then bend the knee. Keep the shinbone vertical; don’t let it tilt. Point the foot up. Press down with your sitting bones and lift the torso and sternum. Keep the shoulders level and even with the front of your mat.
Before you continue, take a breath and reconnect. Is this as far as you should go today? Don’t be overpowered by your ego to go beyond your ability.
To move on, take the belt with both hands and bend your elbows. Keep the elbows from splaying and rotate the upper arms in. Pause.
ADVERTISEMENT
Keep your breath smooth and slowly walk your hands down the belt, opening your chest. Lift the torso and elbows. Take your time. If you feel the breath stiffen, back out. Listen. Go only as far as you can and still breathe freely.
You are done using the belt when the foot and hands meet—but do not distort your alignment to achieve this. Be humble and compassionate with yourself.
Take your time and hold these poses for as long as you need. Consider repeating each pose if you’d like to go deeper. Use cooling poses like forward bends and twists to wind down, and leave time for a long Savasana (Corpse Pose). Find contentment with your work. Let any negativity release with your exhalations.