Updated July 3, 2024 12:49PM
10 Yoga Block Stretches That Will “Deepen” Your Practice
Craving more intensity? First ask yourself why.
(Photo: Renee Choi)
You’ve probably heard yoga teachers talk about “deepening into the pose.” There are a lot of different approaches as to how to do this, and many of them include yoga block stretches.
But to truly understand what “deepening” means, we need to approach the word holistically. Although you can make the physical expression of almost any posture more physically challenging, the practice of yoga goes beyond our physical bodies.
Yoga is a practice of deepening our entire experience, which can be felt in more ways than in our muscles and fascia. Deepening into an experience means being aware of and accepting whatever is happening for you in the moment without identifying, or confusing your sense of self, with what is—or is not—actually taking place.
How to “Deepen” into a Yoga Pose
When you consider “deepening” your physical practice, first be curious about why you want to intensify a posture. Then be realistic about your body’s abilities. To take a pose to a new depth requires that you not force or rush it. You wouldn’t go straight from the shallow end of a swimming pool to deep-sea diving. Approach your yoga practice in the same way.
ADVERTISEMENT
If you are still working on reaching your toes in Seated Forward Bend (Paschimottanasana), straining to reach a yoga block in front of your feet is not in your best interest. In this instance, it’s better to practice deepening your understanding of your own physical abilities. Your flexibility is constantly changing and evolving, just as you are always changing and evolving. Deepening your yoga practice sometimes means deepening your ability to practice patience and self-control.
As you explore different approaches to poses, it can be easy to place judgments or labels on yourself, but it’s essential to differentiate your identity from your thoughts about yourself. You are not what exists in your mind or your aesthetic performance of any yoga pose. As you find yourself in familiar poses, pay attention to your breath and any subtle sensations in your body. If you find yourself holding your breath or tensing your body, it may be a sign that you need to lessen the intensity.
In any pose, you’re deepening not only your stretch, you’re deepening your experience of yourself.
10 Yoga Block Stretches to “Deepen” Your Practice
When you’re ready to take a pose a little farther than in the past and feel it in a different way, yoga blocks can assist you. Below are 10 common yoga poses and ways that you can use blocks as tools to intensify the physical stretch you experience.
ADVERTISEMENT
As you practice these yoga block stretches, continue to be aware of your breath and your body. Remember, your objective with yoga is to ensure the safety and the longevity of your practice.
You may find that not all of the following variations meet your current needs. Take what works for you. Keep your mind open and your ego off the mat.
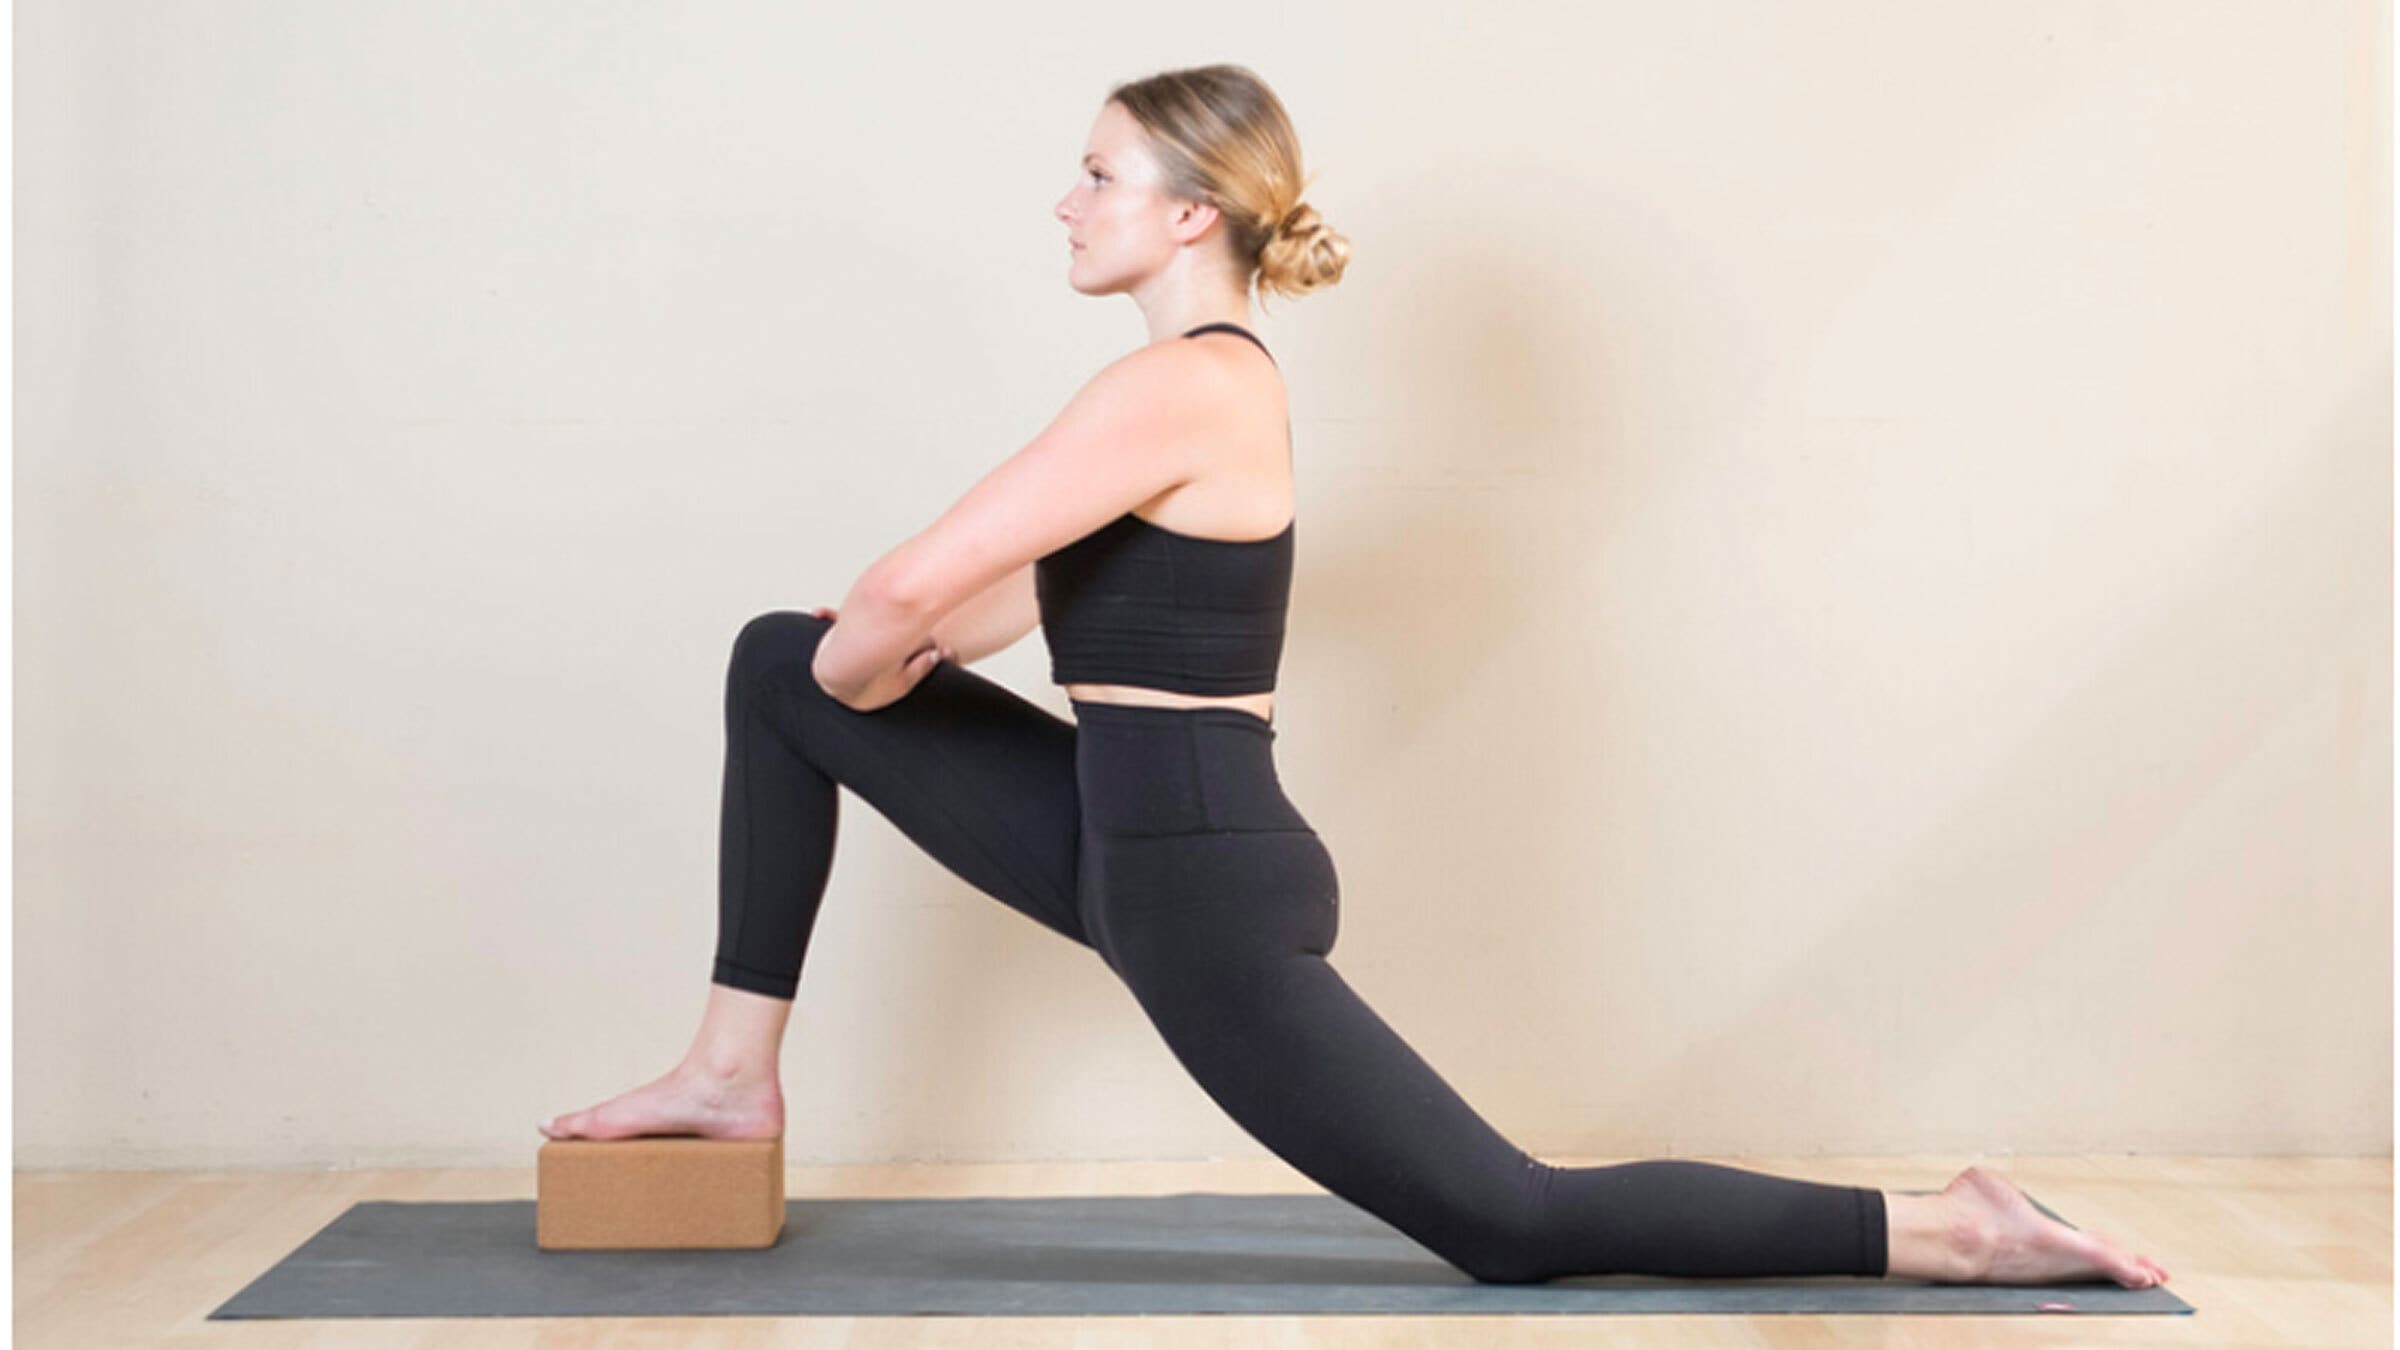
1. Low Lunge (Anjaneyasana)
Block benefit: Placing a block beneath your front foot intensifies the stretch in the psoas (hip flexor), hamstrings, and quadriceps.
How to: Start in Low Lunge with your hands framing your front foot. Slide a block on the lowest level beneath your front foot, making sure it supports your entire foot. Press down through your big toe mound. Interlace your hands on top of your front thigh and press the thigh muscles away from your hip crease as you draw your lower front ribs toward the spine. Stack your shoulders over your hips. To deepen the stretch even more, bend your knee more. Draw your pubic bone toward your navel to prevent sagging in your lower back. Breathe. Repeat on the other side.
ADVERTISEMENT
2. Lizard Pose (Utthan Pristhasana)
Block benefit: Taking a block beneath your back thigh lifts your knee, which helps your thigh relax, and, in turn, allows for deeper hip opening.
How to: Start in Downward Dog and step your right foot outside your right hand. Start with a block on the lowest level beneath your back thigh. The exact level and placement of the block will depend on what feels comfortable for you. You can tilt the block to match the slope of your back thigh.) Draw your right knee toward your right upper arm. To intensify the stretch, come onto your forearms, whether on the mat or blocks. Allow your chest to release toward the mat in Lizard Pose. Breathe. Repeat on the other side.
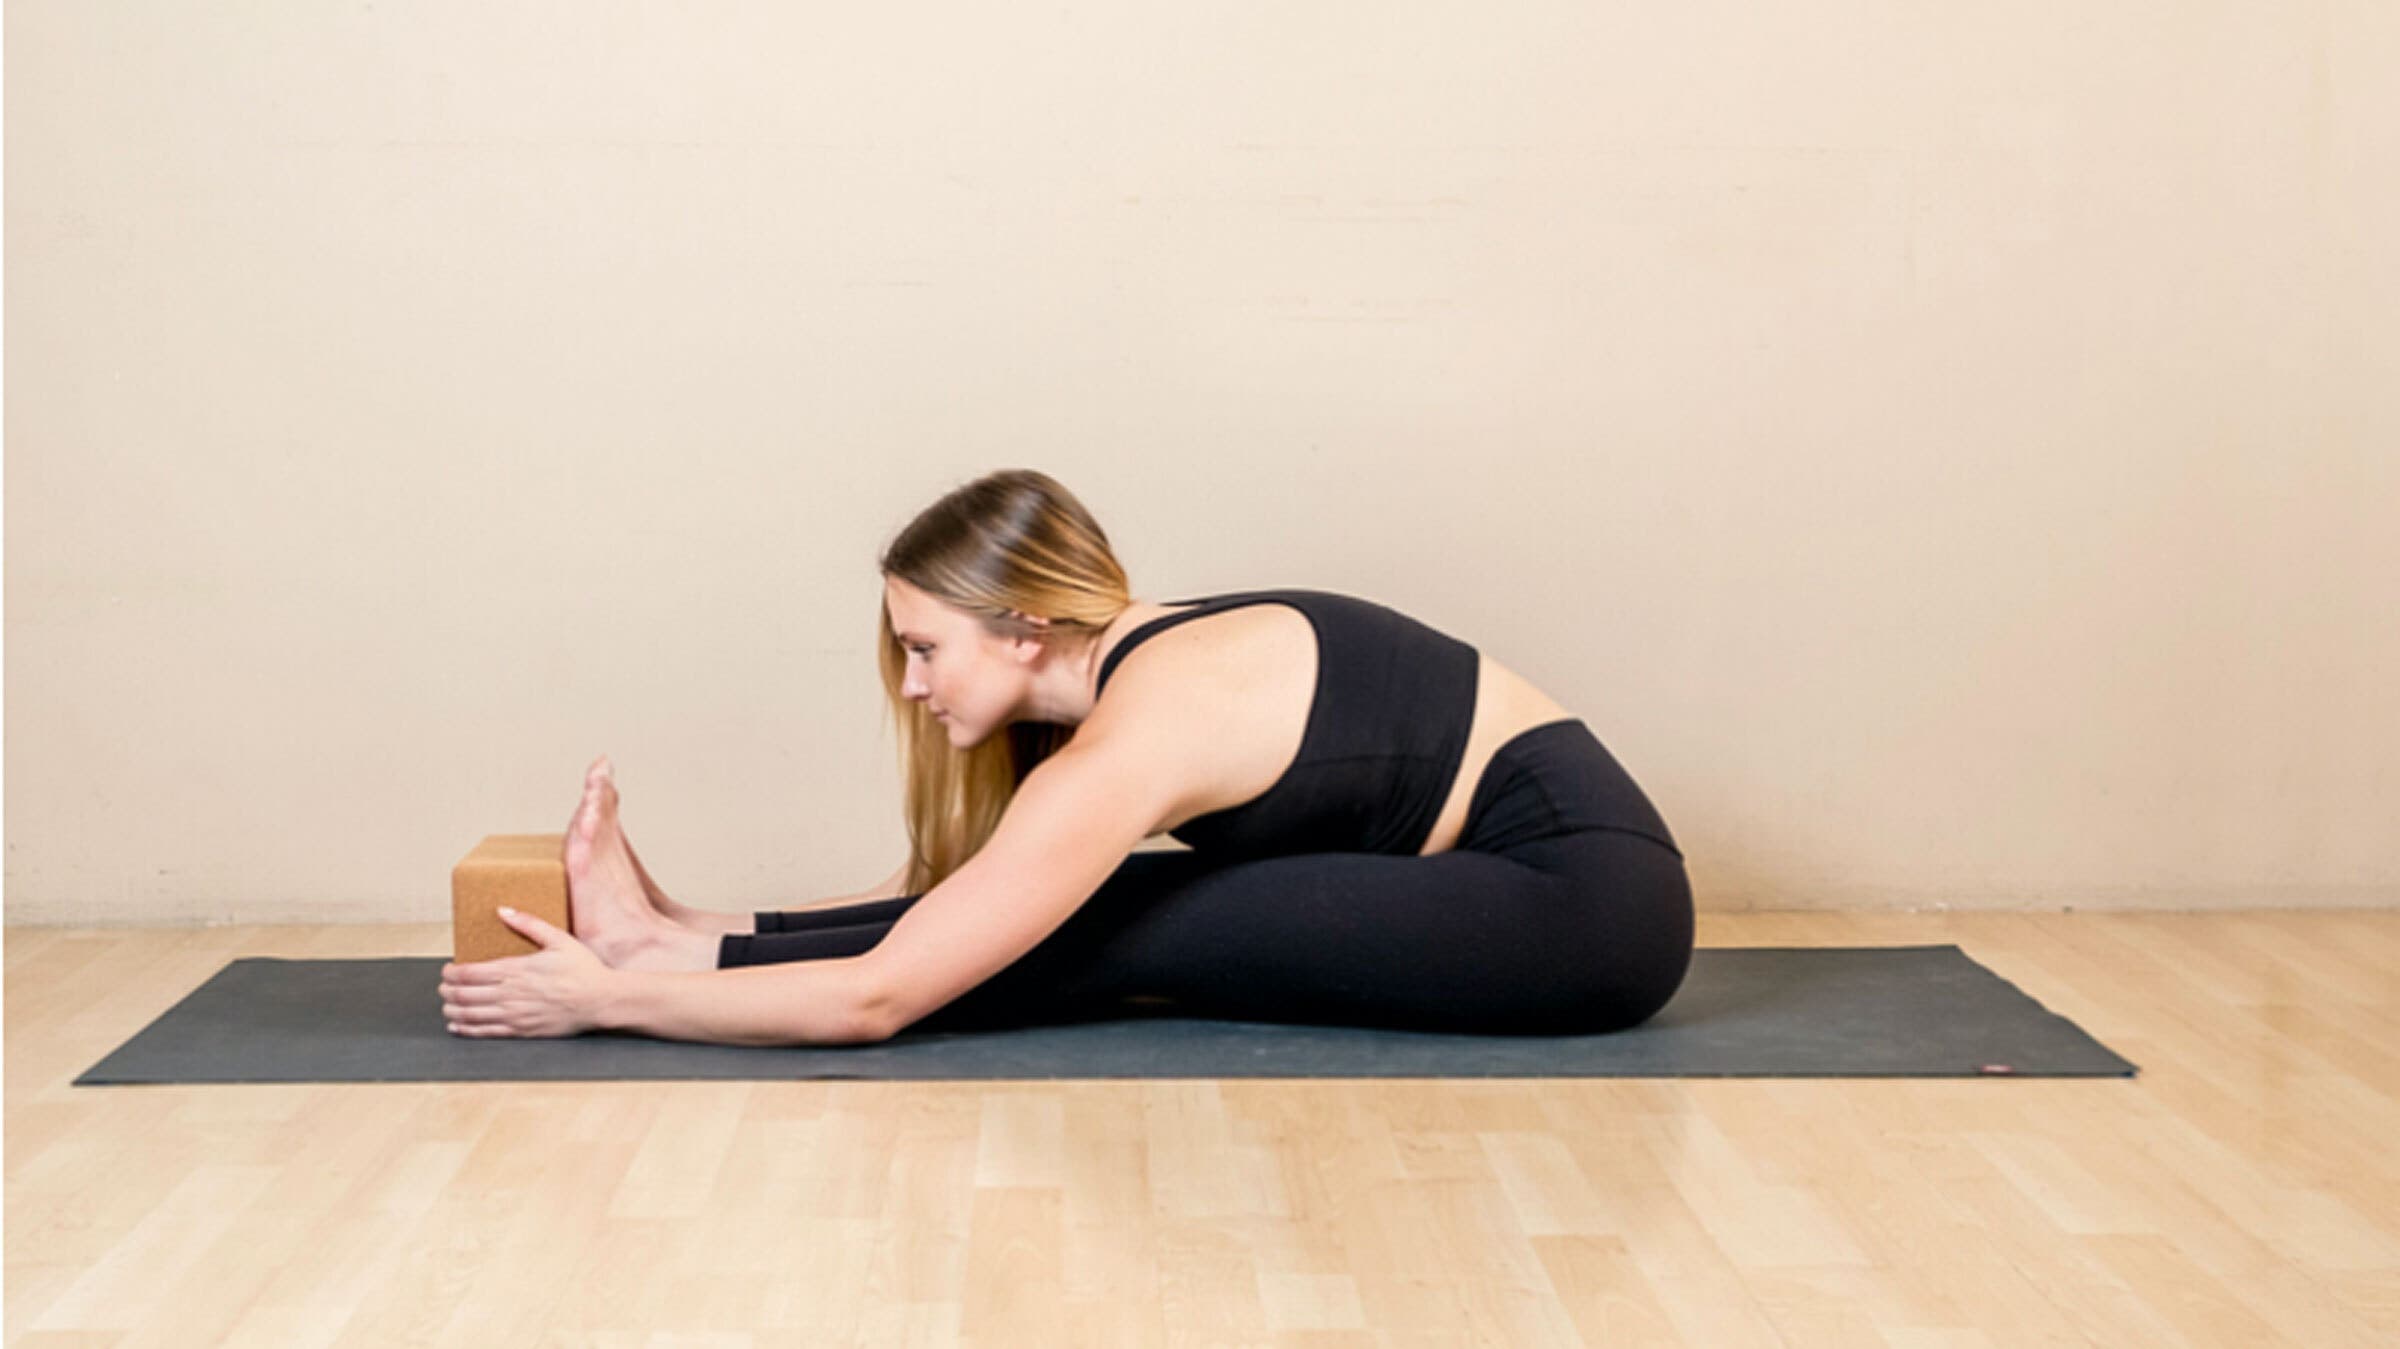
3. Seated Forward Bend (Paschimottanasana)
Block benefit: Using a yoga block in front of your feet and reaching for it creates a more intense hamstring stretch. Holding onto the block also strengthens your arms and helps you lengthen your back body as you reach forward.
How to: Sit with your legs extended straight in front of you and your feet flexed. If you have tight hip flexors, sit on the edge of a folded blanket. Place a block in front of your feet. Sit tall through the spine and hinge at your hips as you reach your chest toward your toes in Seated Forward Bend. Press your heels and hamstrings into the mat. When you cannot reach any farther, continue to hold the outer edges of the block with your hands. For a more intense stretch, gaze toward the block and keep your spine elongated. For a more restorative stretch, round through your upper, middle, and lower back as you release your chin toward your chest.
ADVERTISEMENT
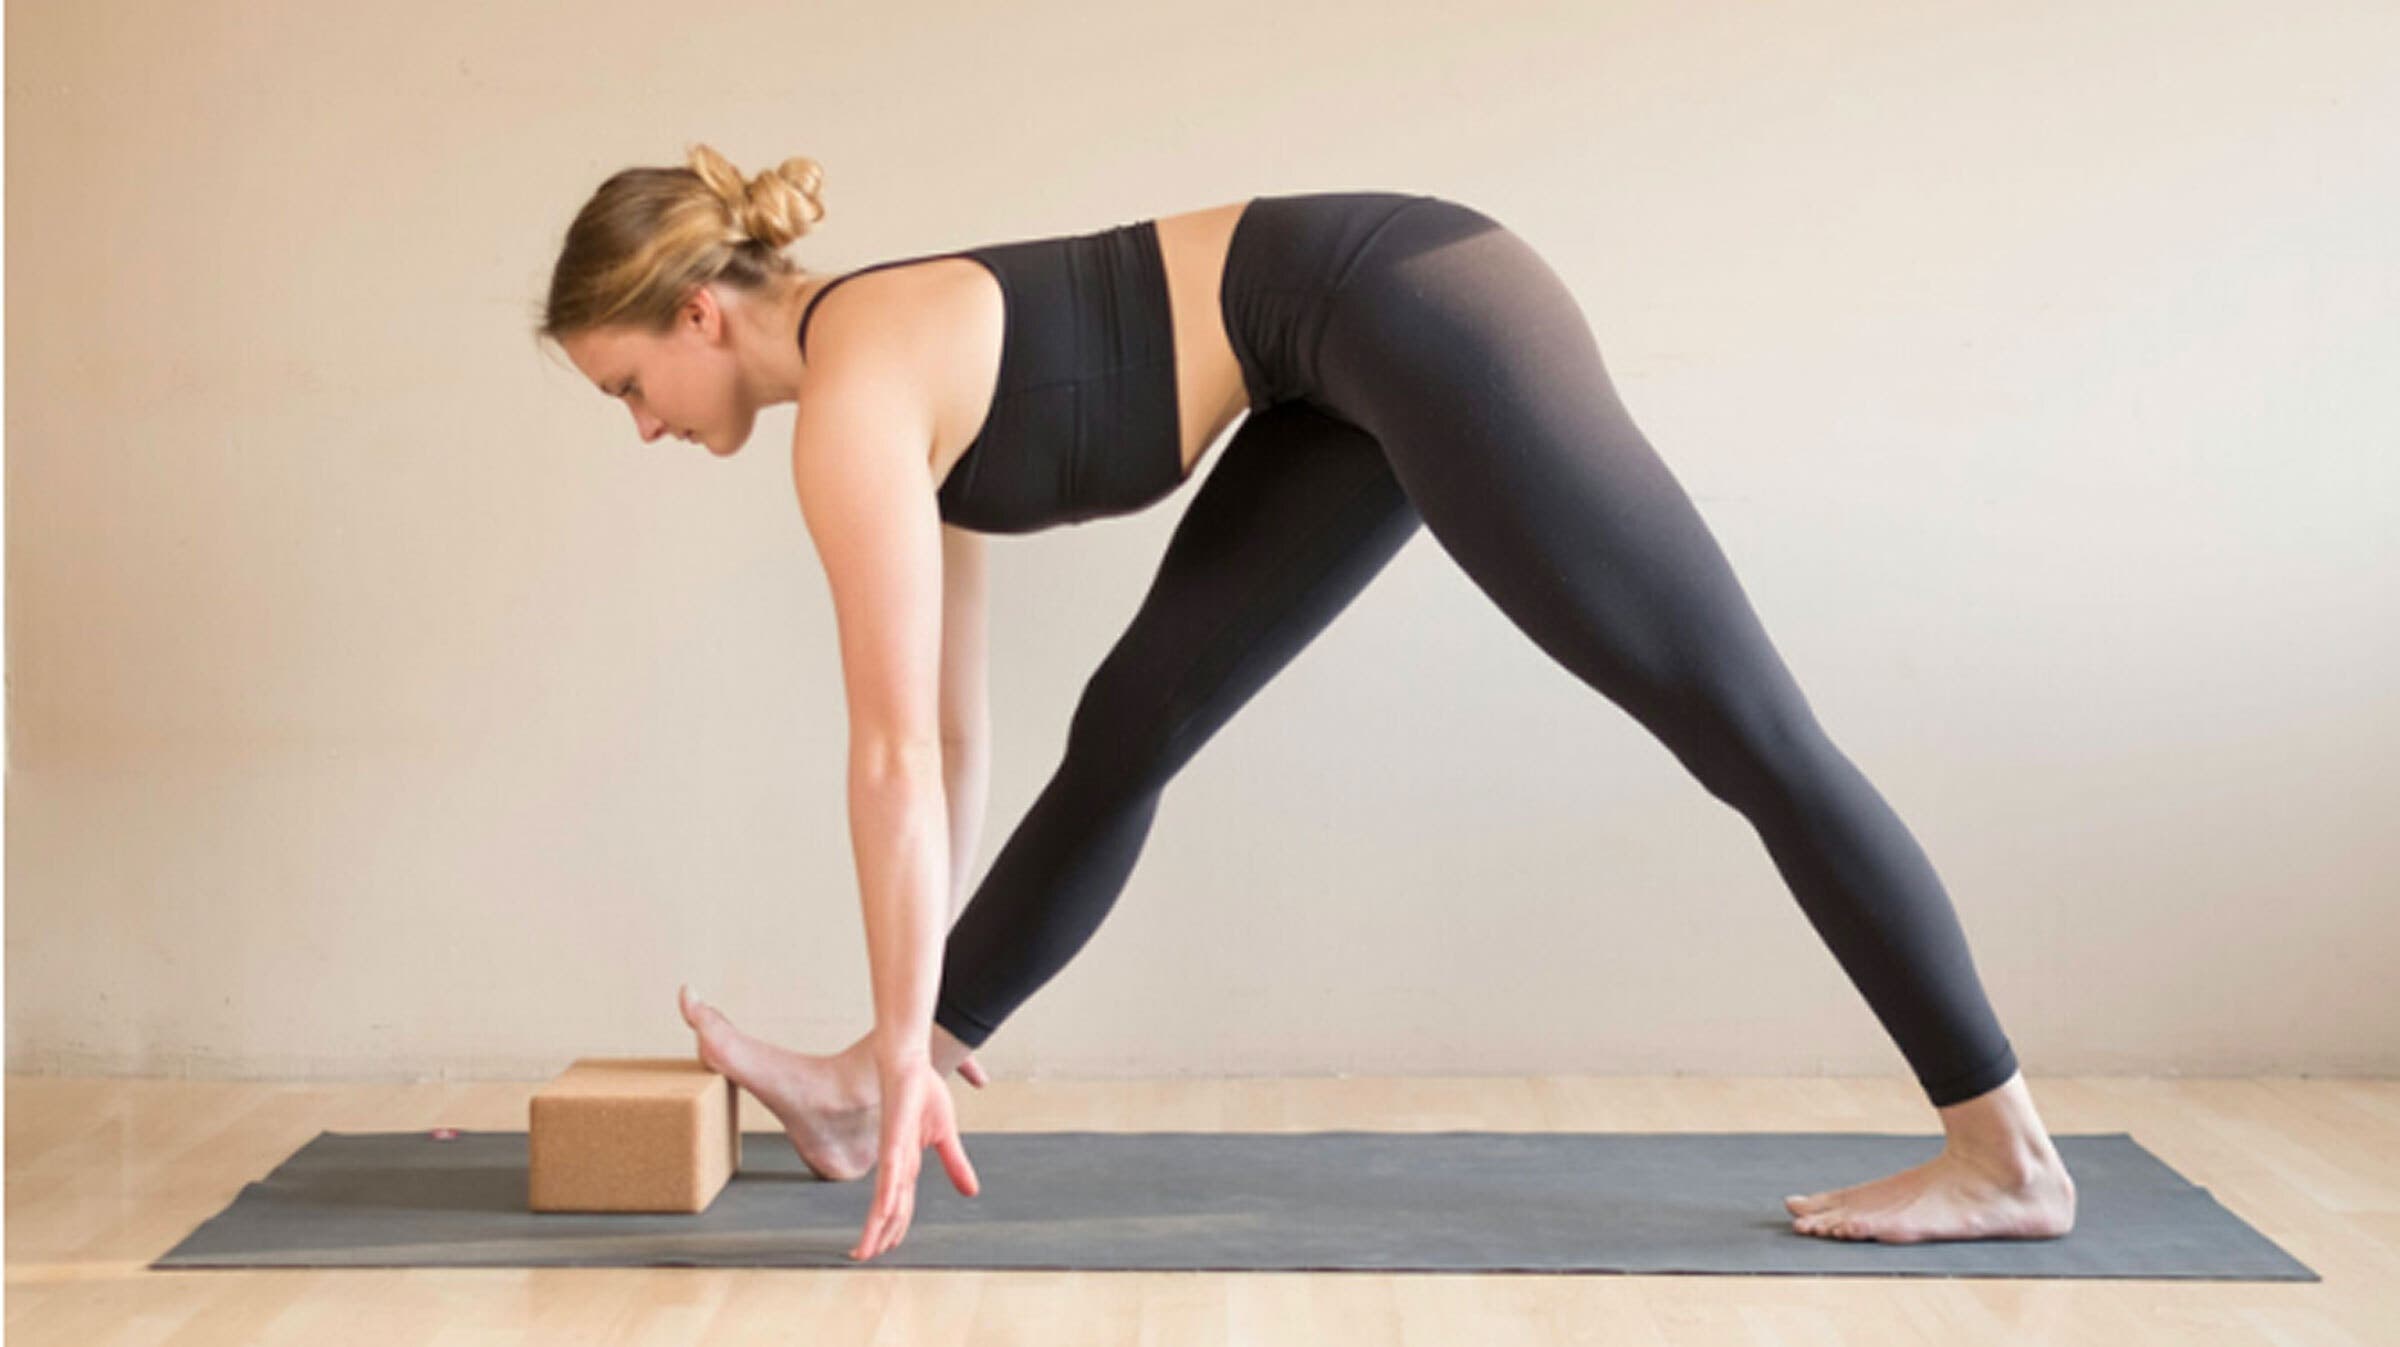
4. Pyramid Pose (Parsvottanasana)
Block benefit: Resting your front foot against a block intensifies the stretch along the back of that leg.
How to: Start in Pyramid Pose. Flex your front foot, bringing your toes toward your shin. Place a block on the lowest height beneath the ball of your foot. Bring your fingertips directly beneath your shoulders on the mat or blocks. Inhale and lift halfway as you press through the ball of your front foot, contracting your calf muscles. Exhale as you fold forward again and draw your front toes toward your shin to release and stretch your calf muscles. Repeat on the other side.
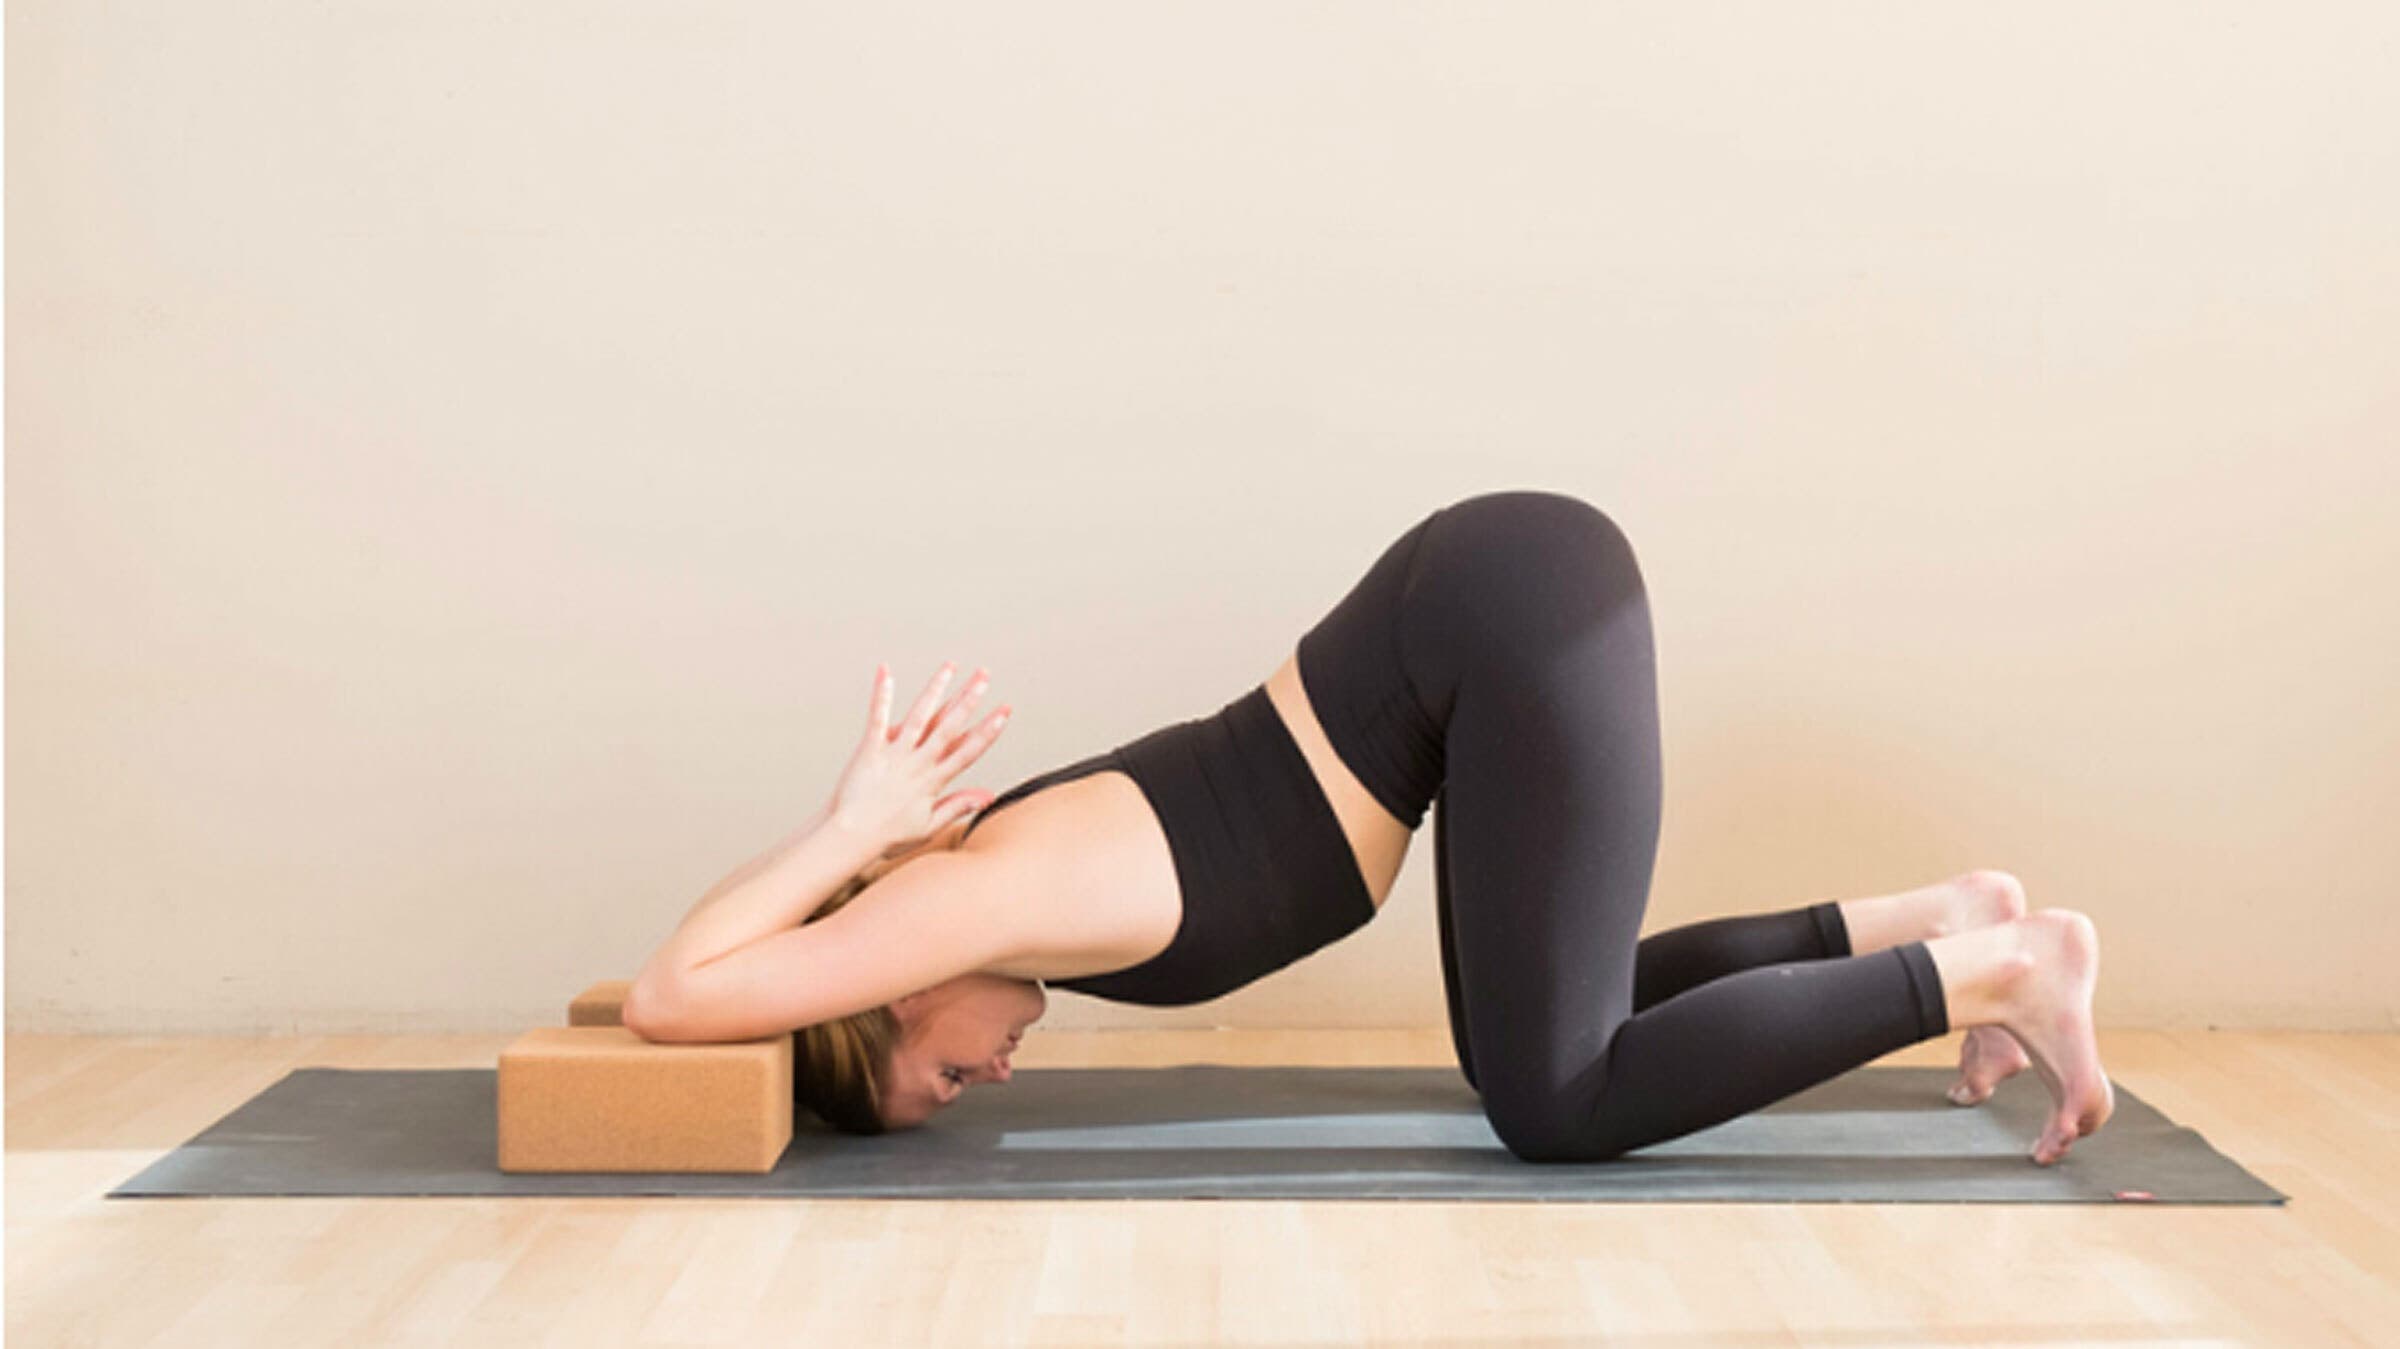
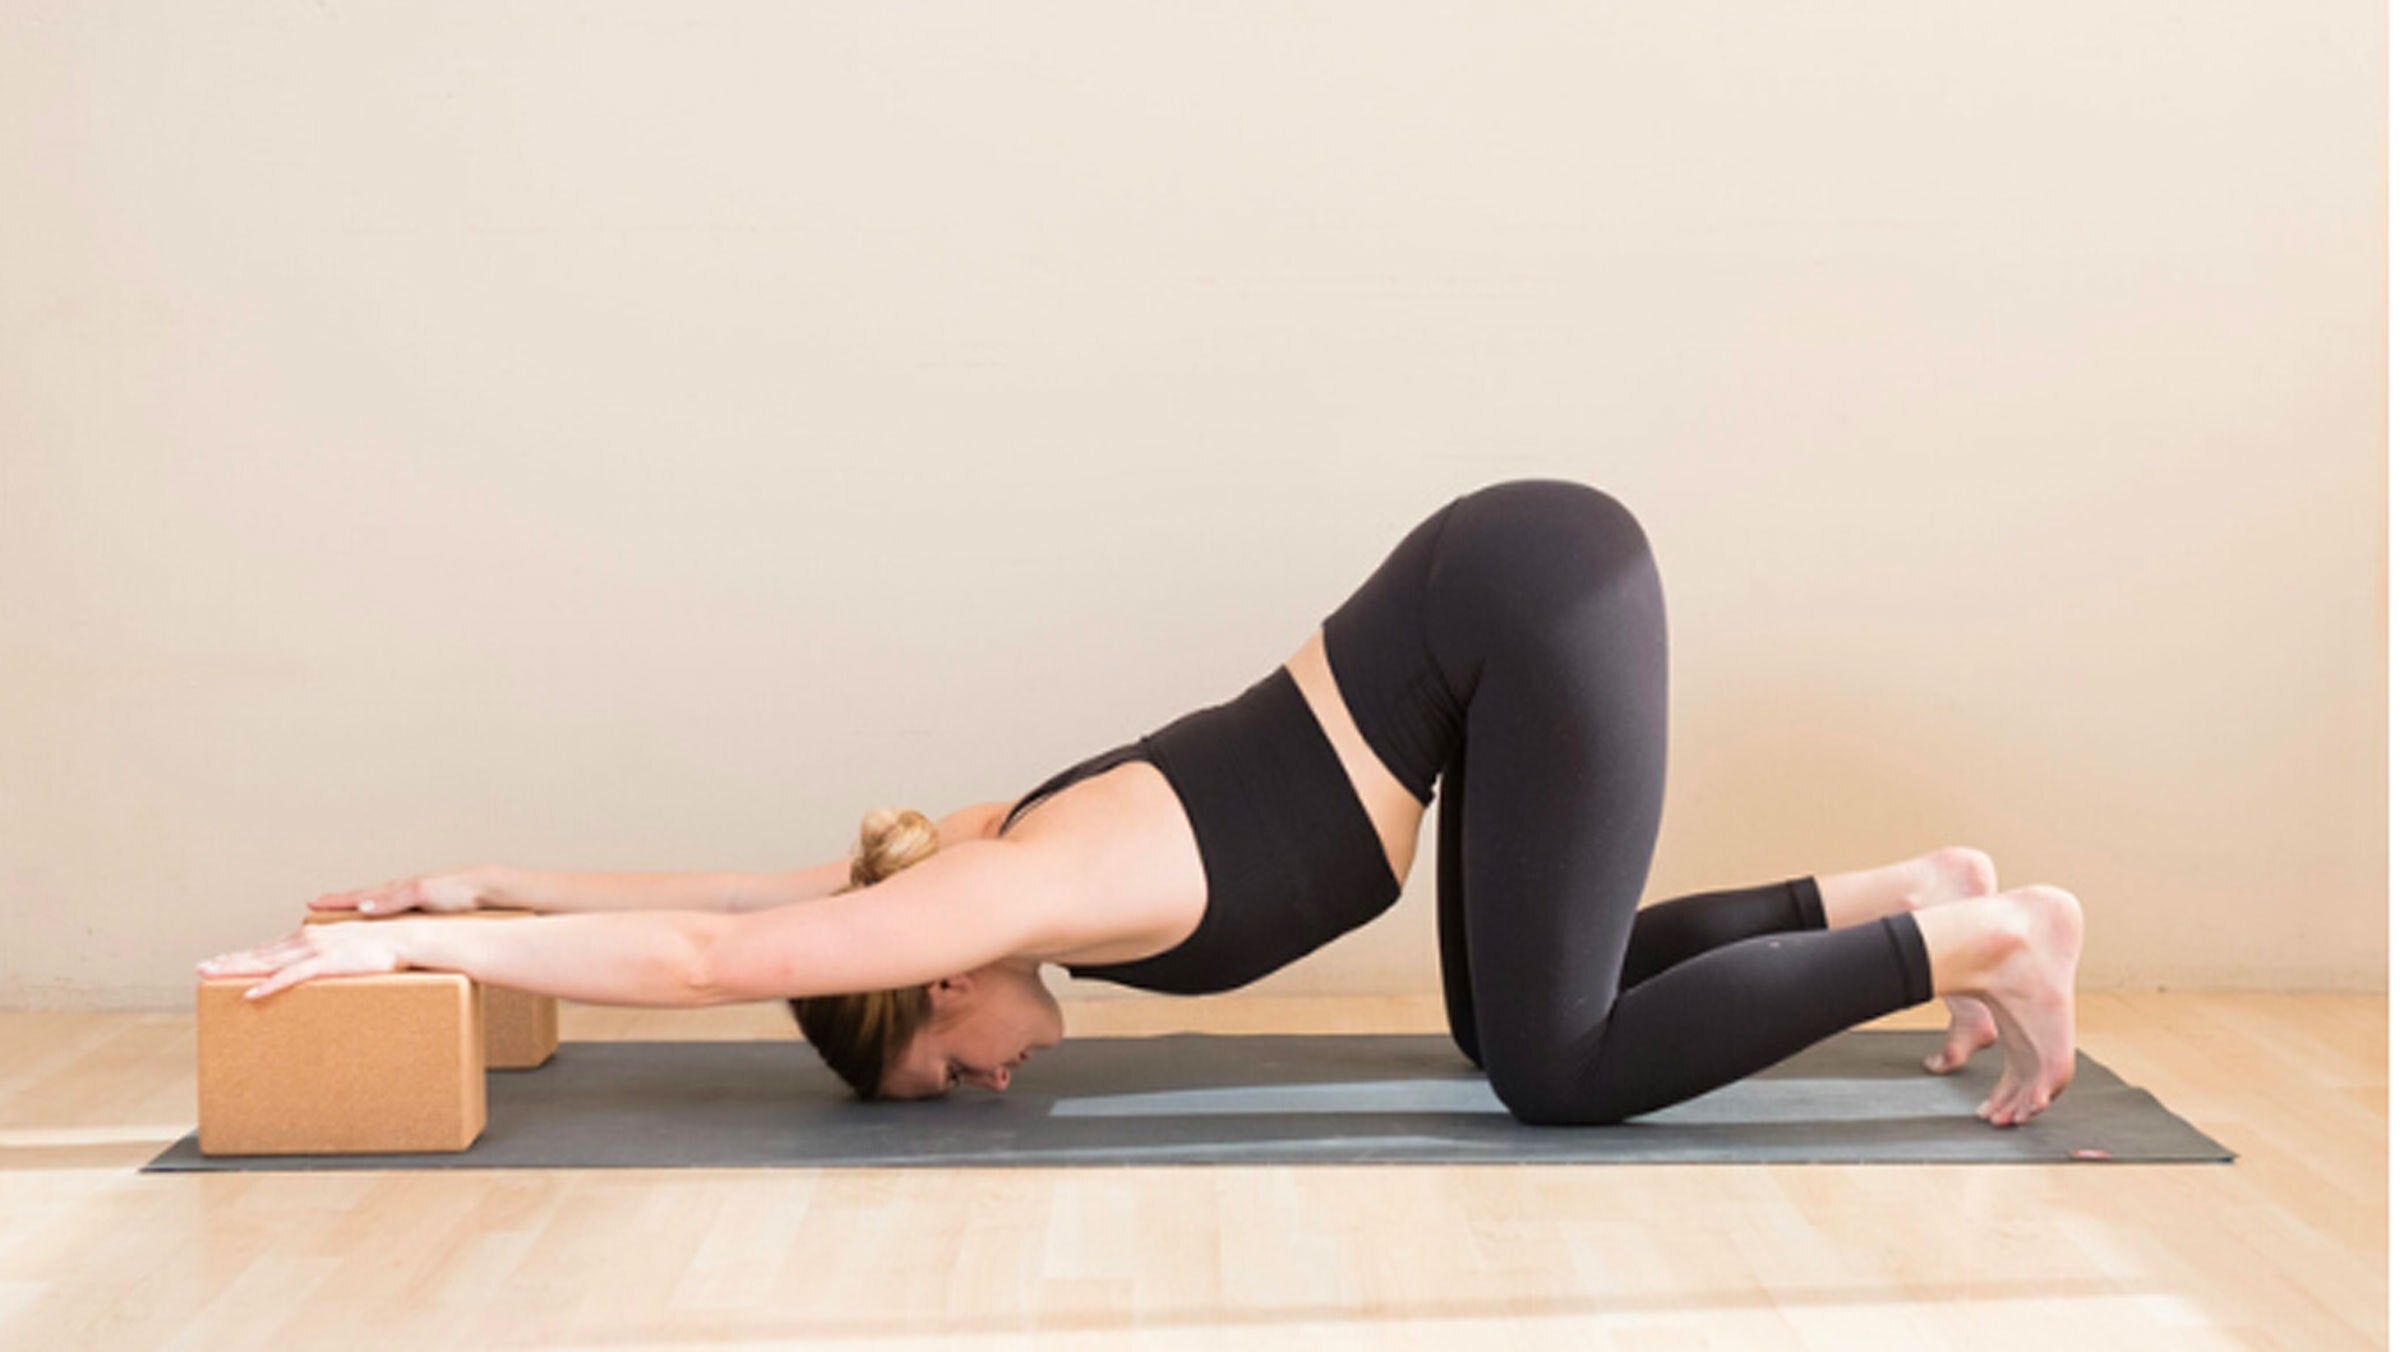
5. Extended Puppy Pose (Uttana Shishosana) With Blocks Beneath Elbows
Block benefit: Bringing blocks beneath your elbows creates a deeper opening in your chest and shoulders.
How to: Start in Tabletop with two blocks in front of your hands, the long side of each block running parallel to the long side of the mat. Bring your elbows onto the blocks. (For added cushioning, drape a folded blanket over the blocks.) Adjust your knees so they are directly beneath your hips. Bring your hands together in prayer and bend your elbows to bring you thumbs toward your upper back. Allow your chest to release toward the mat in Puppy Pose. Imagine you are drawing your shoulder blades toward your side body. Breathe into your chest and back, focusing on creating more space in between your ribs. To intensify the stretch, press down through your elbows as you breathe in and release as you breathe out.

ADVERTISEMENT
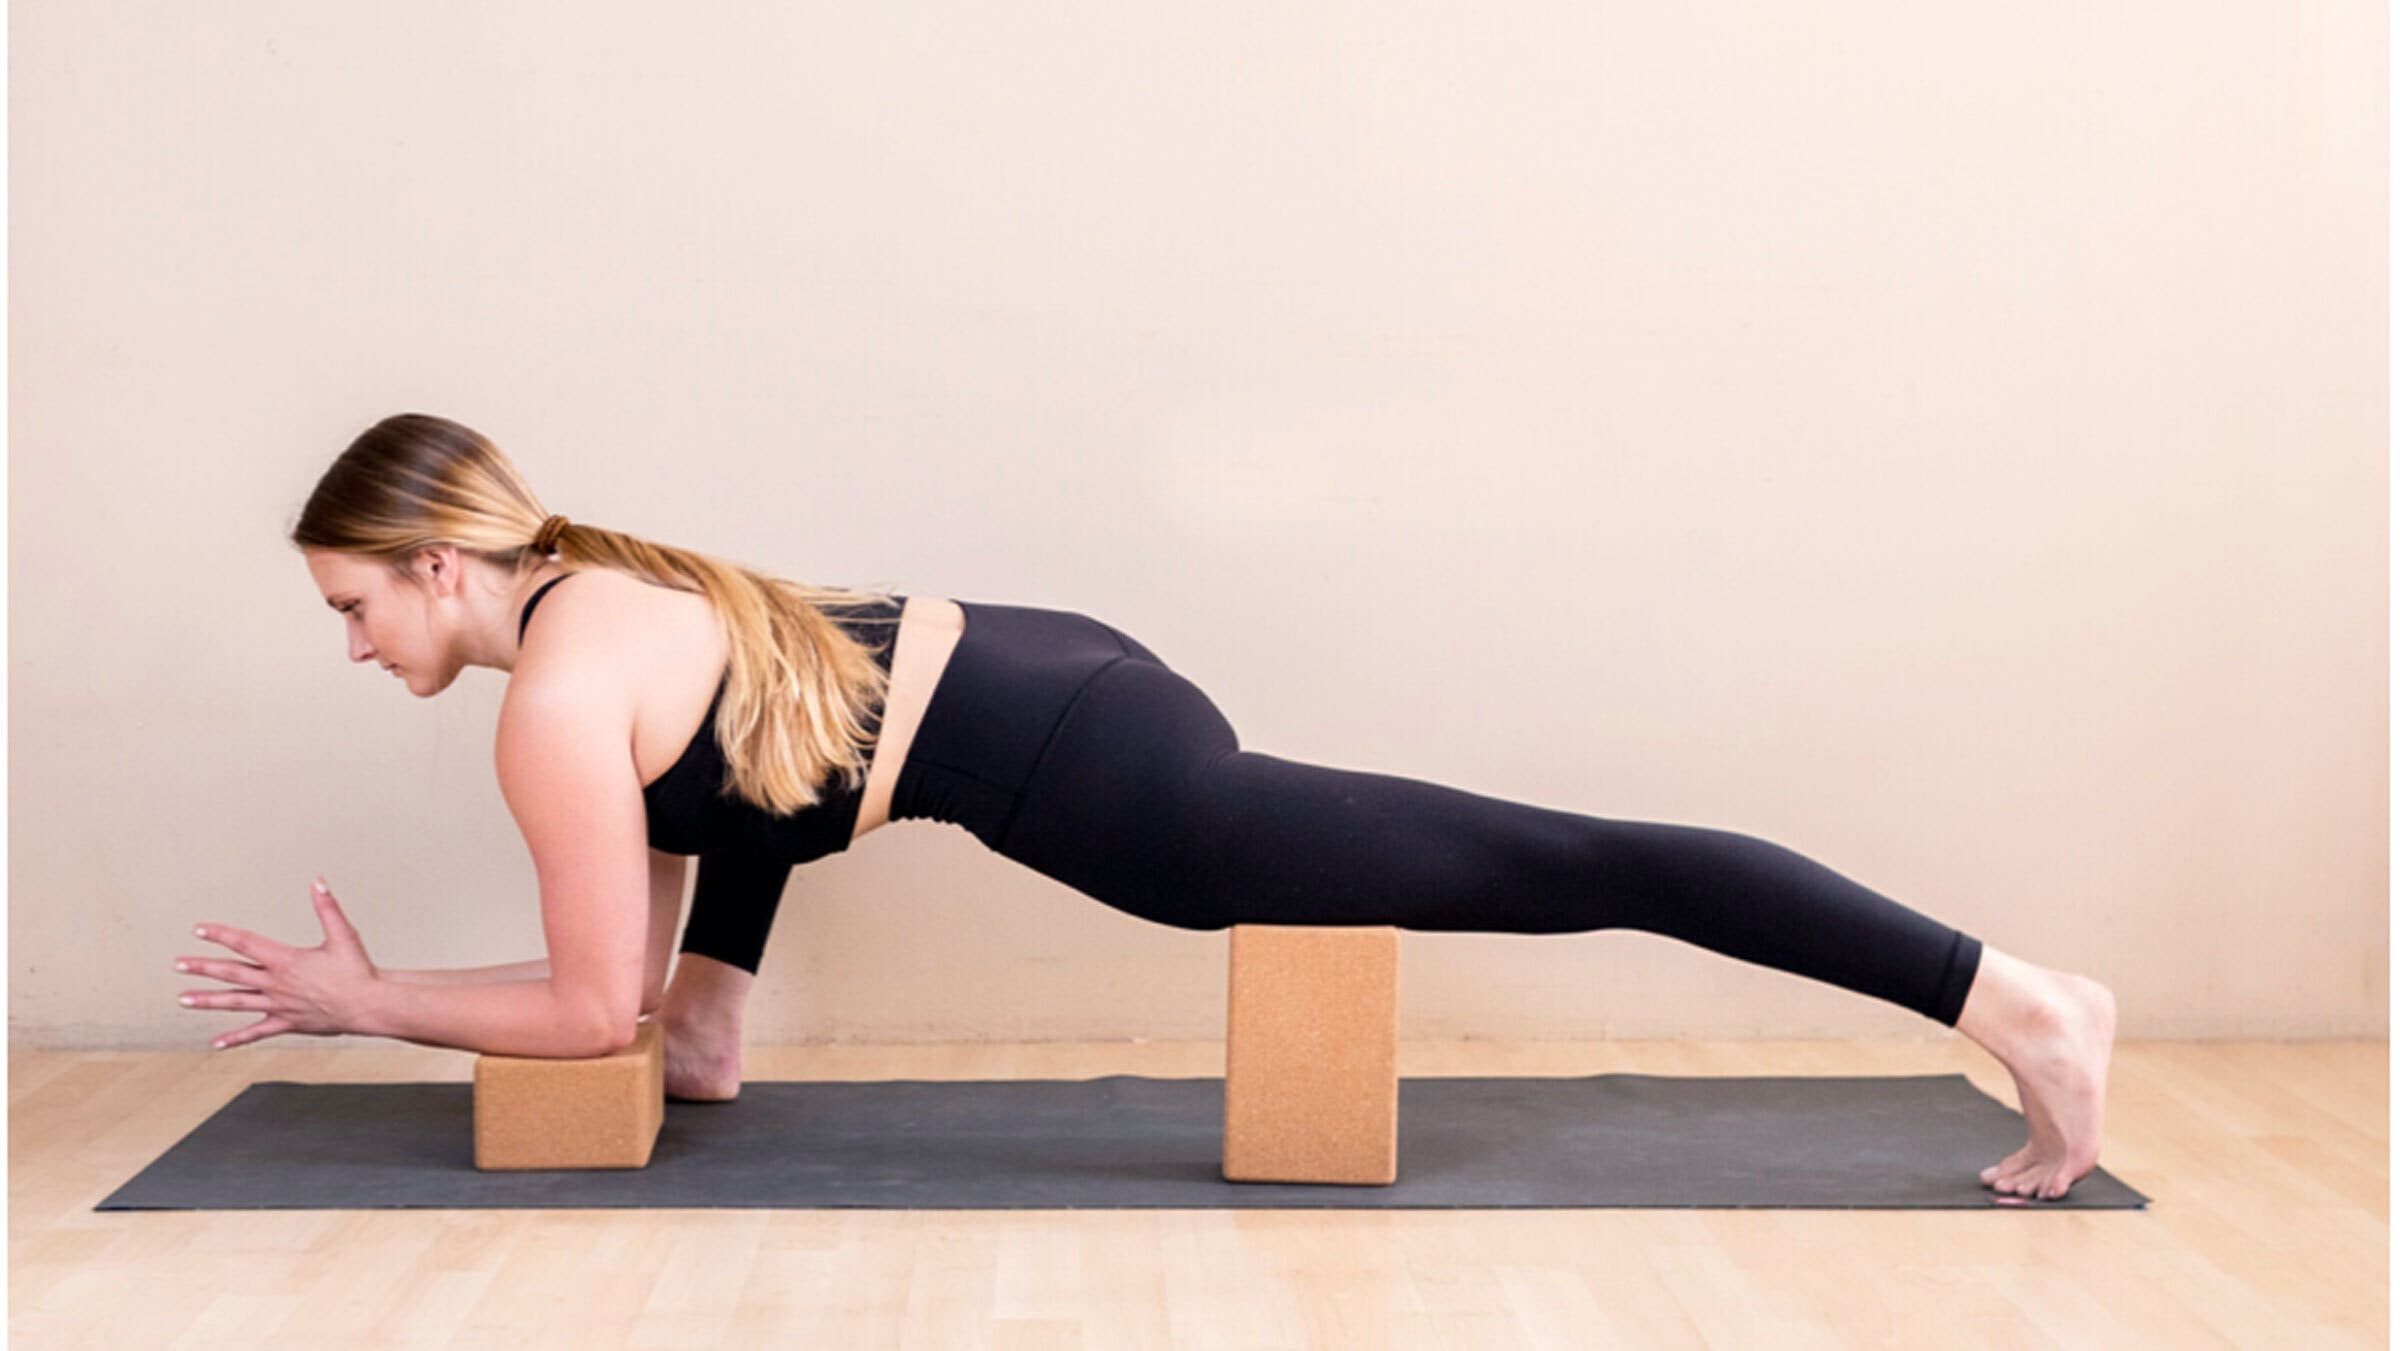
6. Extended Puppy Pose (Uttana Shishosana) With Blocks Beneath Hands
Block benefit: Resting your hands on blocks creates a deeper stretch throughout your upper body.
How to: Start in Tabletop with two blocks in front of your hands, the long side of each block running parallel to the long side of the mat. Bring your hands onto the blocks and adjust your knees so they are directly beneath your hips. Turn your upper arms outward, stretching your upper back. Allow your chest to release toward the mat in Puppy Pose. As you inhale, press your hands firmly into the blocks, feeling as if you’re drawing your armpits toward each other. As you exhale, stop pressing and release your chest deeper toward the mat.
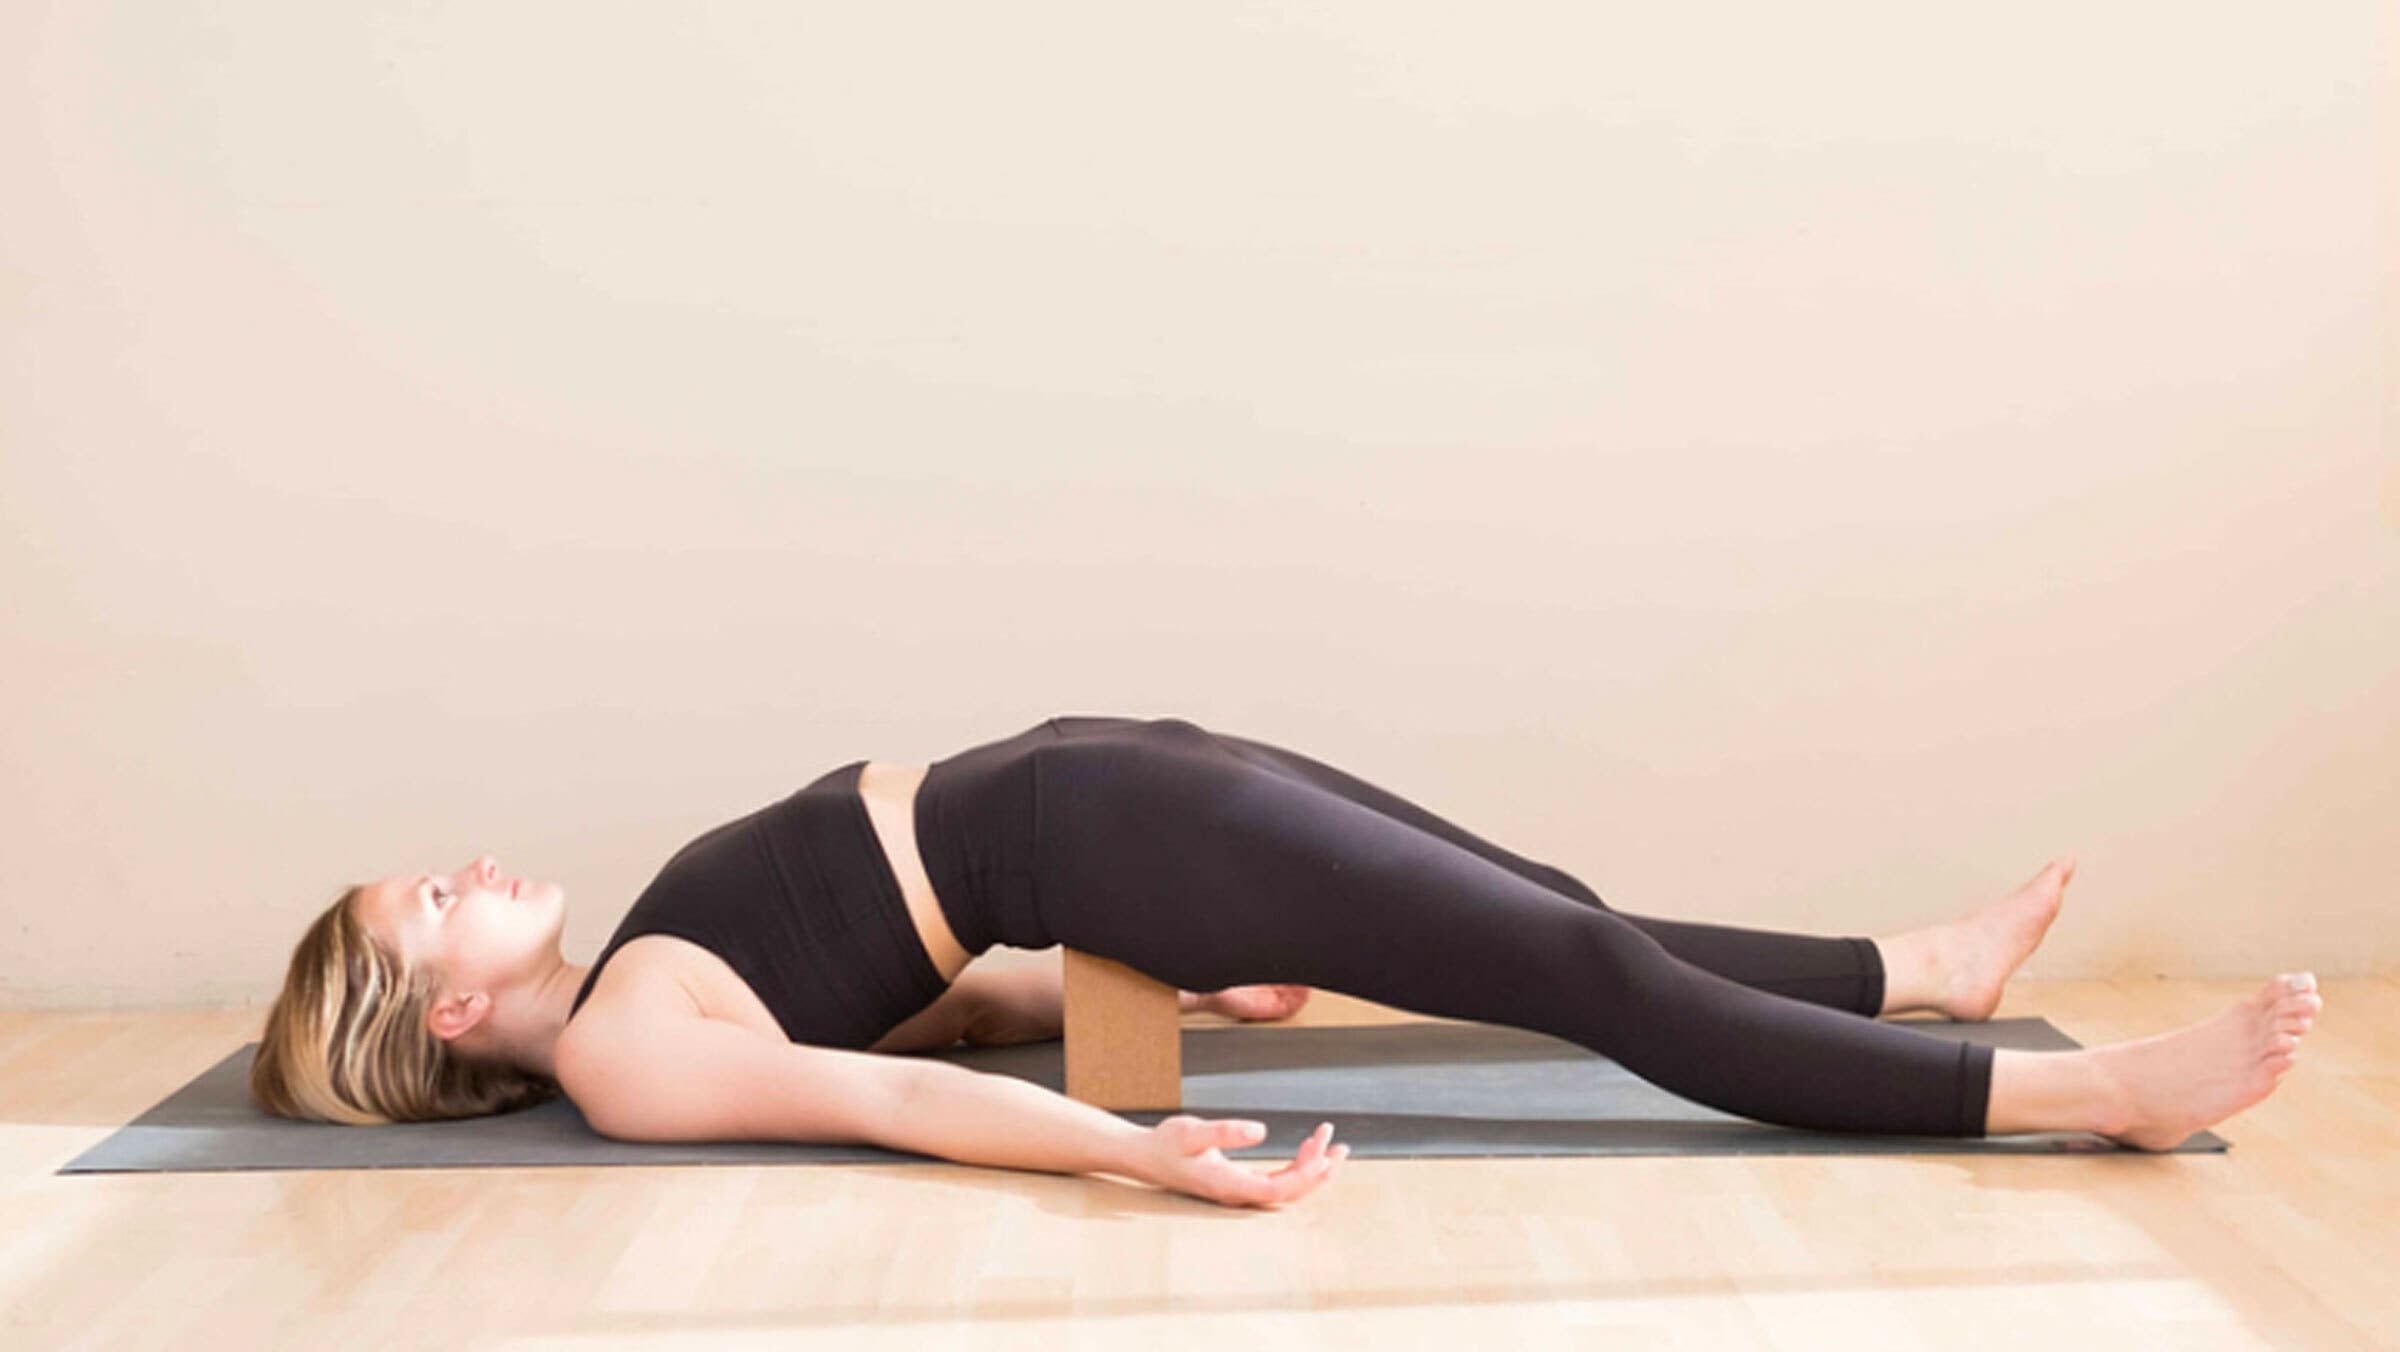
7. Bridge Pose (Setu Bandha Sarvangasana)
Block benefit: Supporting your sacrum with a block helps release and stretch the hip flexors and deep abdomen muscles as well as the lower back. It also creates a supported backbend, which can be profoundly restorative to body and mind.
How to: Lie on your back with your knees bent and your feet flat on the mat hip-distance apart in preparation for Bridge Pose. Press down through your feet and lift your hips enough to slide a block on the lowest level beneath your sacrum, which is the triangle-shaped bone at the base of your spine. Straighten your legs, in front of you, hip-distance apart or wider, with your feet falling toward the far corners of the mat. Roll your inner thighs down toward the mat and relax through your glutes and chest. Breathe deeply into your belly, low back, and hips. For a more intense stretch, you can turn the block onto a higher level, although less is more with backbends. If you like, bend one knee at a time and draw it in toward your armpit, hold for 5 breaths, and then switch sides.
Tip: A common mistake in supported Bridge Pose is situating the block beneath your lower back rather than your sacrum. Make certain that the block is not beneath your lumbar vertebrae. You want the base of the tailbone to feel stable and supportive of your entire body weight. If you feel any pain in your back at any time during this pose, come out of the pose.
ADVERTISEMENT
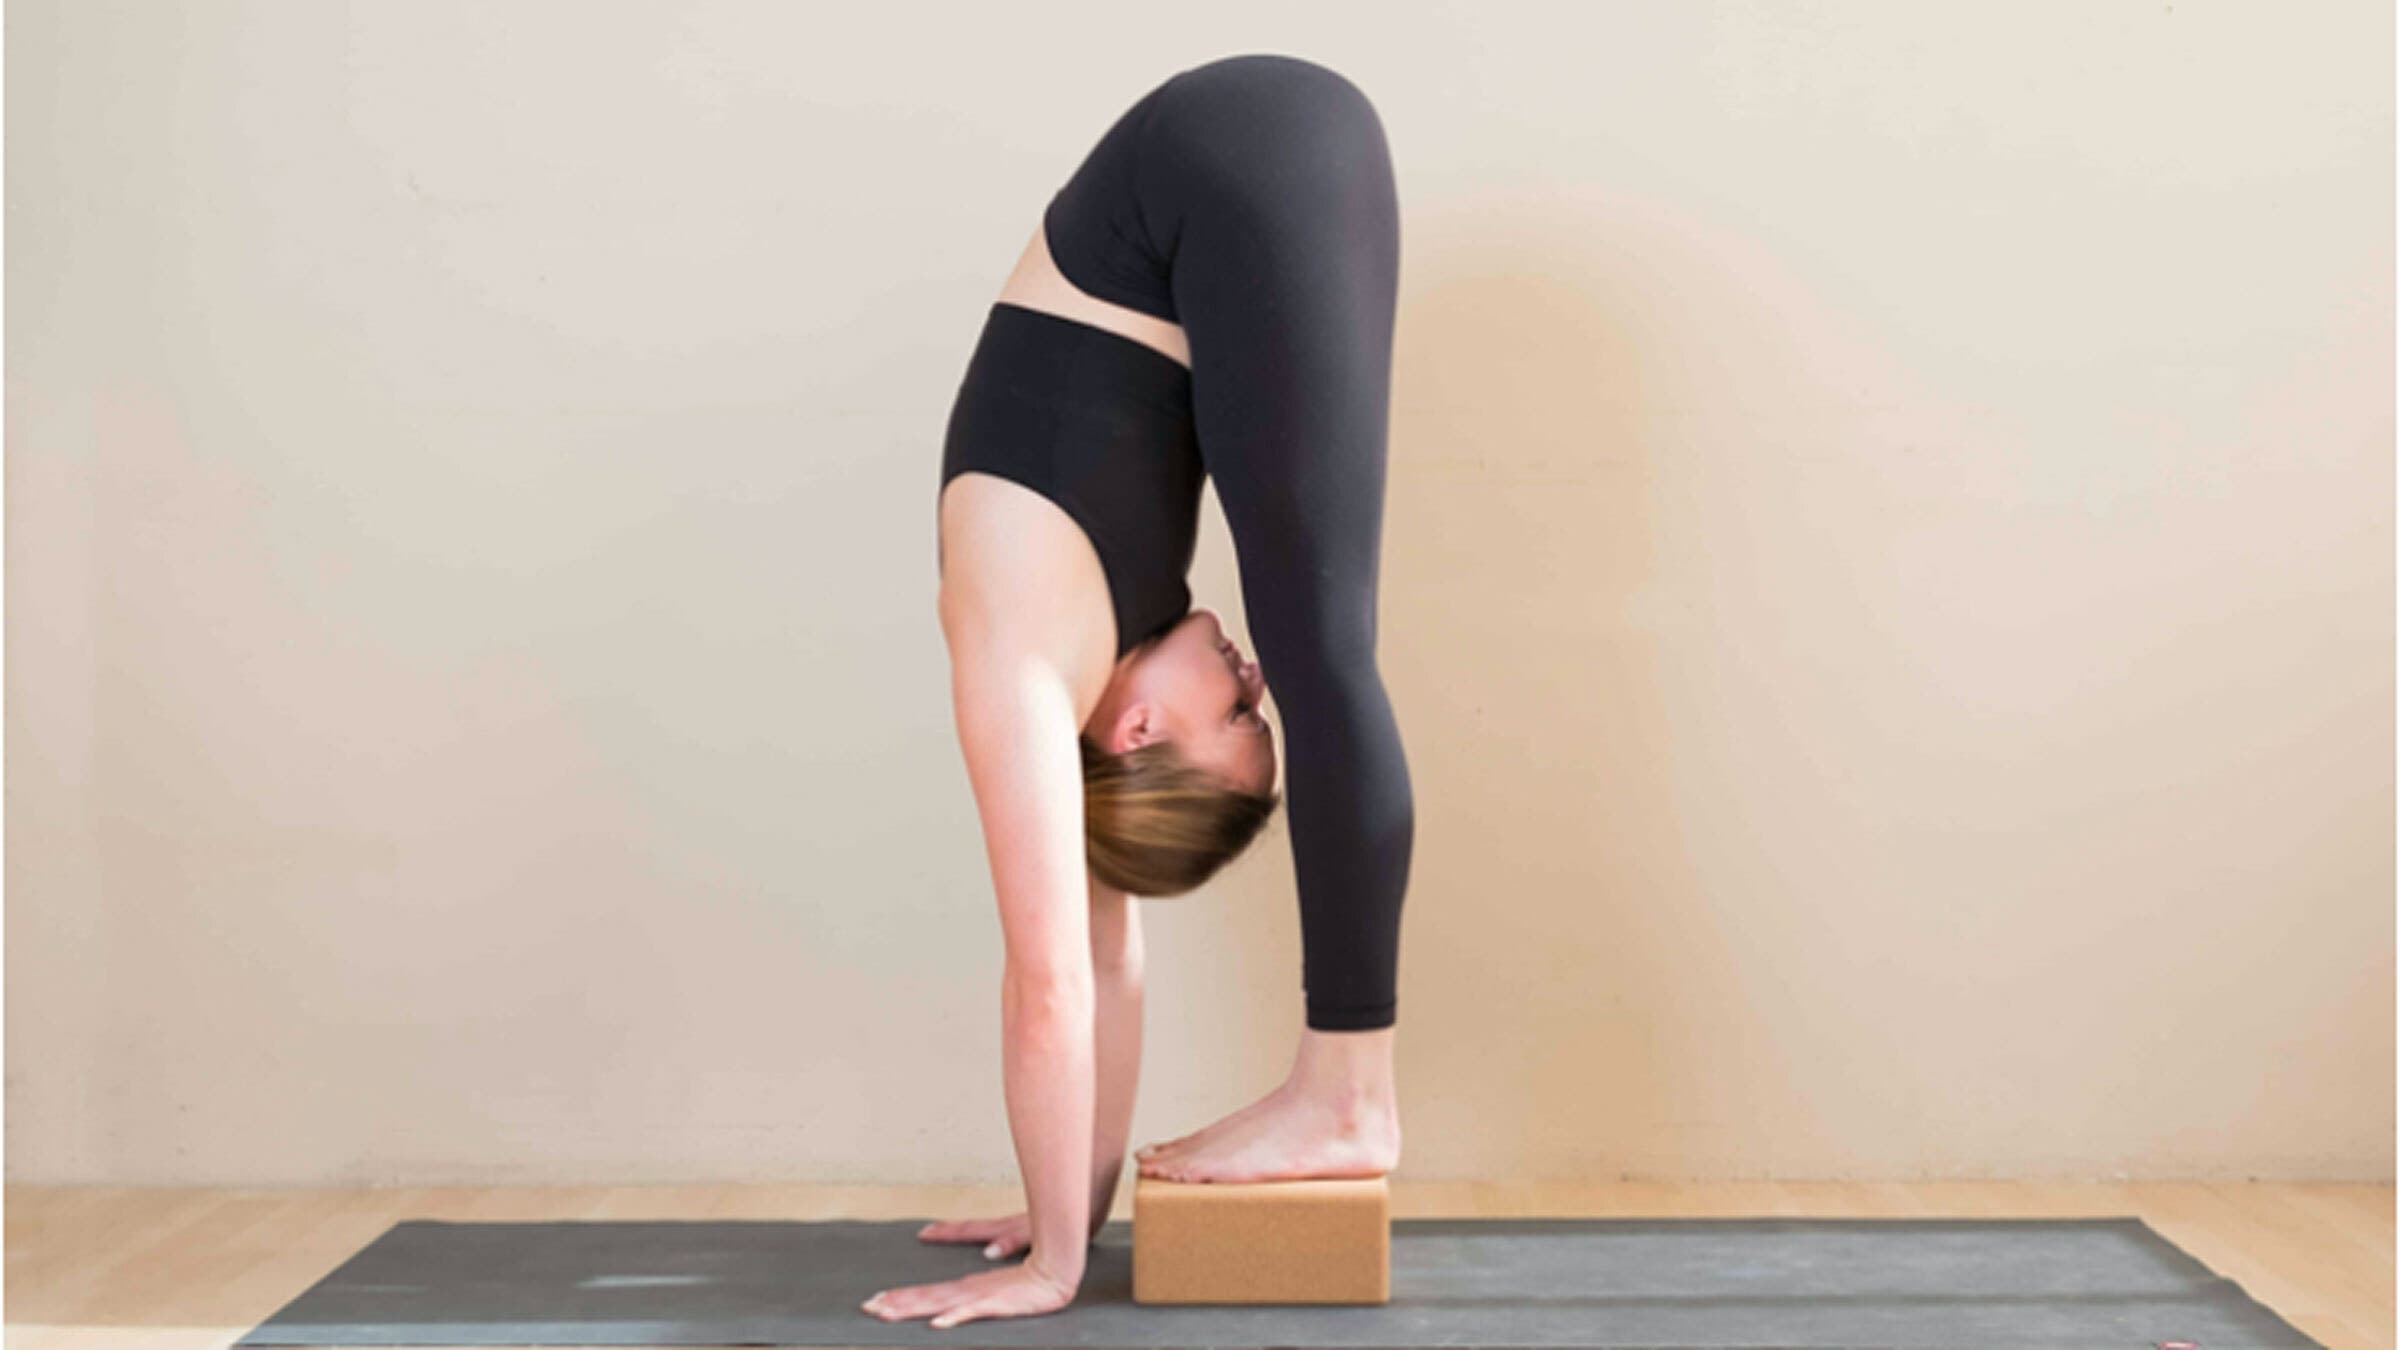
8. Standing Forward Bend (Uttanasana)
Block benefit: Standing on blocks effectively increases your distance from the mat, which brings a greater stretch to your hamstrings as you try to reach your hands to the mat. The variation also helps stretch your upper, middle, and lower back.
How to: Place two blocks, side by side or hip-distance apart, on their lowest level. Stand on the blocks in Mountain Pose (Tadasana). Begin to hinge at your hips and fold forward, keeping a slight bend in your knees as you bring your chest toward your thighs. Rest your hands on the mat in front of the blocks or allow them to dangle and release the top of your head toward the mat in Standing Forward Bend.
Slowly straighten your legs as you keep your weight evenly distributed between the front and back of your feet. Lift through the inner and outer arches of your feet. Remain here as you work on lengthening through your low back and reaching your chest toward your shins. Breathe into your lower back to open more deeply through your hips.
ADVERTISEMENT
Tip: To practice the alignment of pressing into Handstand in your upper back, play with keeping your palms on the mat in this pose and round slightly through your upper back as you draw your shoulder blades away from one another (shoulder protraction).
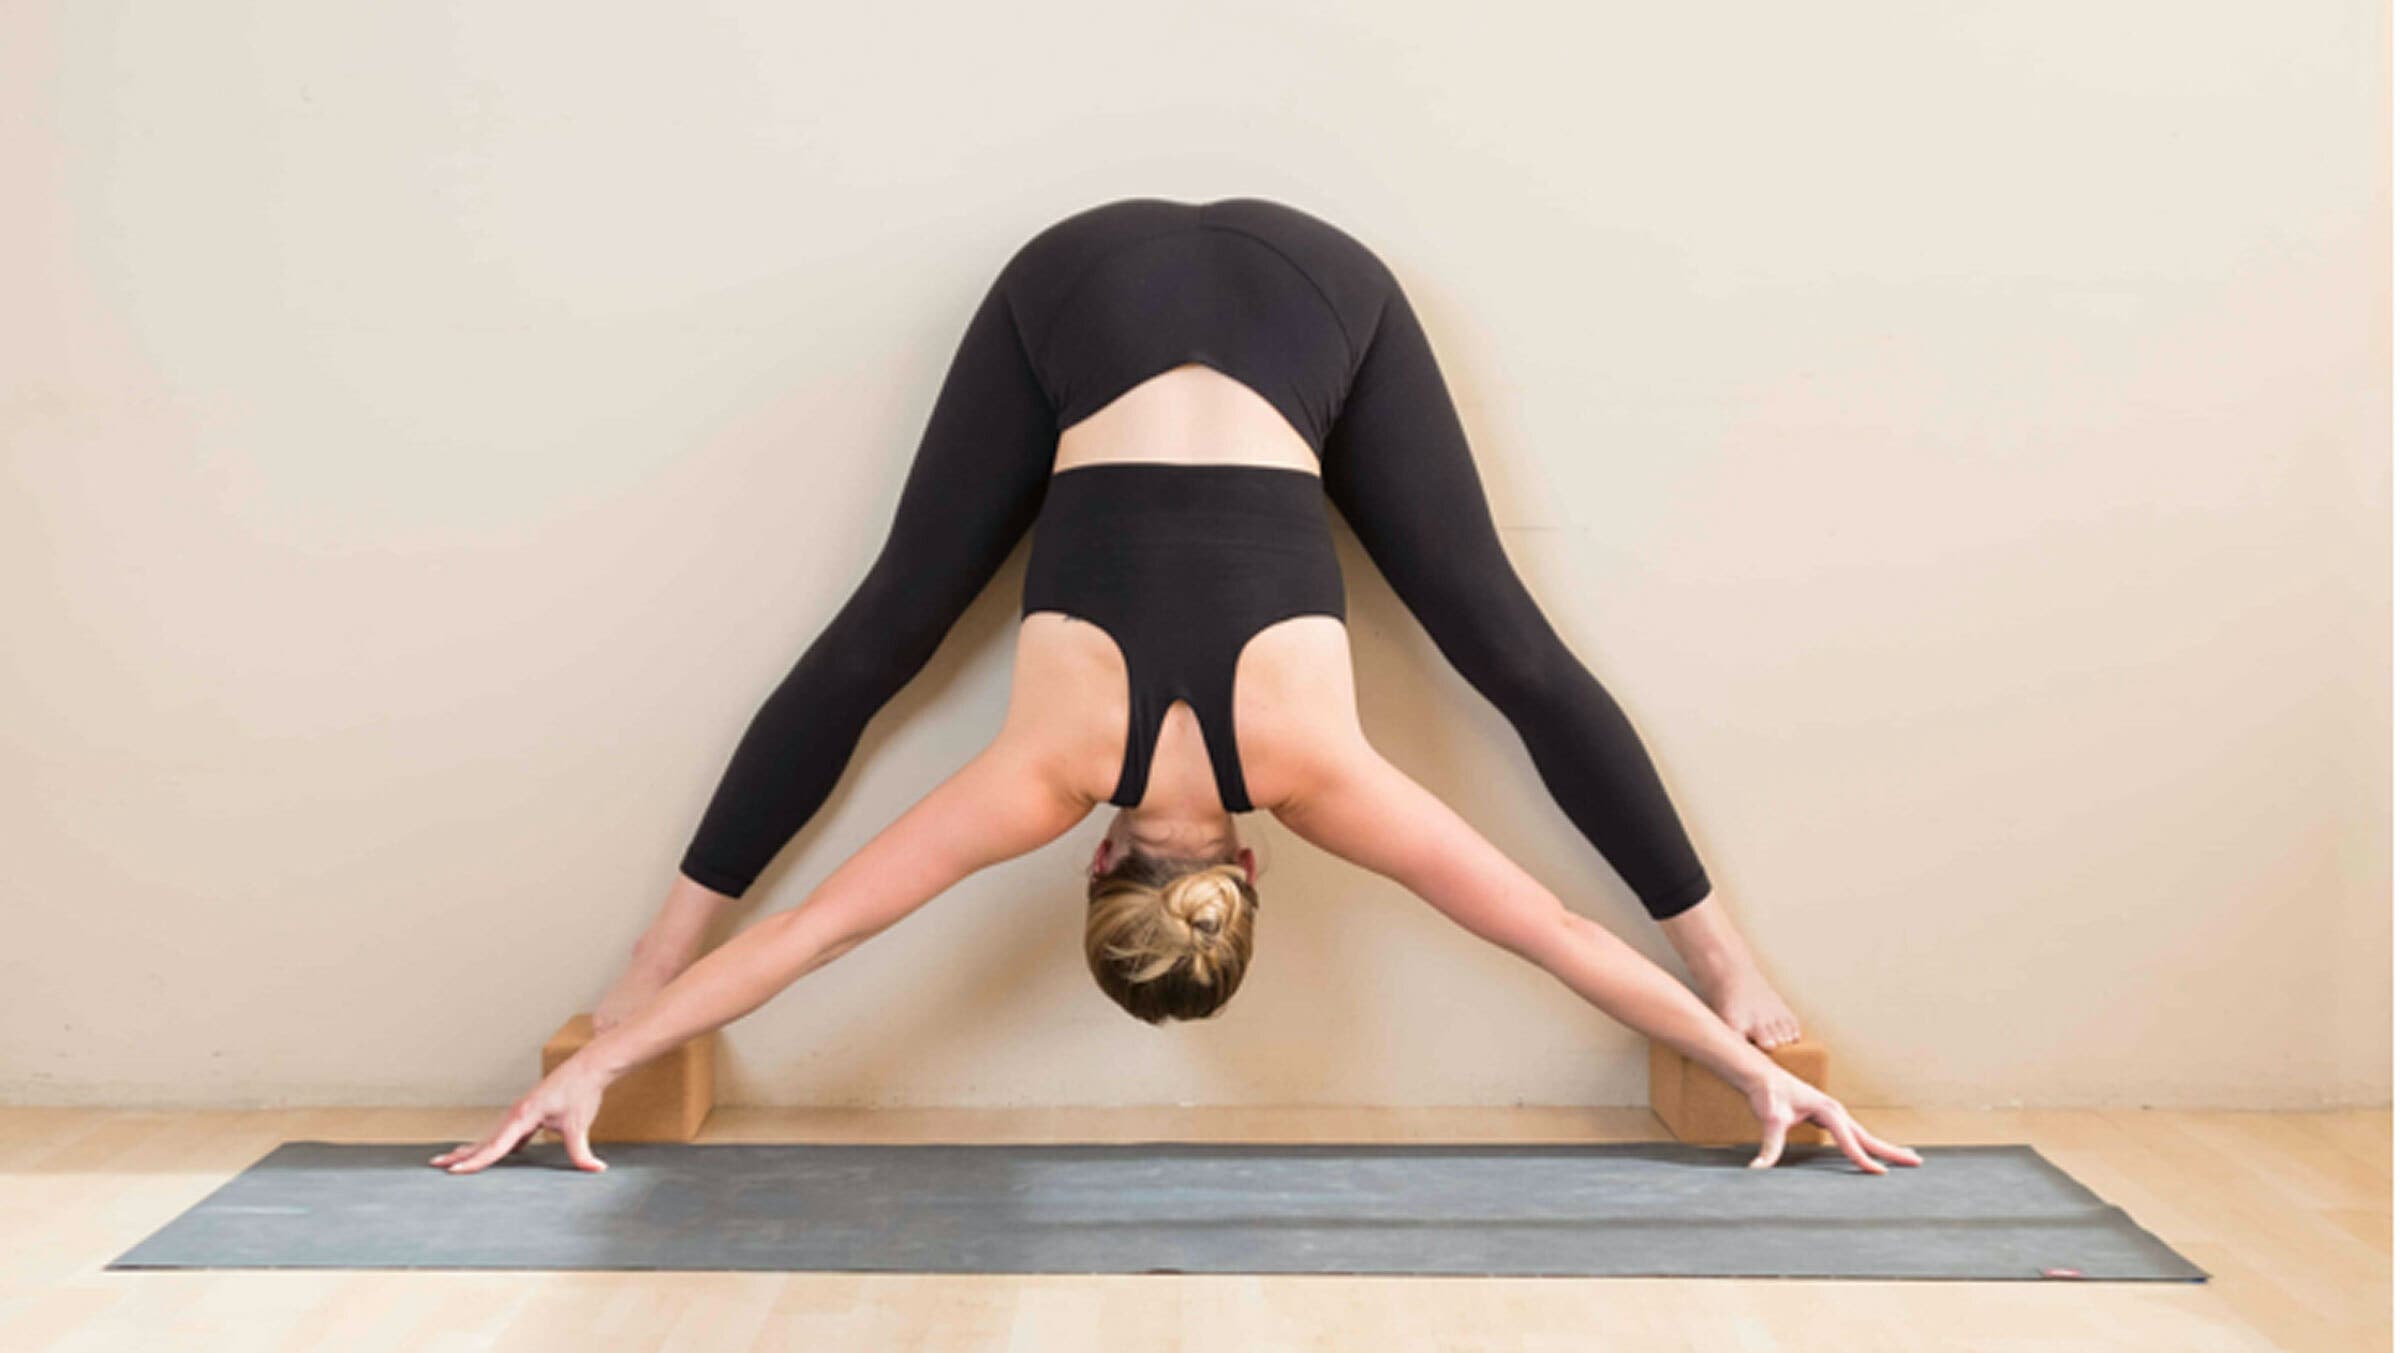
9. Wide-Legged Standing Forward Bend (Prasarita Padottanasana)
Block benefit: Standing on blocks (similar to Standing Forward Bend above) requires greater hamstring flexibility to reach your hands to the mat. This also creates a deeper stretch in the muscles of your upper, middle, and lower back.
How to: Take a block in each hand as you come into Wide-Legged Standing Forward Bend with the backs of your legs facing a wall. Place a block on its lowest level between each foot and the wall. Step onto the blocks and bring your heels and the backs of your thighs to touch the wall. Bring your hands to the mat, either straight in front of you or reaching out at an angle.
Find a slight bend in your knees and keep your weight evenly distributed between the front and back of your feet. Shift your gaze between your thighs so that your head releases toward the mat. Breathe into your lower back to open more deeply through the hips. For a more intense stretch, flip your orientation so your toes face the wall and then lean your back against it.
ADVERTISEMENT
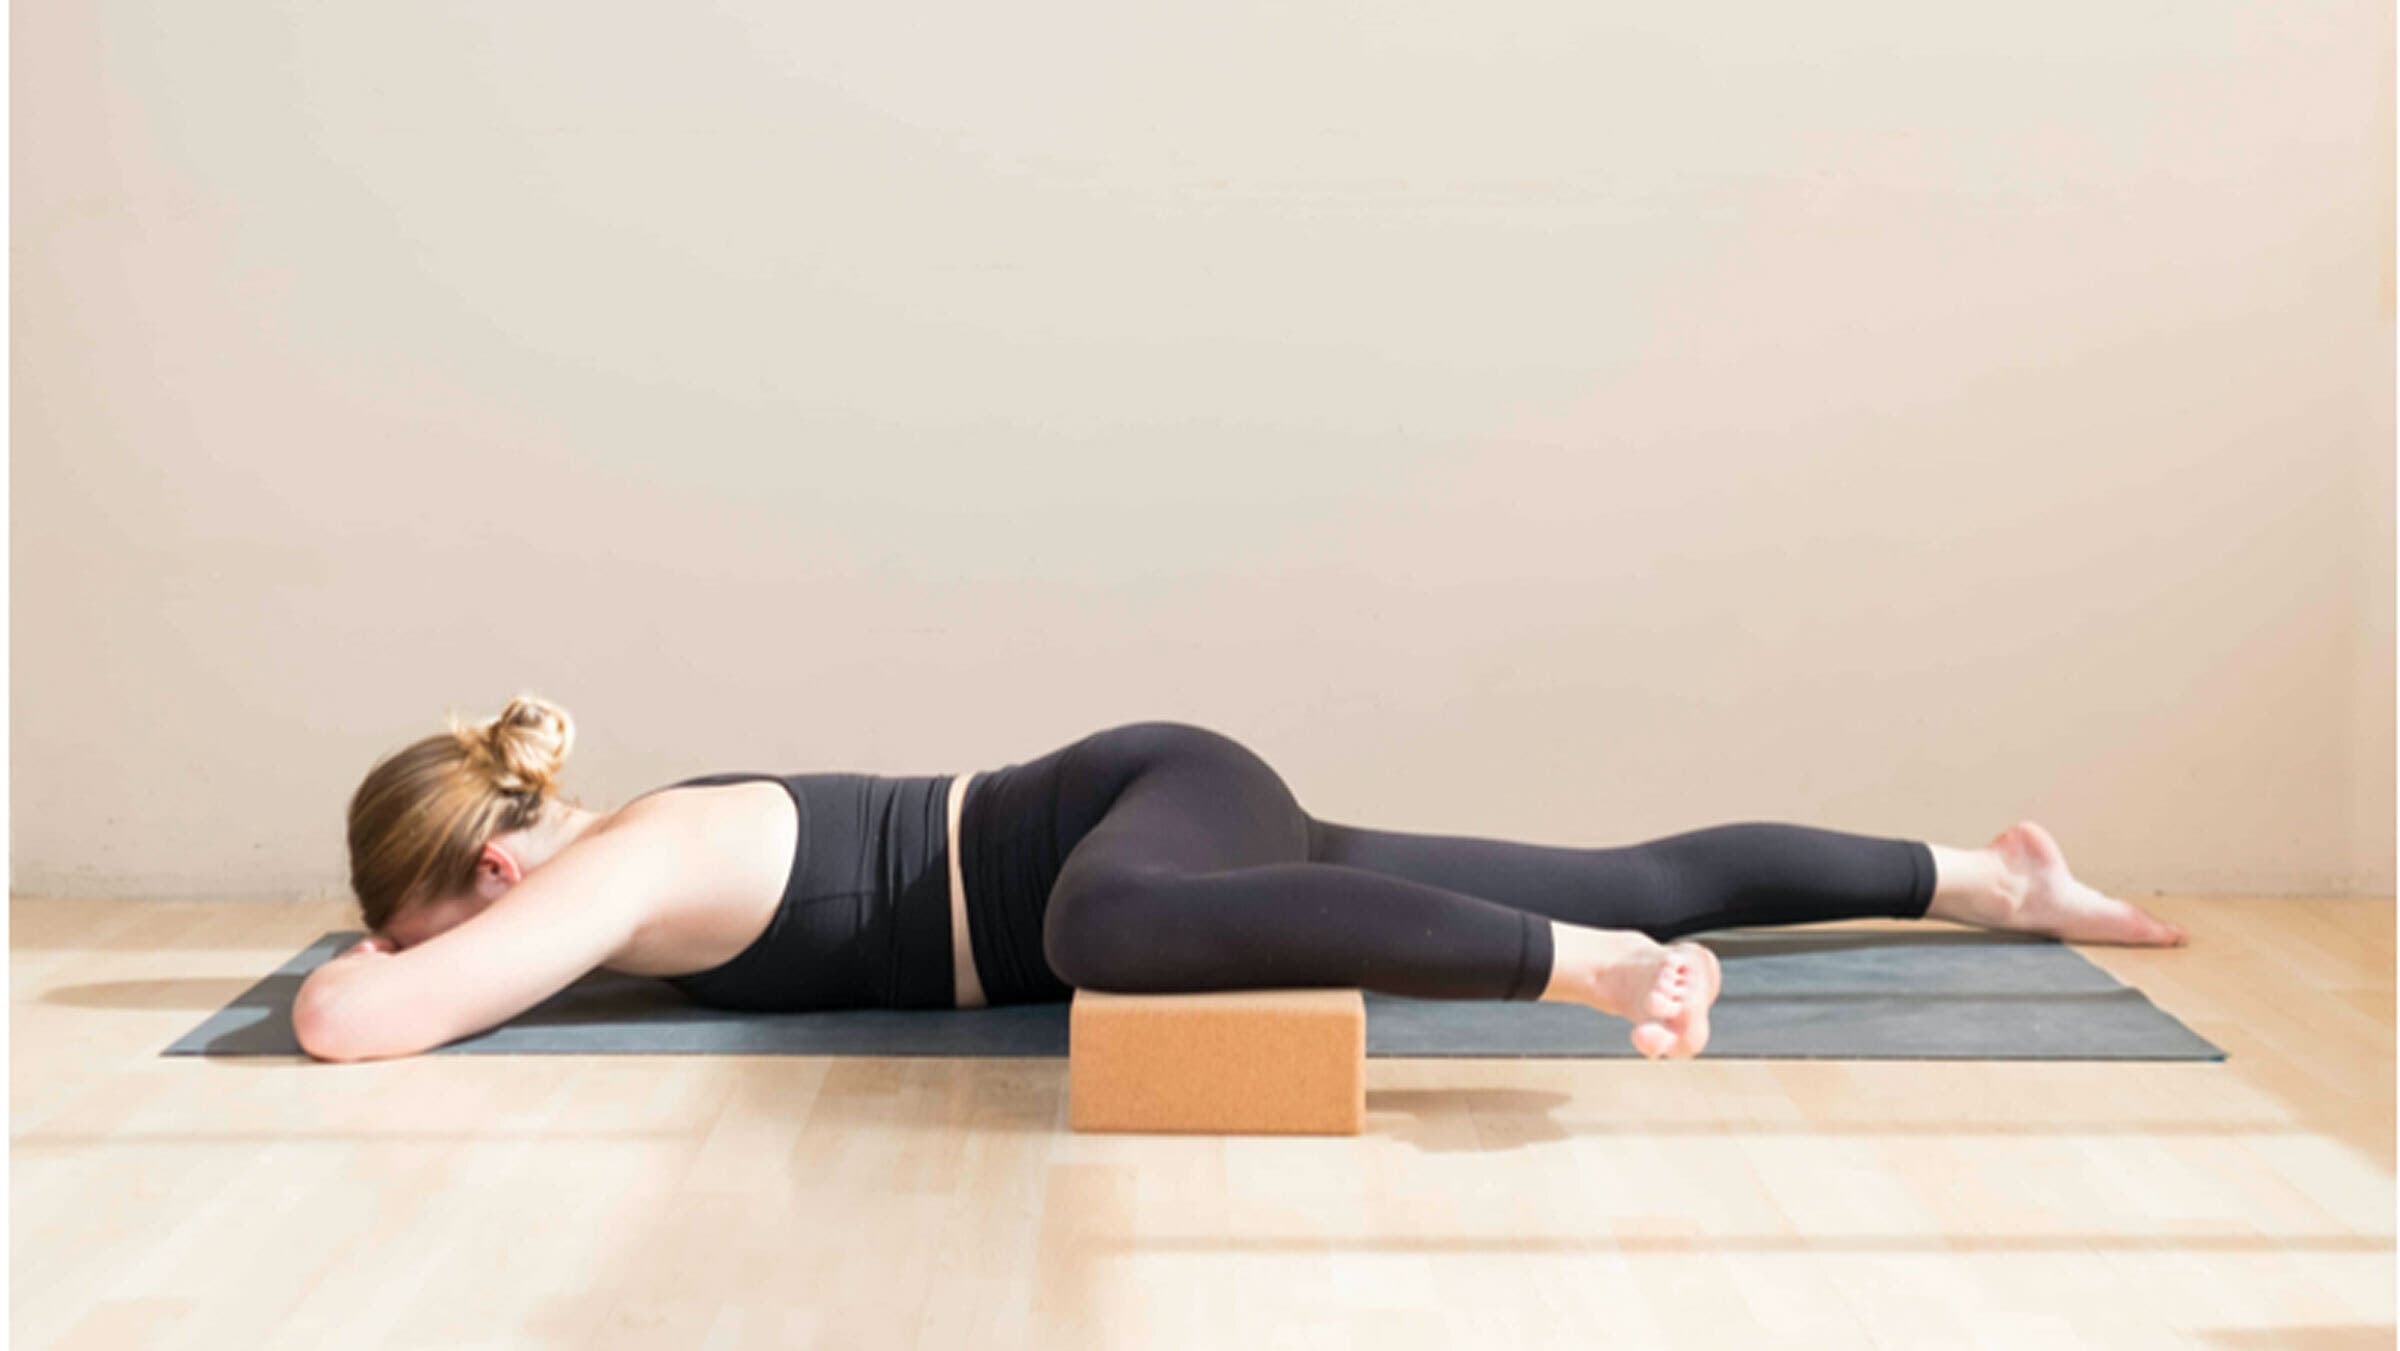
10. Half Frog Pose (Ardha Bhekasana)
Block benefit: Bringing a block beneath the shin of your bent leg creates a deeper stretch through your hips and groin muscles. It also reduces pressure on your knee.
How to: Lie on your back with a block on the lowest level near your right hip. Draw your left knee toward your left armpit and slightly out to the side, avoiding your rib cage. Take a few breaths here. Gently guide your knee across your body to the right, coming into a reclining twist with yourknee making contact with the block. You can adjust the position of the block as needed. (If you’d like more cushioning for your knee, drape a blanket over the block.) Continue to roll all the way to the right, onto your belly, sliding the block and knee a little more out to the left so they’re perpendicular to your body.
Rest your hands on top of one another in the center of the mat to make a pillow for your forehead. Breathe deeply into your lower back and hips, softening through the hip flexors and belly each time you breathe out.
ADVERTISEMENT
Encourage rolling the inner thigh of your extended right leg toward the mat and pressing the top of your right foot onto the mat. If you feel any strain in your left knee, flex your toes or come out of the pose.
To come out, begin to roll onto the back, reversing the direction you came in, and gently bring your left hip back toward the mat. Repeat on the other side.
This article has been updated. Originally published October 14, 2022.