Updated February 25, 2025 12:42PM
If you buy through our links, we may earn an affiliate commission. This supports our mission to get more people active and outside.Learn about Outside Online's affiliate link policy
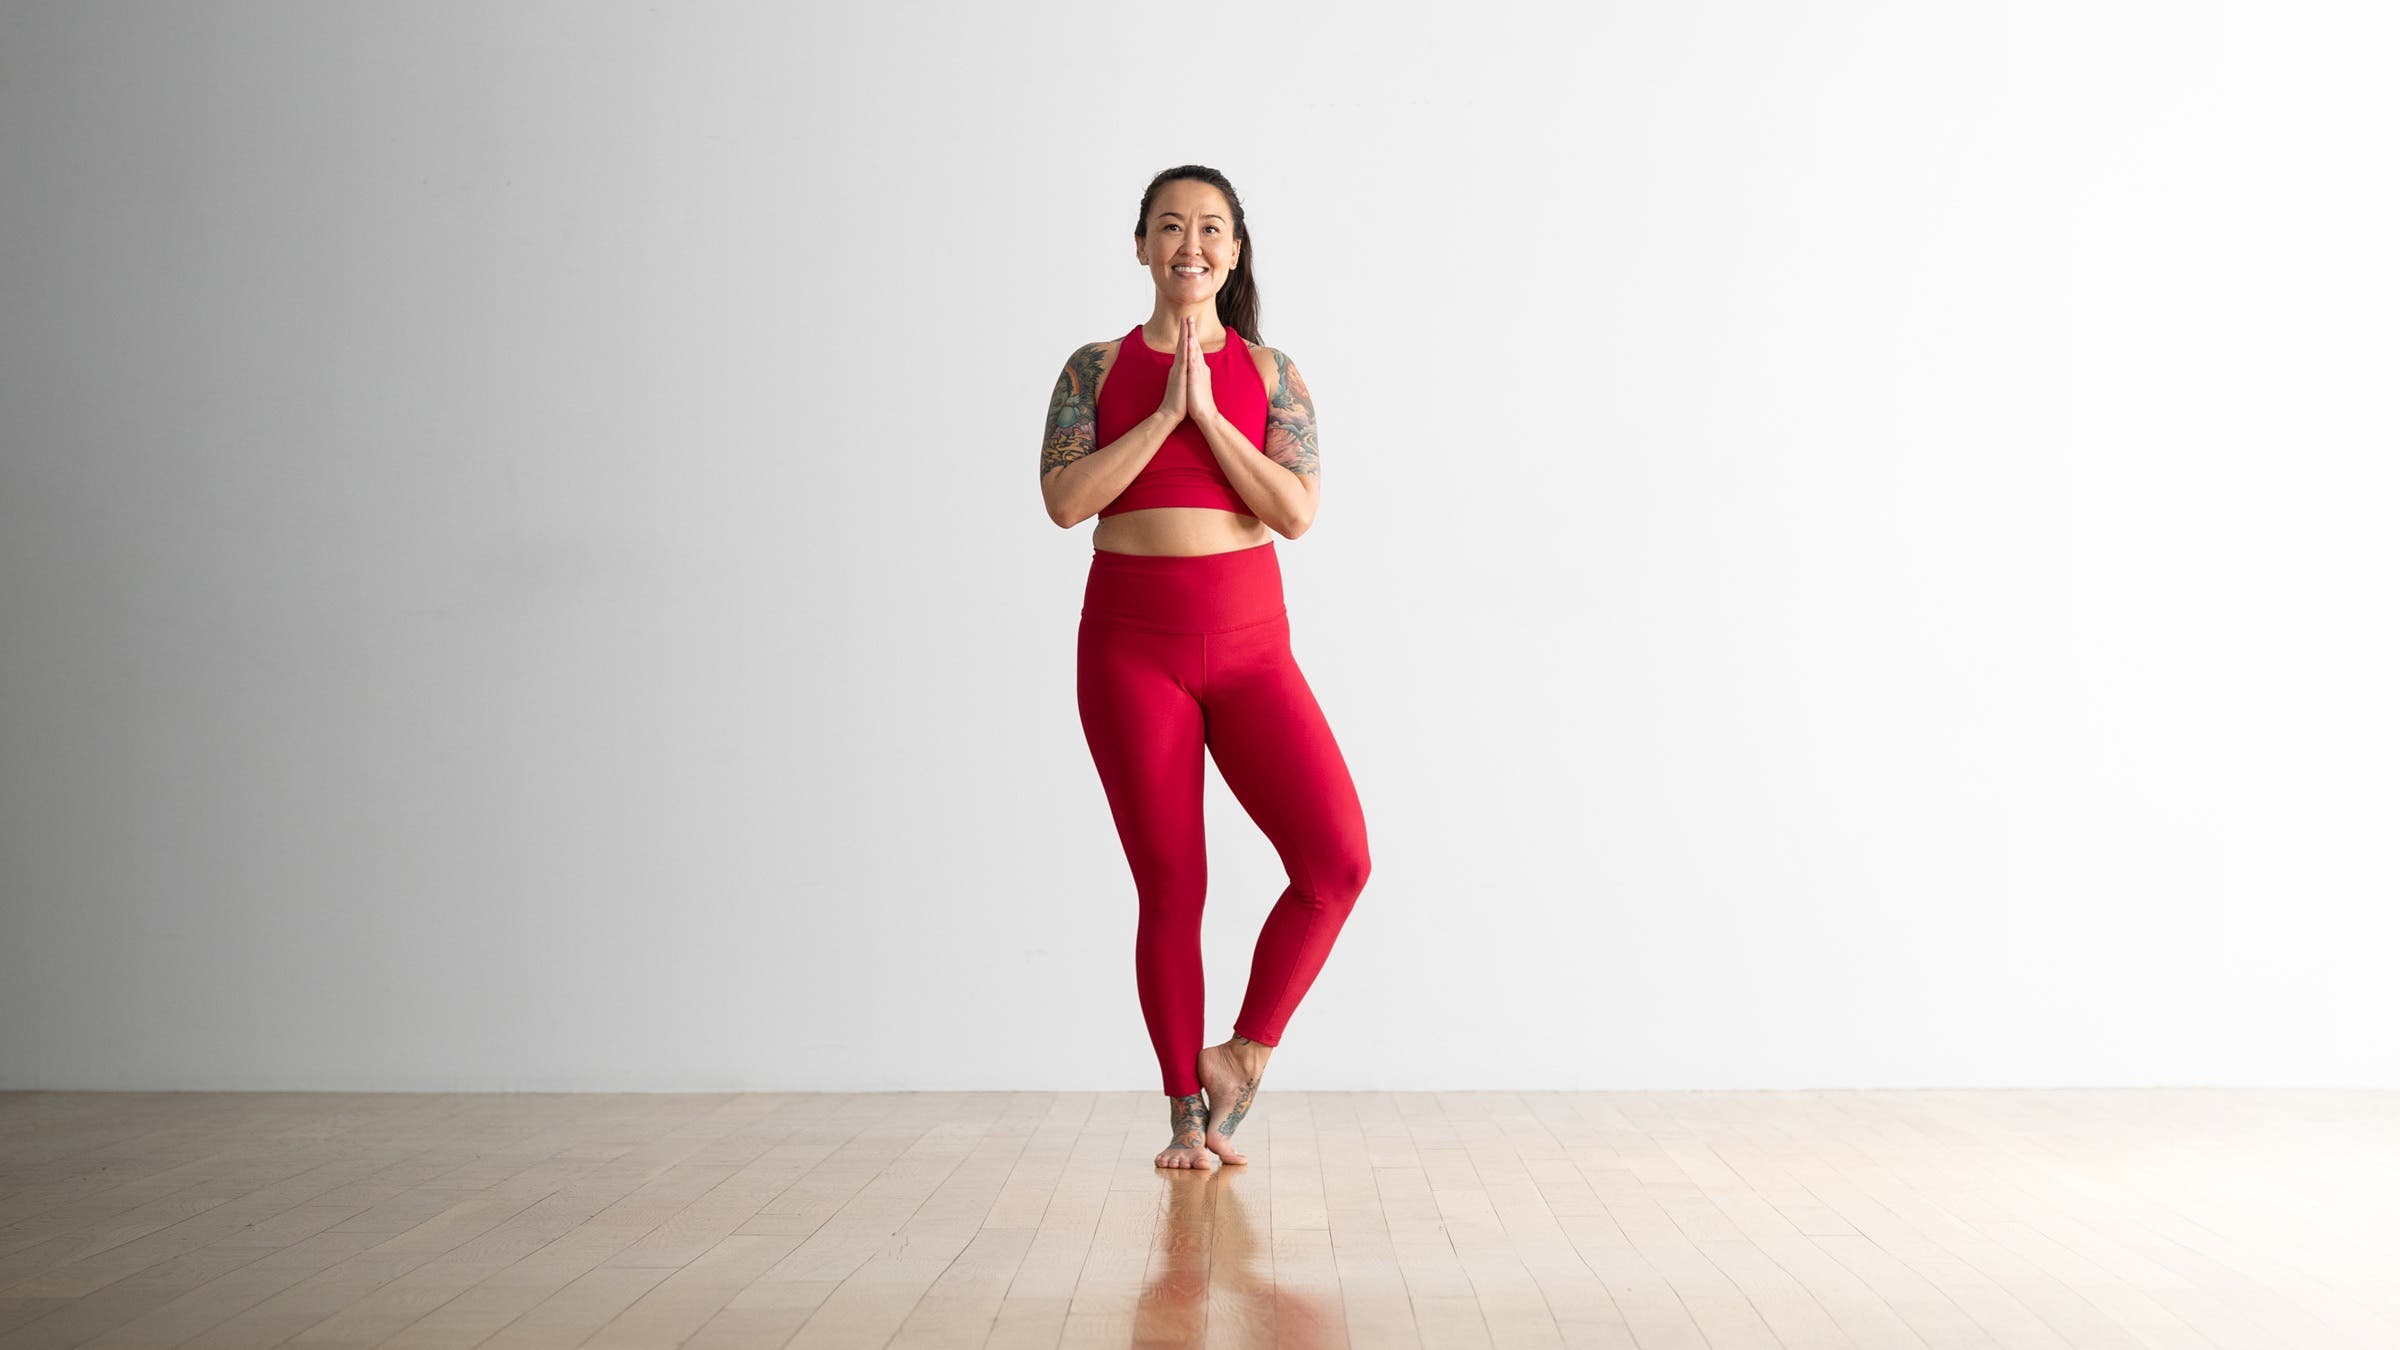
Tree Pose
A classic standing posture, Vrksasana establishes strength and balance, and helps you feel centered, steady and grounded.

(Photo: Andrew Clark)
Vrksasana (Tree Pose) teaches you to simultaneously press down and feel rooted as you reach tall like the branches of a mighty tree. In this pose, you find a sense of groundedness through the strength of your standing leg. Bringing the sole of your opposite foot to your shin or thigh challenges your balance. Continuously engage your ankles, legs, and core and notice what tiny movements your body might make to help you stay balanced.
By strengthening your legs, glutes, core, and back, Tree Pose can improve your posture and alignment, which is especially helpful if you sit throughout the day.
What makes this pose special is that it teaches you to explore your connection with your body. Maybe one day your lifted foot is positioned closer to your groin. Maybe another day, you leave your foot partially on the ground for balance. Be honest with your limits and learn to honor what your body needs on any given day.
Sanskrit
Vrksasana (vrik-SHAH-sah-nah)
vrksa = tree
ADVERTISEMENT
How to do Tree Pose
- Stand in Tadasana. Spread your toes, press your feet into the mat and firm your leg muscles. Raise your front hip points toward your lower ribs to gently lift in your lower belly.
- Inhale deeply, lifting your chest, and exhale as you draw your shoulder blades down your back. Look straight ahead at a steady gazing spot.
- Place your hands on your hips and raise your right foot high onto your left thigh or shin. Avoid making contact with the knee.
- Press your right foot and left leg into each other.
- Check that your pelvis is level and squared to the front.
- When you feel steady, place your hands into Anjali Mudra at the heart or stretch your arms overhead like branches reaching into the sun.
- Hold for several breaths, then step back into Mountain Pose and repeat on the other side.
Variations
Tree Pose with foot lower
Place your foot on your calf or keep your toes on the floor and place your heel just above the opposite ankle.
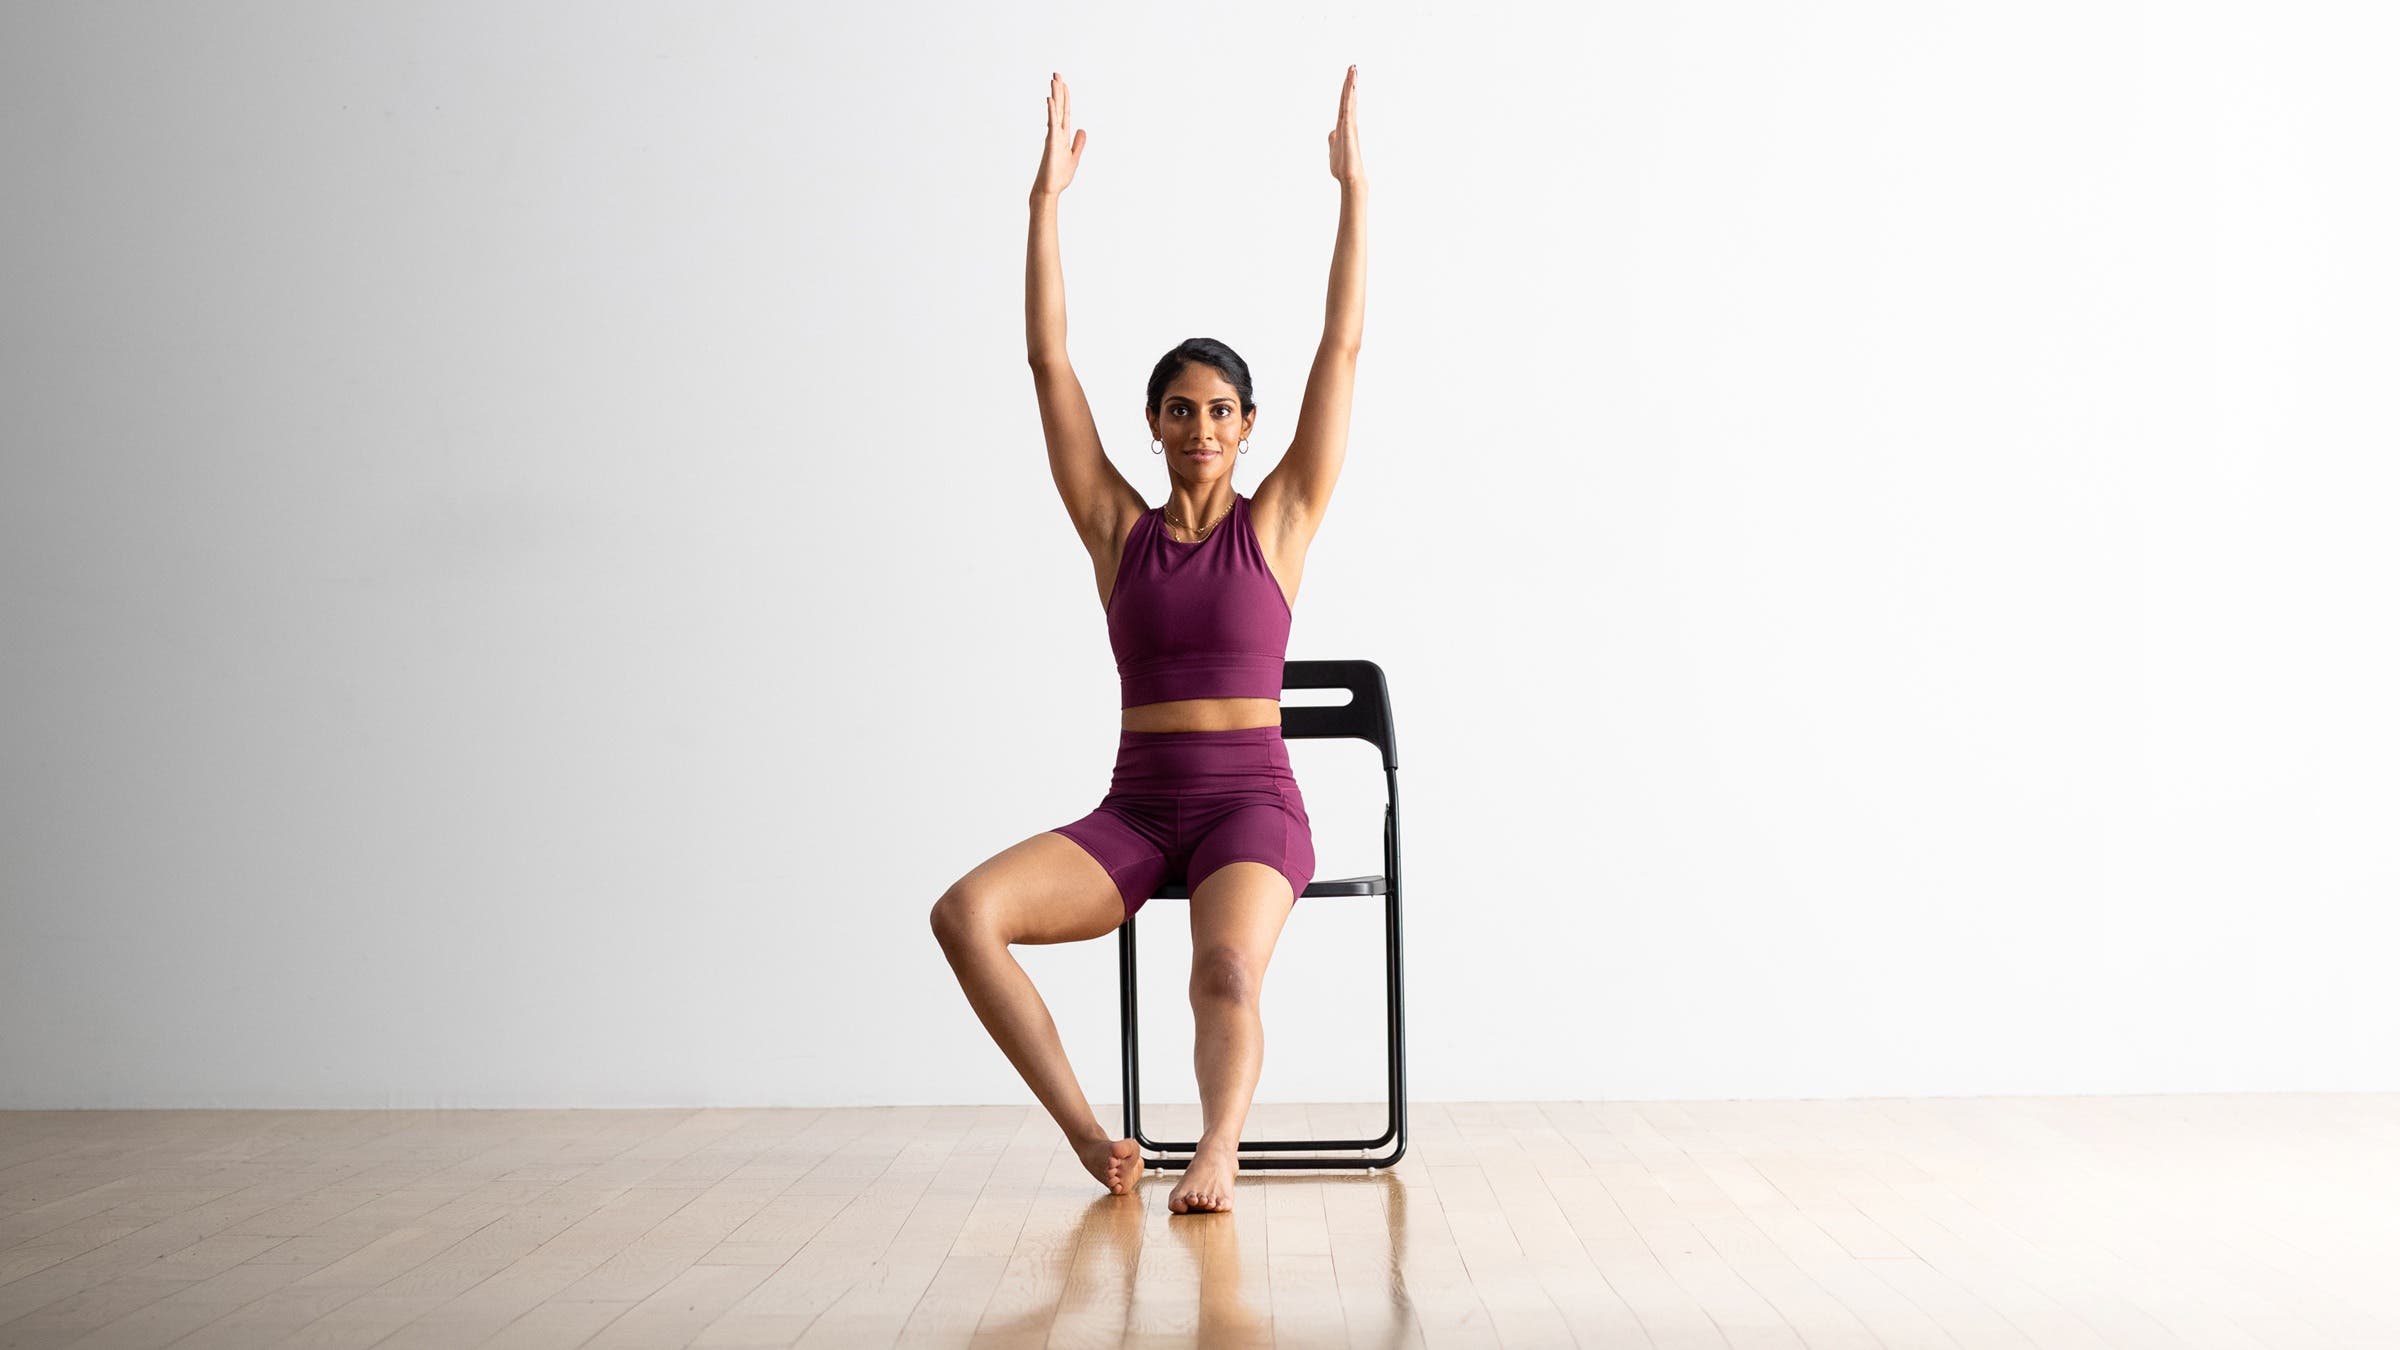
Tree Pose in a chair
Sit toward the front of a sturdy, armless chair. Bring one leg forward with your knee mostly straight. Bring the other knee out to the side, opening your hip. You can use a block under your lifted foot or simply bring that ankle to the opposite shin. Your arms can be raised into a big V shape. Hold for several breaths, then repeat on the other side.
Tree Pose Basics
Pose type: Standing posture
Targets: Lower-body strength
Benefits: Tree Pose is a strengthening posture that can help build confidence. This pose can improve your posture and counteract the effects of prolonged sitting. On your standing leg, this pose strengthens your thigh, buttock (glute), and ankle. On your lifted leg, this pose gently stretches your entire thigh and buttocks.
Other Tree Pose perks:
- Boosts energy
- Strengthens your core
- Stretches around your shoulders and your back (latissimus dorsi)
Learn more about finding alignment and balancing effort with ease in this posture in Tree Pose: The Complete Guide for Students and Teachers. You’ll access expert insights on this and other poses from top teachers—including anatomy know-how, variations, and more—when you become a member. It’s a resource you’ll return to again and again.
ADVERTISEMENT
Beginner Tips
- Practice Tree Pose while standing a few inches from a wall on your straight-leg side. Even if you don’t touch the wall, the proximity of it helps you feel confident you won’t fall out of the pose. But if you wobble, you can simply reach out a hand and rebalance yourself.
- To avoid falling out of Tree Pose, you need to explore and understand your hip-opening capacity. If your hips aren’t naturally open and you force the lifted knee to point straight out to the side, your entire pelvis will twist in that direction, pulling you out of alignment. Your hips should be level and facing forward, even if it means your knee is not rotated out as far.
- When you reach up, keep the arms aligned with the ears. Taking your hands too far back may shift your center of gravity and cause you to fall backward.
- Lean into the metaphor of the Tree, embodying the roots below, the strong trunk, and the full flowering of your upward reach.
Be mindful!
- Don’t turn out the foot on your standing leg. This can misalign the supporting knee and hip. Keep your toes and knee facing forward.
- Never place your foot on the opposite knee. Rather, keep the foot above or below the knee in order to protect the knee of the standing leg.
- If you have shoulder pain, numbness, tingling, or shooting pain when you lift your arm, try keeping your hand on your hips.
Deepen the pose
Challenge yourself by closing your eyes as you balance in Vrksasana. You can also challenge your balance by touching the palms overhead.
Why We Love Tree Pose
“A tidbit I picked up along the way and have often repeated is that stiffer trees are more likely to be felled in a storm; the trees that can bend in the wind are less prone to breaking. I love to remember this in Vrksasana,” says Sage Rountree, author and co-owner of Carolina Yoga Company. “A little sway from side to side is a sign of resilience and an opportunity to find equilibrium in the middle of shifting circumstance.”
How to Teach Tree Pose
These cues will help protect your students from injury and help them have the best experience of the pose:
- Place the foot anywhere along the inside of the standing leg except the knee. Pressing into the knee can destabilize the joint—and your pose.
- Imagine that your body is centered on an invisible plumb line dropping from the crown of your head, through the middle of your torso and pelvis, and straight into the ground beneath you. Remain centered around that plumb line even though you’re on only one leg. To do this, strengthen the trunk of the tree—your core—and firm your standing leg by hugging the muscles of your inner thigh in toward your midline.
- Feel free to use a wall or chair to steady yourself into position. Even lightly touching a hand on the wall or even standing near a wall gives you confidence in case you lose your balance.
ADVERTISEMENT
Preparatory and Counter Poses
To prep for Tree Pose, focus on poses that open your hips. Also, practice your drishti to develop the habit of keeping your attention centered in balancing poses.
Preparatory poses
Virabhadrasana II (Warrior II)
Utthita Trikonasana (Extended Triangle Pose)
Baddha Konasana (Bound Angle Pose)
ADVERTISEMENT
Counter poses
Prasarita Padottanasana I (Wide-Legged Forward Bend)
ADVERTISEMENT
Anatomy
Several “stories” take place simultaneously in Vrksasana. It is both a balancing pose and, secondarily, a hip opener, explains Ray Long, MD, a board-certified orthopedic surgeon and yoga instructor. The pose also unites the various parts of the body, from the foundation formed by the standing foot through the palms of the lifted hands. Tree Pose asks some parts of you to ascend while others remain rooted to the ground.
In the drawings below, pink muscles are stretching and blue muscles are contracting. The shade of the color represents the force of the stretch and the force of contraction. Darker = stronger.
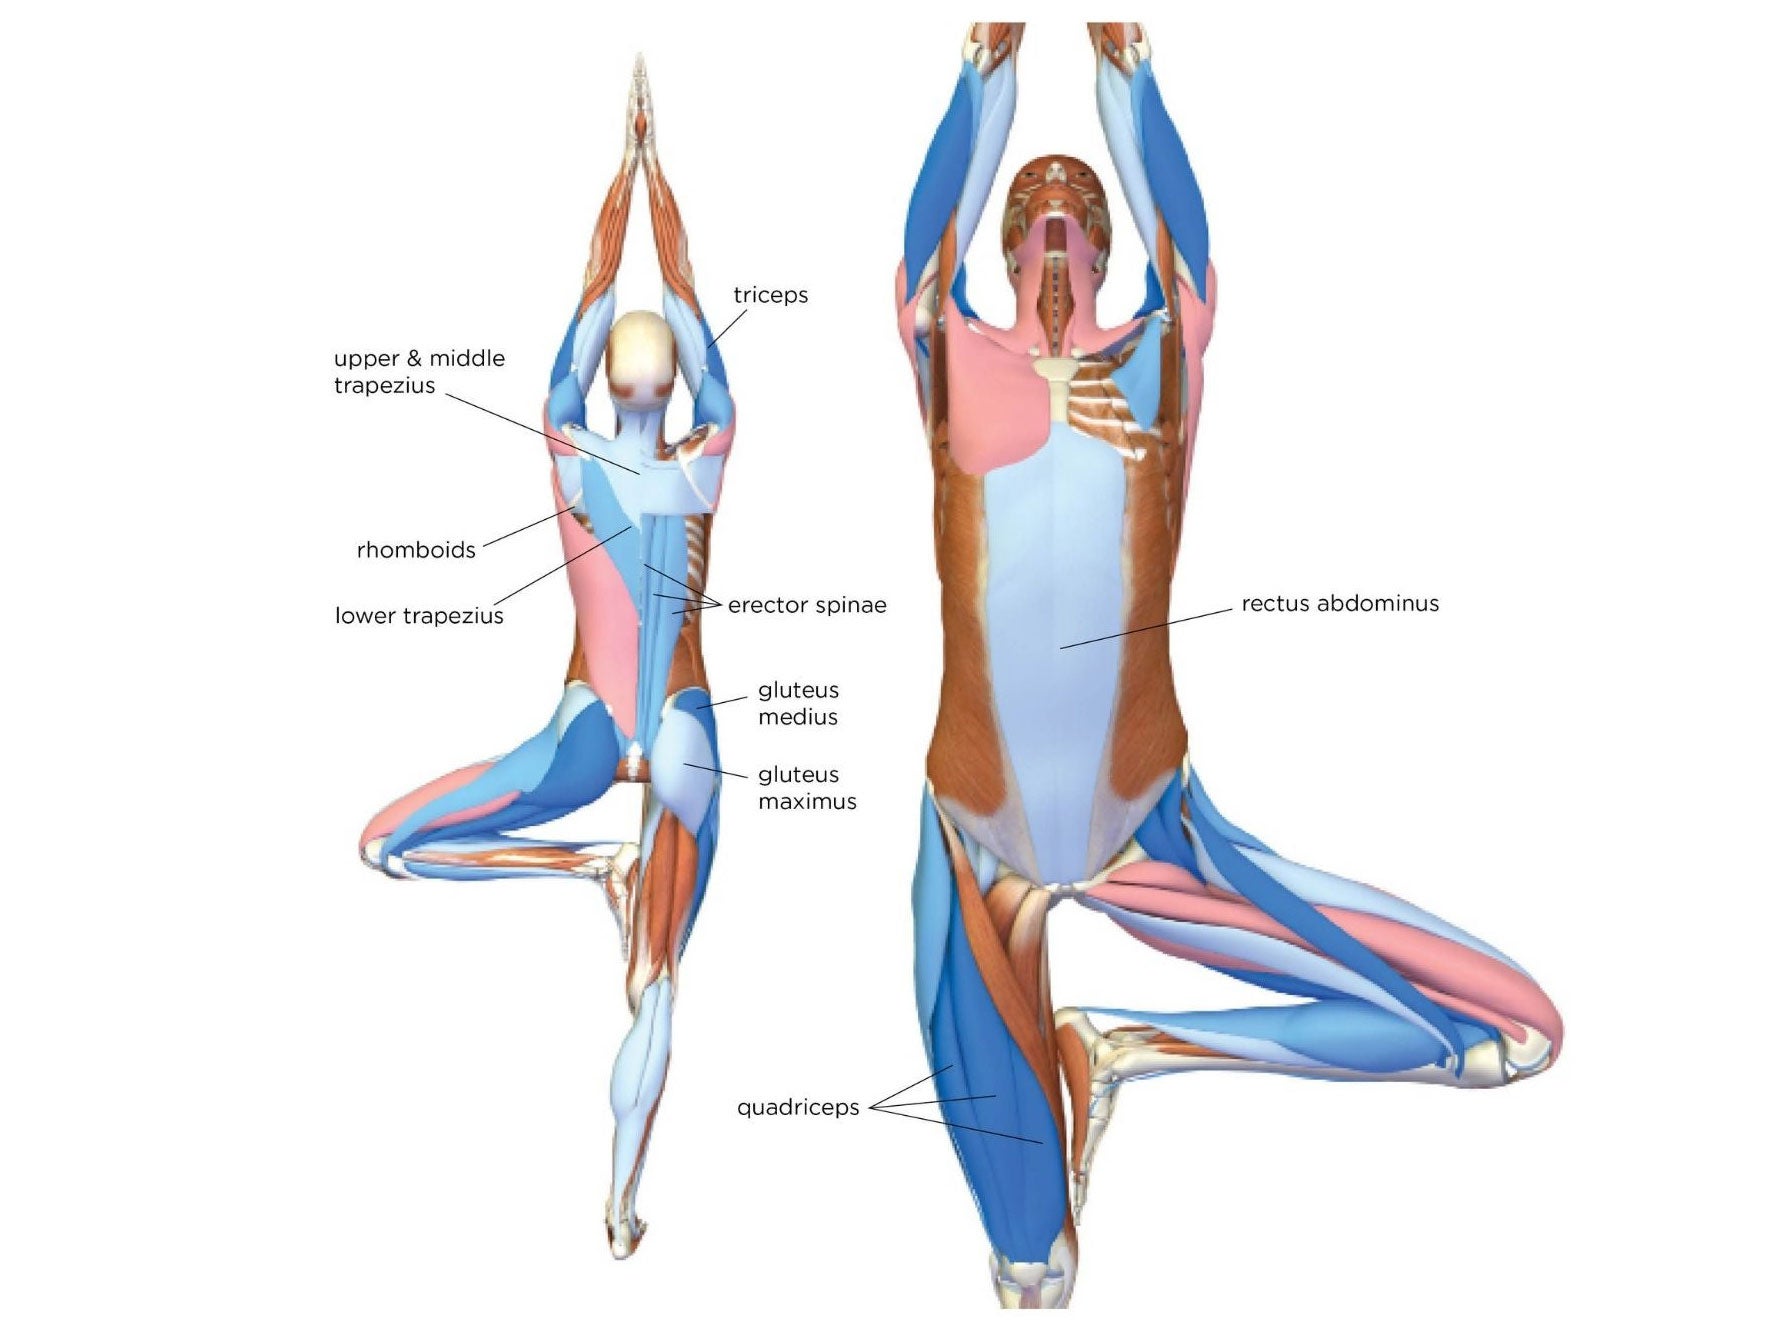
Straighten the standing leg by activating the quadriceps. The gluteus medius automatically contracts when you balance on one leg. Engage the muscles of the ankle and foot to stabilize the standing leg.
Pay attention to how the other leg feels. The hamstrings activate to bend the knee; the adductor group presses the sole of the foot into the inner thigh of the standing leg; and the hip abductors, gluteals, and deep external rotators contract to draw the knee back and externally rotate the femur. The bent-leg foot pressing into the thigh stabilizes the standing leg.
The pelvis connects to the spine through the erector spinae muscles along the spine. Engage the deltoids, the main shoulder muscles, to lift the arms, and the infraspinati (part of the rotator cuff) to externally rotate the upper arm bones. Draw the shoulders away from the ears with the lower third of the trapezius and press the palms of the hands together evenly.
The balance of the pelvis results from the interplay of various muscles that move the hip—the adductors, abductors, extensors, flexors, and rotators. Move up the body to the back and balance the activation of the erector spinae and quadratus lumborum with that of the abdominal muscles on the front body. Draw the shoulder blades toward the midline and down the back. Then activate the pectoralis minor and serratus anterior muscles to lift the chest.
Excerpted with permission from The Key Poses of Yoga and Anatomy for Vinyasa Flow and Standing Poses by Ray Long.
Put Tree Pose into practice
Ready to put Vrksasana into practice? Here are a few flows to try:
Inspire Stability & Fluidity with This Short Tree Pose Flow
7 Poses That Help Deepen Your Awareness to Release Your Psoas
About our contributors
Teacher and model Natasha Rizopoulos is a senior teacher at Down Under Yoga in Boston, where she offers classes and leads 200- and 300-hour teacher trainings. A dedicated Ashtanga practitioner for many years, she became equally as captivated by the precision of the Iyengar system. These two traditions inform her teaching and her dynamic, anatomy-based vinyasa system Align Your Flow. For more information, visit natasharizopoulos.com.
Ray Long is an orthopedic surgeon and the founder of Bandha Yoga, a popular series of yoga anatomy books, and the Daily Bandha, which provides tips and techniques for teaching and practicing safe alignment. Ray graduated from the University of Michigan Medical School and pursued post-graduate training at Cornell University, McGill University, the University of Montreal, and the Florida Orthopedic Institute. He has studied hatha yoga for over 20 years, training extensively with B.K.S. Iyengar and other leading yoga masters, and teaches anatomy workshops at yoga studios around the country.