Updated January 20, 2025 11:52PM
Mission Possible: 5 Steps to Kasyapasana
Build up to Kasyapasana with these opening and balancing poses.
Build up to Kasyapasana with these opening and balancing poses.
You already know yoga is transformational: The practice strengthens your body, focuses your mind, and tempers your nervous system. But the most powerful shift occurs when you realize you can do something you didn’t think was possible. And when you exceed your own expectations, you feel a sense of empowerment that flows into every facet of your life.
For many students, taking flight in a new arm balance is just such an occasion. The striking beauty and demanding complexity of arm balances can be intimidating, and if you’re like most people, these postures don’t come easily and can seem out of reach. But arm balances are more accessible when you break them down into manageable steps. The truth is, the process of stepping back, taking a breath, and piecing apart a challenging situation can be just as fulfilling as being able to do the arm balance itself.
ADVERTISEMENT
While all arm balances require core and shoulder strength, Kasyapasana (Balance Dedicated to Kasyapa) also requires shoulder and hip flexibility. In fact, the hardest part of Kasyapasana isn’t building strong abs and arms, but rather getting enough motion in your shoulders and hips to hold your foot while firing all the muscles that keep you afloat in the pose. It may take awhile to bring all of the posture’s elements together, so be patient with yourself and use the poses in this sequence to help you get there: They focus on opening the leg, hip, and shoulder muscles with the support of the floor or a wall. As you move through the sequence, remember that it’s not a competition and that you don’t have a deadline. It’s an opportunity for you to get to know yourself better, to work with a challenging posture or limiting beliefs about yourself, and to practice mindfully and consistently. Remember, a journey of 1,000 miles starts with a single step.
5 Steps to Kasyapasana
Before You Begin
The Half Lotus component of Kasyapasana is unique. In most postures that include Half Lotus, the hip joint is flexed; in Kasyapasana, it is extended, which requires even more flexibility in the adductors, or inner legs, and hip flexors. This means having to work the muscles on all sides of the joint to prepare your outer hips for Kasyapasana. Helpful prep poses include Eka Pada Rajakapotasana (One-Legged King Pigeon Pose) and Gomukhasana (Cow Face Pose). And to stretch your hip flexors, practice Anjaneyasana (Low Lunge). Round out these hip openers by stretching your adductors with Baddha Konasana (Bound Angle Pose) and Upavistha Konasana (Wide-Angle Seated Forward Bend).
In Kasyapasana, the top arm is internally rotated and adducted, requiring shoulder flexibility, especially in the rotator cuff; Parsvottanasana (Intense Side Stretch) and Baddha Parsvakonasana (Bound Side-Angle Pose) prepare for that. Core strength is also key to help your ribs, pelvis, and spine work together. Take Paripurna Navasana (Full Boat Pose) and Vasisthasana (Side Plank Pose) to fire up your core and create stability. Also, any time you work with Lotus variations, stop immediately if you feel pain in your knee.

ADVERTISEMENT
1. Extended Hand-to-Big-Toe Pose (Utthita Hasta Padangusthasana)
Once you’ve stretched your adductors, each hip joint should ex–tend into Half Lotus more easily. (If your thighs are still tight, your leg may go into Half Lotus, but your thigh will be flexed rather than extended and pulling your foot down, making it harder to bind in Kasyapasana. If so, stretch your adductors more.)
Stand an arm’s length from a wall, the wall to your right. Place your right hand on the wall. Externally rotate your arm; if the bottom arm is not externally rotated in Kasyapasana, you lose stability in the rotator cuff and scapula, making the posture harder and potentially injurious.
ADVERTISEMENT
Bend your left knee into your chest, and hold your left big toe with the index and middle finger of your left hand. Root down through your right big toe, engage your right quadriceps, and broaden your chest. Stretch your left leg ahead, then out to the side. Straightening your left leg can create misalignment: The standing hip often shifts to the right, the chest narrows, and the chin drops. If this happens, apply opposite actions: Hug your standing hip toward the midline, continue broadening your chest, and keep your eyes level with the horizon.
After four to eight breaths, release your left leg. Pause in Tadasana (Mountain Pose) before practicing the second side.

2. Side Plank Pose, variation (Vasisthasana)
Side Plank helps you set up appropriate alignment for your lower hand, arm, and shoulder. Placing your top leg in Vrksasana (Tree Pose) opens your hips and challenges your balance.
To create stability in your lower shoulder in all Vasisthasana variations and in our final pose, it’s essential that your hand and arm be slightly beyond your shoulder, toward the front end of your mat. That position is structurally stable. It also makes it easier to externally rotate your arm and engage the muscles around the shoulder blades.
ADVERTISEMENT
Come into Plank Pose, and move your right hand toward the front of your mat almost a full hand’s length. Rotate your right arm so that your biceps turns toward the front end of your mat. Roll to the outer edge of your right foot, stacking your legs and placing your left hand on your hip. Maintaining integrity in your shoulder, bend your left knee, hold your left ankle, and guide your foot into Tree Pose as high on your inner leg as you can.
Feel the extra weight that the Tree Pose variation of Plank produces on your middle and lower body. Counteract the force by lifting your hips high. Integrate your core by gently hugging your navel toward your spine. Stretch your left arm toward the ceiling, take five breaths, then return to Plank. Move to your second side.

3. Bound Half-Lotus Forward Bend, variation (Ardha Baddha Padmottanasana)
Bound Half-Lotus at the wall provides you with the neuromuscular blueprint for Kasyapasana. It’s the same shape and requires the same physical actions, without the demands of the arm balance.
ADVERTISEMENT
Begin by standing an arm’s distance from the wall, with the wall on your right. Shift your weight onto your right foot, and bend your left knee toward your chest. Place your left foot in your right hip crease, and hold it in place with your right hand. Keeping hold of your left foot, gently lower your knee, feeling a stretch in your inner leg and outer hip. The higher your foot is in the hip crease, the easier it is to bind, especially in Kasyapasana.
Now it’s time to work on binding. Stretch your left arm out to the side at shoulder height. Internally rotate it so the back of your hand is facing the floor, and bend your elbow as you sweep your arm around your back. Take hold of your Half Lotus foot or big toe. If you don’t have the range of movement to hold your foot, hold your waistband; this means you won’t be able to bind in Kasyapasana and you’ll have to take the same modification in the final pose.
From there, place your right hand on the wall in line with your shoulder. Rotate your hand so that your index finger is pointing toward the ceiling. Since this arm correlates to your bottom arm in the peak pose, focus on externally rotating your arm, which makes your biceps face the ceiling, and on drawing your right shoulder blade down your back. Stay here for five breaths before releasing and shifting to your second side.

ADVERTISEMENT
4. Fish Pose (Matsyasana)
Fish Pose in Lotus is one of a few postures that extend the hip, which is what happens in Kasyapasana. Also, gravity helps stretch your inner legs, hip flexors, and internal rotators, which need to open for the peak pose.
To prepare, sit and fold your legs into Lotus, sliding your left leg into the pose first. Place your hands on the floor behind you, and lower yourself. You can allow your knees to lift as you recline. Once you’re on the ground, let each hand hold the foot ahead of it, and bend your elbows slightly, resting them on the floor. Root down through your shoulders and upper arms. Keeping engaged, lower your knees to the floor (or a folded blanket).
ADVERTISEMENT
Feel the stretch in your inner legs as your knees descend. Notice that your spine naturally arches as you lower your knees. Increase this curve by pressing your upper arms more strongly into the ground and lifting your chest. As your chest lifts, shift from the back of your head to the top of your head. Be mindful of the sensations in your neck, and release the posture if you have any discomfort.
Stay in the posture for five breaths before resting on the back of your head again and releasing your legs. Take a moment or two before repeating the pose on the other side.

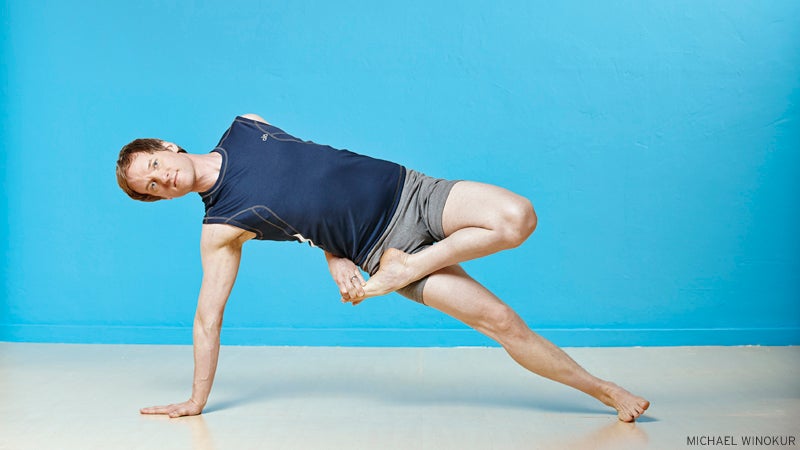
5. Kasyapasana (Balance Dedicated to Kasyapa)
Despite the strength, balance, shoulder mobility, and hip opening our final pose needs, the hardest part is getting into it. The most accessible way is by binding in Half Lotus while sitting, and then lifting into the arm balance.
To begin, sit in the center of your mat, facing its long side. Come into Half Lotus with your left leg on top. Draw the outer edge of your foot deeply into your hip crease. Wrap your left arm behind your back, and take hold of your foot.
ADVERTISEMENT
Next, place your right hand on the floor in line with your hip and about a foot from your pelvis. Externally rotate your arm, and draw your shoulder blade down your back. Begin to lean into your right arm and partially straighten your bottom, right leg in the opposite direction. This may sound complicated, so take a moment to picture yourself doing the full pose. Remember, you’ll essentially be in Side Plank—right now, you’re simply positioning other body parts for the final pose.
Now, it’s time for the hard work. You may have to experiment with how much your bottom knee is bent before you lift. I start with my knee bent about 45 degrees. Maintaining the external rotation and scapular engagement of your right arm, lean more of your weight into the right hand. With your right leg straight, press the outer edge of your right foot into the floor, and lift your hips. You may need to practice this step many times. If you’re able to lift your hips and maintain the bind, take a few breaths and savor the posture. Open the left side of your chest toward the ceiling, draw your front ribs in, and lift your hips as high as possible. To release, let go of your foot, lower your hips to the floor, and gently release the Lotus leg. Come into Adho Mukha Svanasana (Downward-Facing Dog Pose) before doing the other side.
In this sequence, you’ve done the equivalent of the musical scales (the four “warmup” poses) and the big performance (Kasyapasana). Move gently into finishing poses like Setu Bandha Sarvangasana (Bridge Pose). If you have time, sit cross-legged for a few minutes of meditation before Savasana (Corpse Pose).