Updated March 22, 2025 09:46PM
If you buy through our links, we may earn an affiliate commission. This supports our mission to get more people active and outside.Learn about Outside Online's affiliate link policy
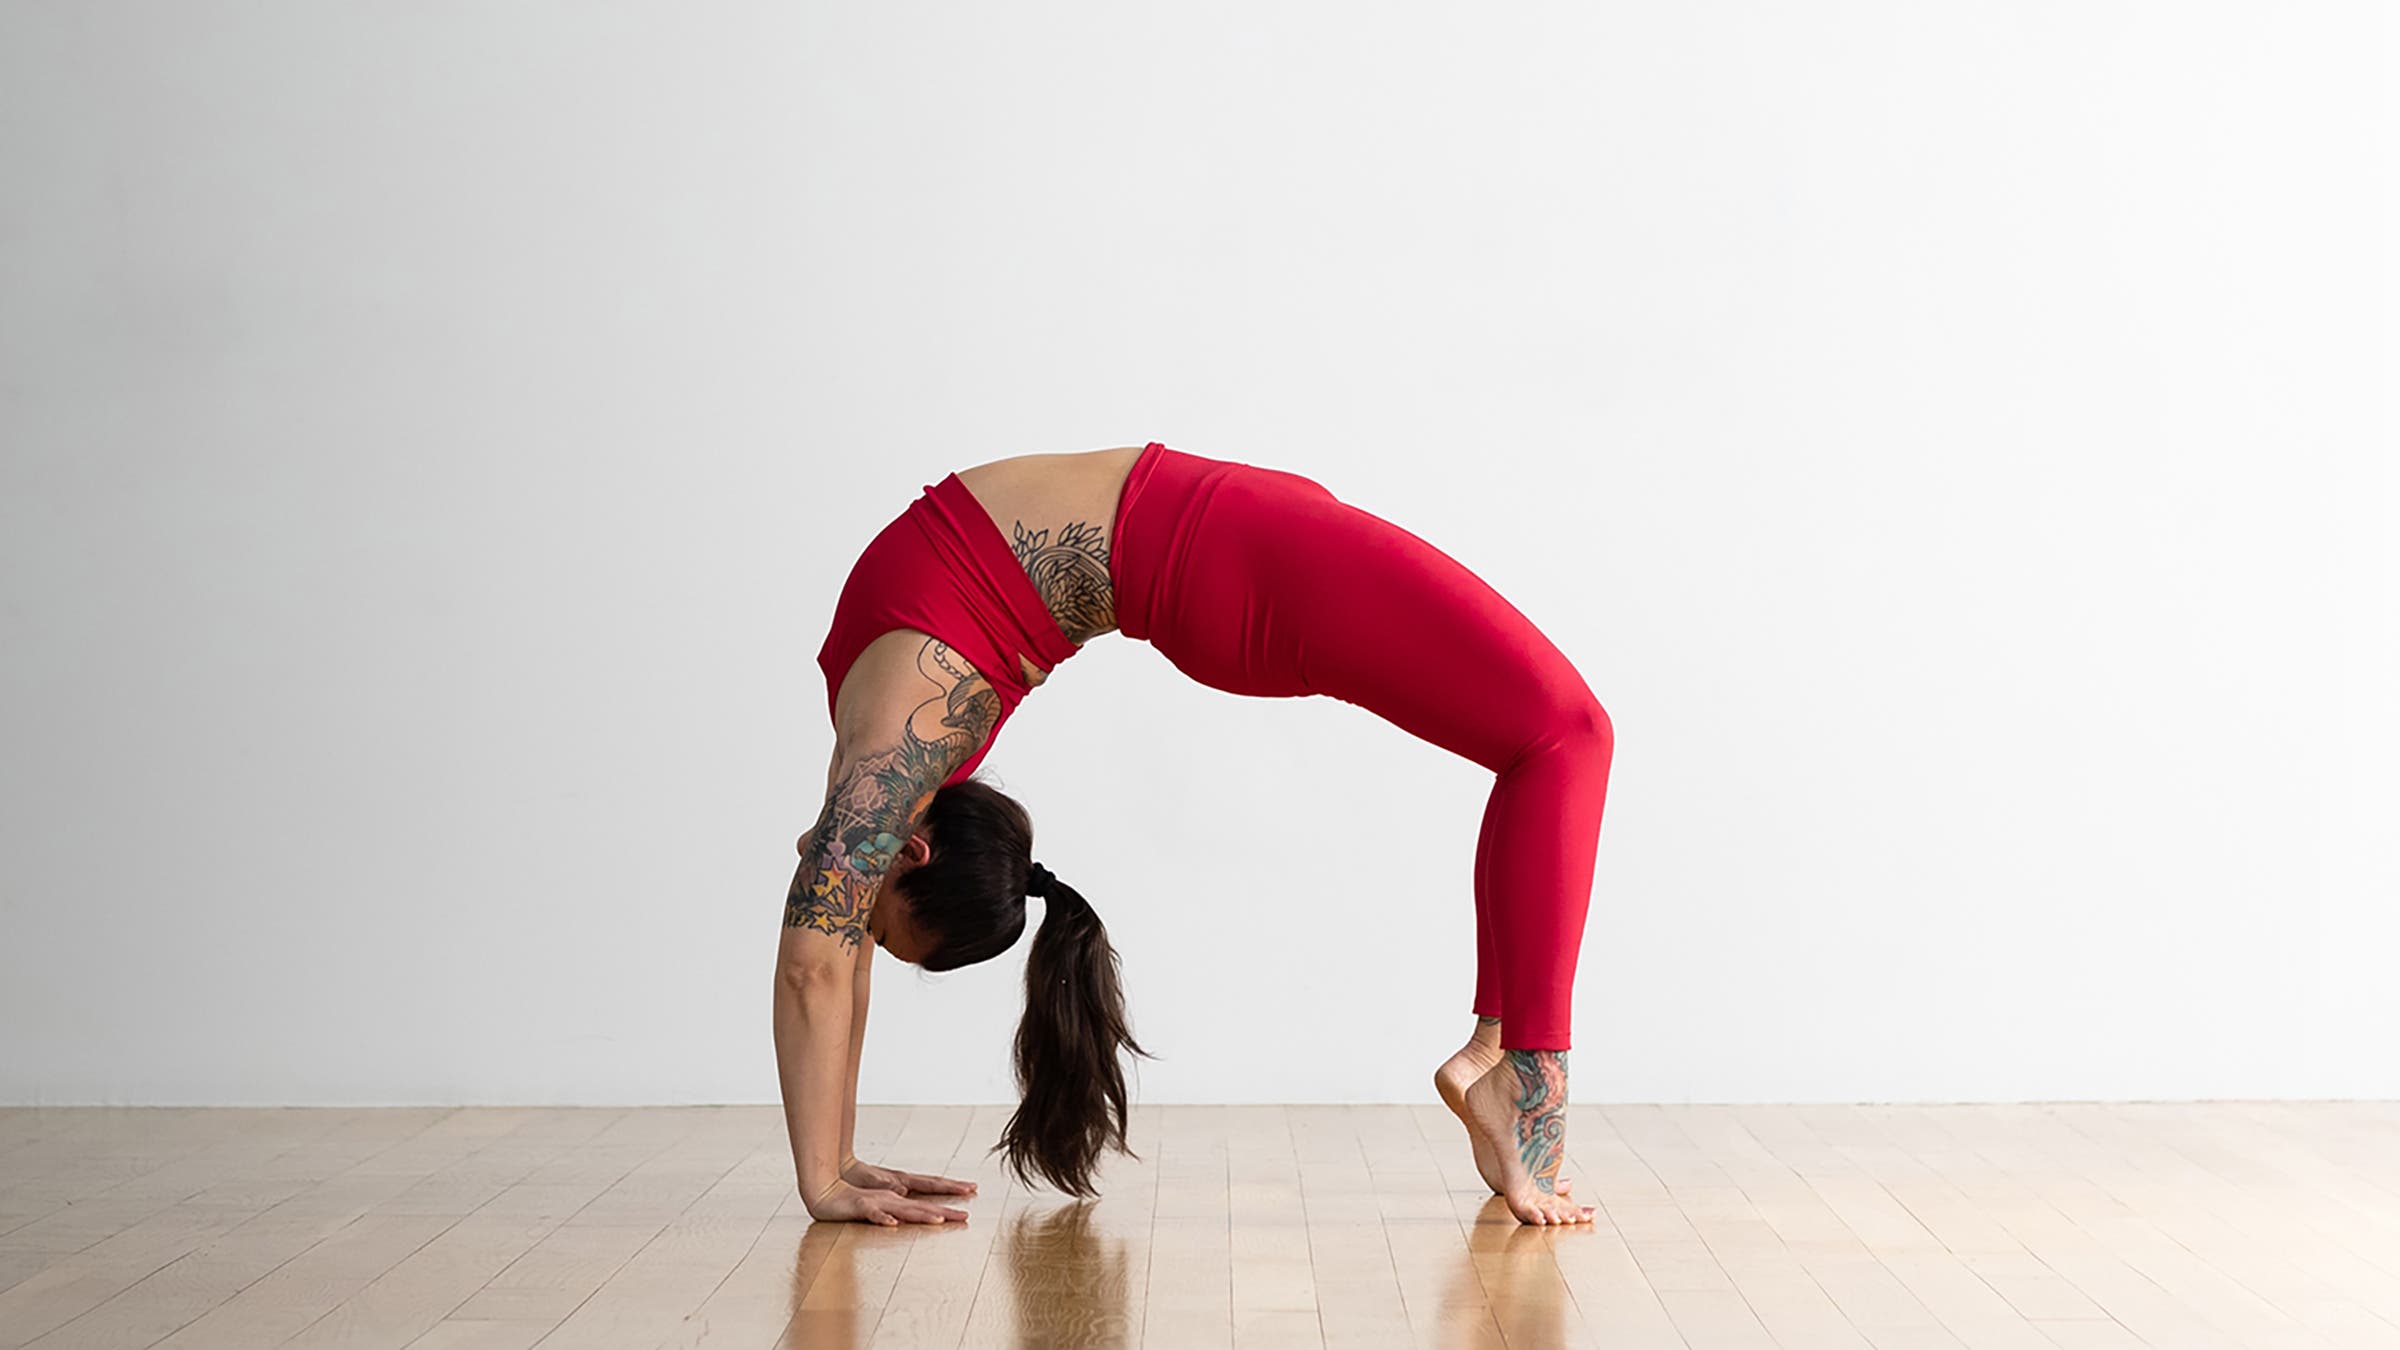
Wheel Pose | Upward-Facing Bow Pose
Need an energy boost? Urdhva Dhanurasana can help—and strengthen your arms, legs, abdomen, and spine in the process.

(Photo: Andrew Clark)
Urdhva Dhanurasana (Wheel Pose or Upward-Facing Bow Pose) is an intense backbend which challenges plenty of students.
“There was a time when backbends and I seriously didn’t get along,” says yoga teacher Kathryn Budig, “To be honest, I think I disliked them simply because I wasn’t good at them. They frustrated me. These gorgeous shapes looked like they should feel so good and yet when I attempted them I felt like I had just gotten back from a trip to the cement factory. I wanted my body to keep going but my spine wouldn’t budge. I’d look at the bendy spines around me and wonder how I missed out on the flexy-vertebra handouts.So, I walked away defeated and kept working on everything else.”
Over time, Budig, like many of us, learned that you can’t “own” a backbend or “do” one—you surrender to it, just like every other part of yoga. Keep in mind that a pose like this, like any yoga pose, doesn’t need to look perfect to be effective and valuable—it simply needs to be safe, maintain strong alignment, and make you feel good.
Sanskrit
Urdhva Dhanurasana (OORD-vah don-your-AHS-anna)
urdhva = upward
dhanu = bow
ADVERTISEMENT
How to
-
- Begin lying on your back. Bend your knees and plant your feet hip-distance apart and parallel, directly under your knees.
- Reach back to place your hands alongside your ears with your palms down and your fingers pointing toward your shoulders.
- Without letting your feet or your knees splay apart, inhale, then use an exhalation to lift your hips, torso, and head enough to place the crown of your head on the mat. Do not rest any of your weight on your head.
- Draw your elbows toward one another, pull your upper arms into their sockets, and start to arch your middle and upper back.
- With the next inhalation, press down with your hands and feet, and lift into the pose.
- Rotate your inner thighs to the floor, and reach your tailbone toward the backs of your knees. Make sure your feet have not turned out, and root down with your big toe mounds.
- To deepen, walk your feet closer to your hands, keeping your forearms and shins perpendicular to the floor and parallel to each other.
- To come out of the pose, tuck your chin and lower your body directly to the floor. (Don’t put the crown of your head on the floor).
Variations
Wheel Pose against a wall
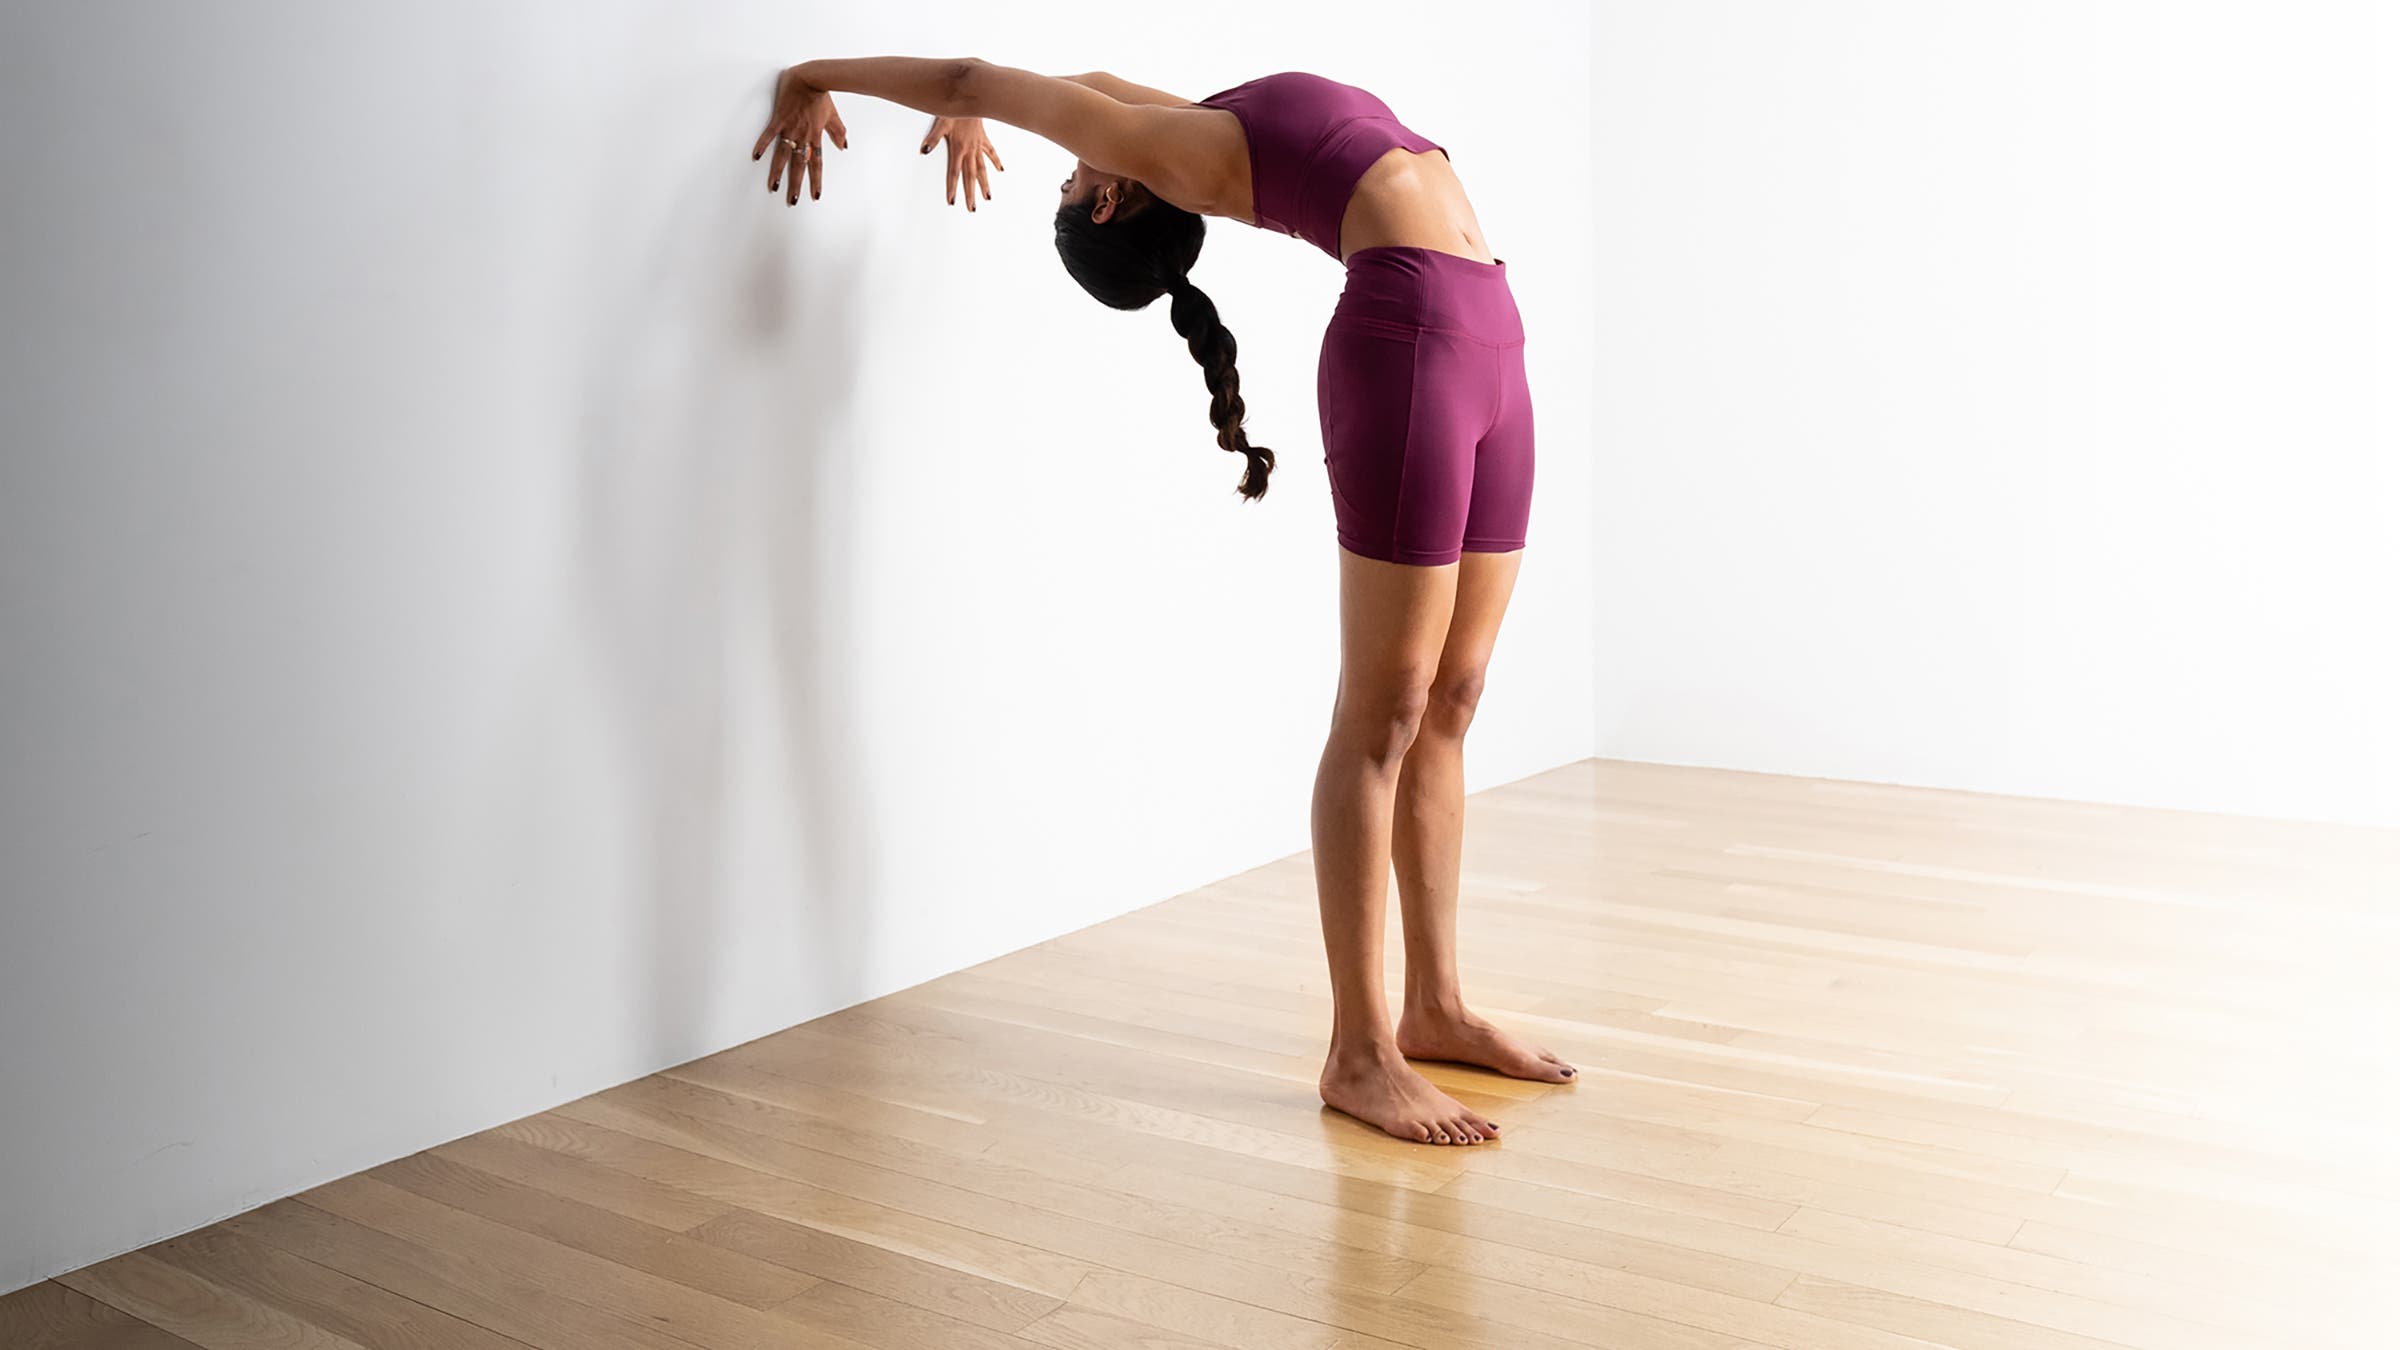
Stand a few feet away from the wall—the exact distance will depend on your flexibility. Place your feet hip-width apart or wider, and press down through your heels. Reach your arms up and alongside your ears, as if you were coming into Urdhva Hastasana (Upward Salute), and then continue to lift up through the chest as you bend your knees and allow your upper back to bend and your arms to reach back for the wall. Let your head tilt back. You can stay here, or slowly walk your hands down further on the wall. Stay for several breaths at a place where you can comfortably breathe, then walk your hands back up the wall to come out of the pose.
Wheel Pose on a chair
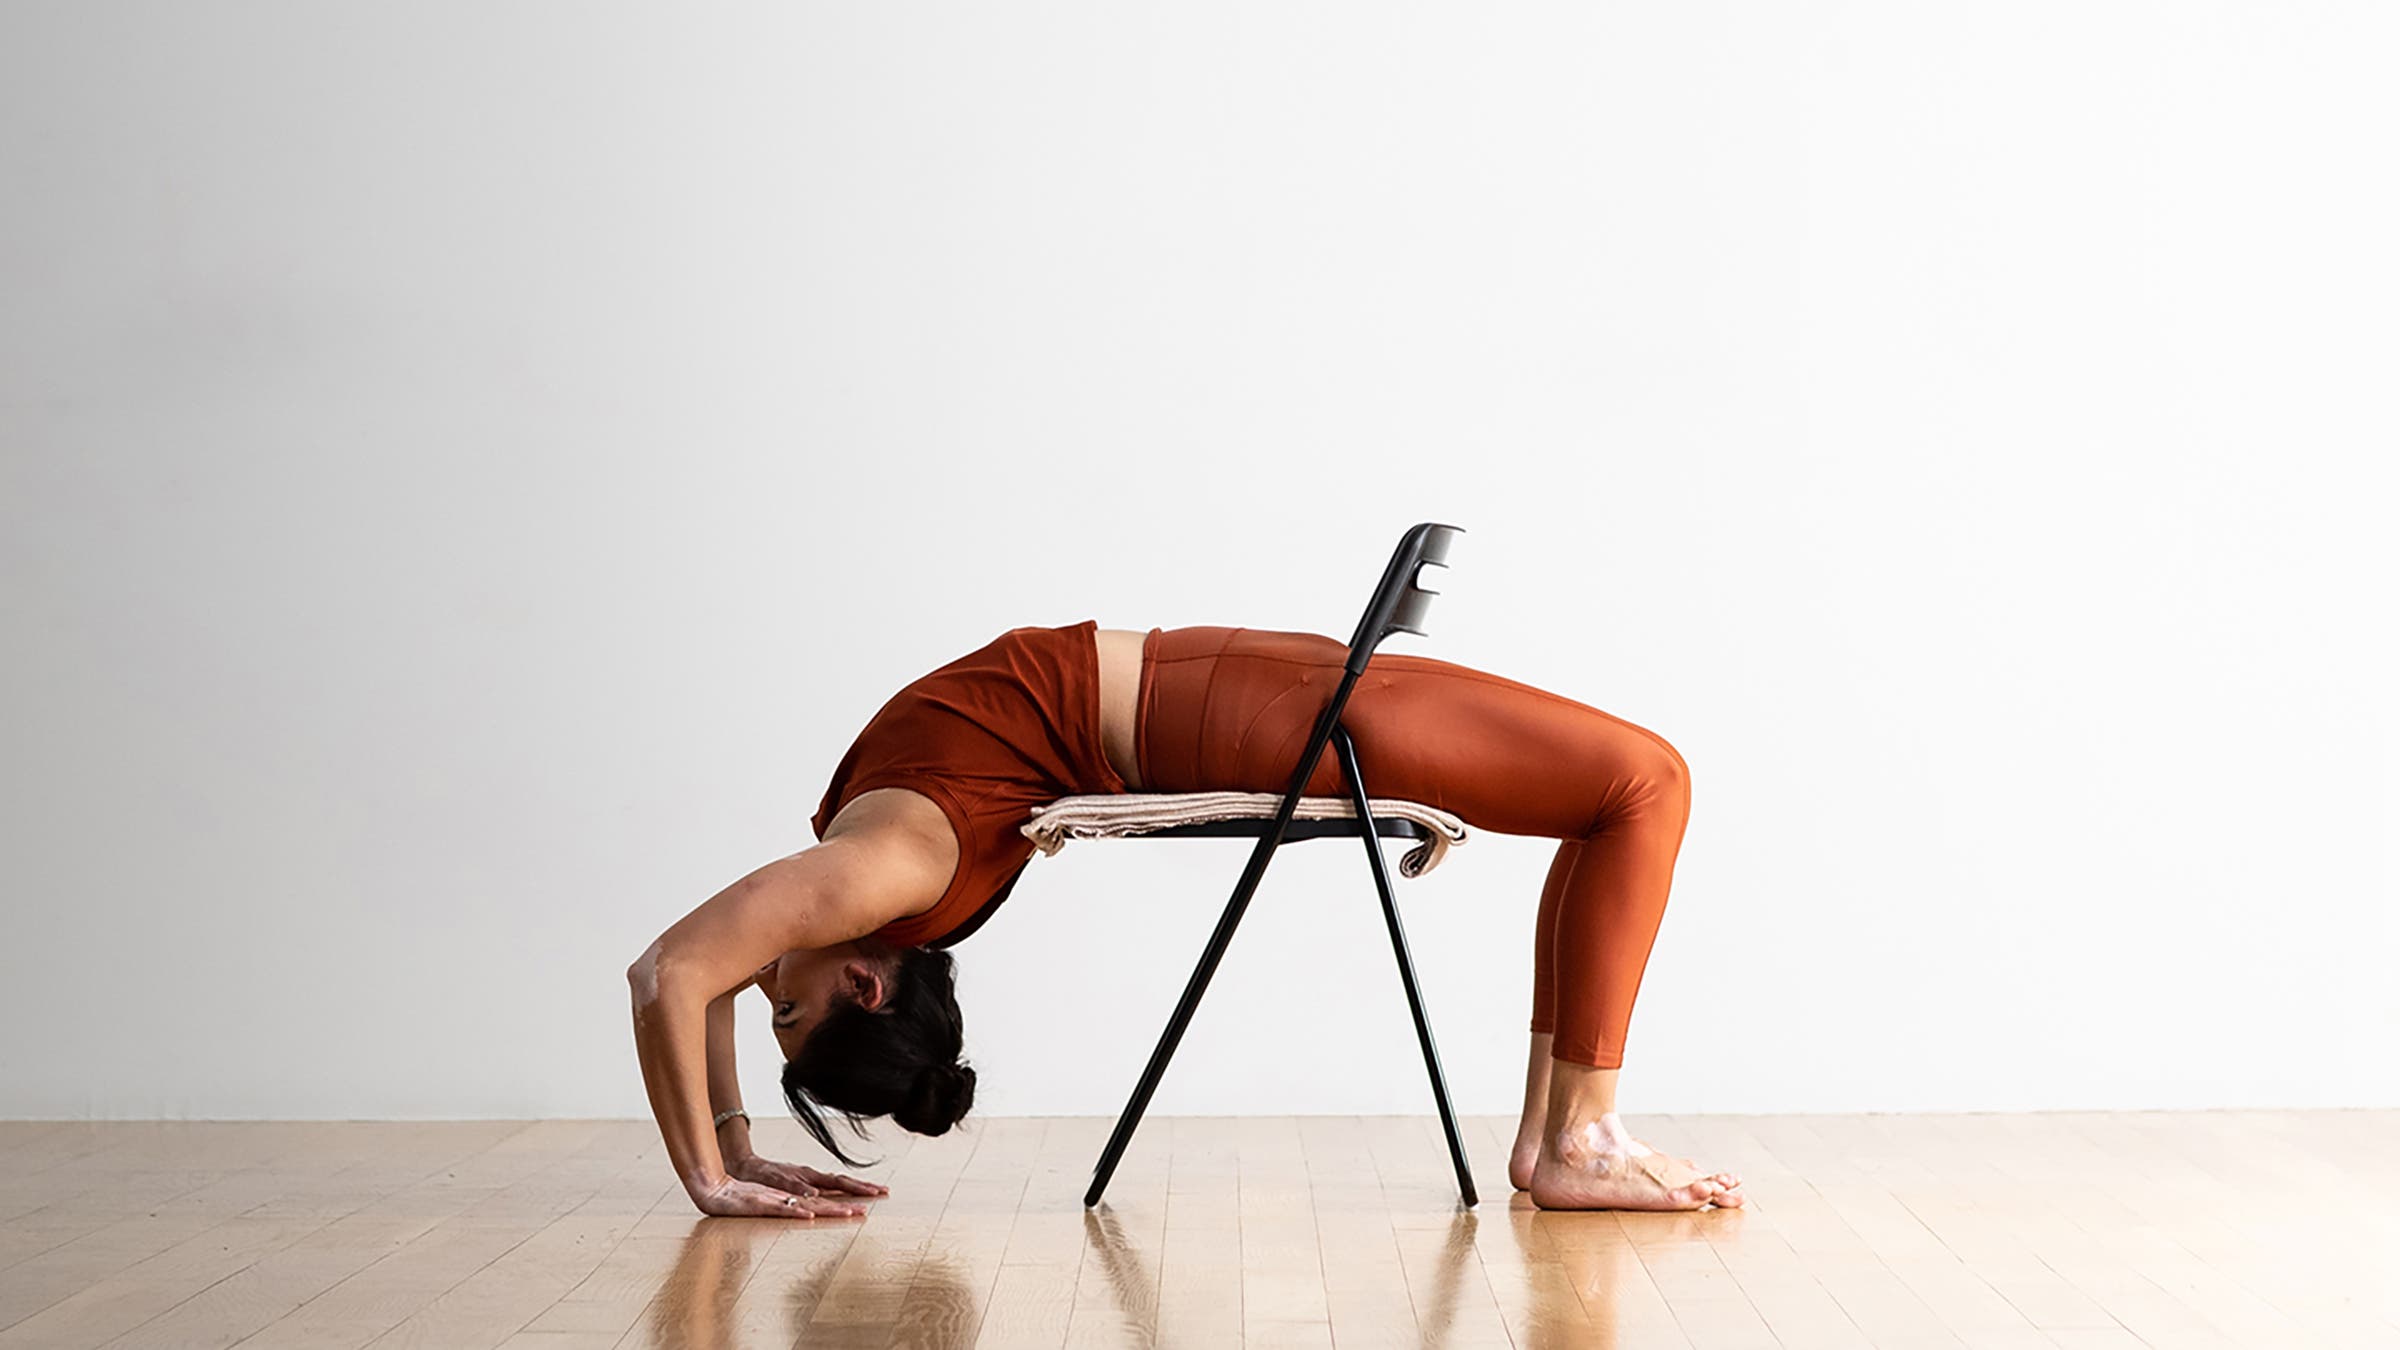
Place a folded blanket on the seat of a chair. Sit on the blanket, facing the back of the chair, with your feet on the ground hip-distance apart. Carefully lower yourself back so your shoulder blades are at the edge of the chair and your hands are shoulder distance apart, fingers pointing toward your heels.
ADVERTISEMENT
Wheel Pose on your toes
To emphasize the backbend, come onto your toes.
Wheel Pose on your forearms
From Wheel Pose, walk your hands toward your feet, bend your elbows and lower yourself until you are supporting the pose on your forearms. Your head may touch the floor, but don’t put weight on your head.
Wheel Pose basics
Other names: Upward-Facing Bow Pose
Pose type: Backbend
Targets: Full-body flexibility
Benefits: Wheel Pose is an energy-boosting posture that can ease back pain. It also stretches your abdomen, chest, shoulders, the front of your hips (hip flexors), and the front of your thighs (quadriceps). It also strengthens your back muscles, the back of your thighs (hamstrings), and your buttocks (glutes).
ADVERTISEMENT
Other Wheel Pose perks:
- Builds confidence and opens the heart chakra
- Improves posture and counteracts the effects of prolonged sitting
Beginner tips
Turn your upper thighs slightly inward and firm your outer thighs. Narrow your hip points and lengthen your tailbone toward the backs of your knees, lifting your pubis toward the navel.
Explore the pose
If your knees and feet splay as you lift into this pose, it compresses your lower back. One way to counteract that: Loop and secure a strap around your thighs, just above the knees, to hold your thighs at hip width and parallel to each other. To keep your feet from turning out, place a block between them, with the bases of your big toes pressing the ends of the block. As you go up, press your feet into the block.
ADVERTISEMENT
If you are having trouble pushing up into this pose, lie backward through a folding chair with your feet flat on the floor. Place your hands on the floor or on blocks that are stabilized against a wall, and push your back up from the chair. Keep pressing away from the floor until your arms are straight.
Be mindful!
- Spend time strengthening your wrists before attempting this pose. Distribute your weight evenly between your hands to avoid injury.
- Modify or avoid this pose if you have high or low blood pressure, a heart condition, vertigo or extreme dizziness, heartburn, ear infection, or certain eye conditions (glaucoma, detached retina, diabetic retinopathy, recent cataract surgery, etc.—ask your ophthalmologist if you are unsure). With these conditions, you may not want to bring your head below your heart.
- If you have a tendency toward shoulder dislocation, consider doing modifications or Setu Bandha Sarvangasana (Bridge Pose) instead.
Why we love this pose
“Wheel Pose was the peak pose that I used when teaching my first ever class. I’ve noticed that many people can be intimidated by it, but what makes it so special is how many people can enter into it when they thought it wasn’t possible. You can surprise yourself in this pose, demonstrating strength that you didn’t know you had, but that’s been there all along.” —former Yoga Journal assistant editor, Kyle Houseworth
Teacher tips
This cue will help protect your students from injury and help them have the best experience of the pose:
- Tight armpits and/or groins can restrict full movement into this pose. You can support either your hands or feet on a pair of blocks to help yourself realize the full backbend. Brace the blocks against a wall, and if you like, cover them with a sticky mat to keep your hands or feet from slipping.
Preparatory and counter poses
Practice this intense backbend at the end of class once your back body has been properly warmed up. Do not skimp on the preliminary backbends. Use more gentle backbends to warm up. Counter with forward bends.
ADVERTISEMENT
Preparatory poses
Setu Bandha Sarvangasana (Bridge Pose)
Urdhva Mukha Svanasana (Upward-Facing Dog Pose)
Salamba Bhujangasana (Sphinx Pose)
ADVERTISEMENT
Counter poses
Paschimottanasana (Seated Forward Bend)
Ananda Balasana (Happy Baby Pose)
ADVERTISEMENT
Anatomy
Urdhva Dhanurasana creates a backbend with your shoulders fully flexed over your head. This differs from Dhanurasana (Bow Pose), in which your shoulders extend back away from your torso, explains Ray Long, MD, a board-certified orthopedic surgeon and yoga teacher. The muscles that extend your arms in Bow Pose lengthen in Wheel Pose or Upward-Facing Bow Pose. Compared to Bow Pose, in Upward-Facing Bow, your torso is arched higher, taking the front of the body into a deeper stretch. The muscles at the front of your pelvis lengthen more because your hips are in greater extension. Your hands and feet are fixed to the mat, so the energy of straightening the arms and legs is transferred to your trunk, indirectly extending your back and hip and stretching the front of your body.
In the drawing below, pink muscles are stretching and blue muscles are contracting. The shade of the color represents the force of the stretch and the force of contraction. Darker = stronger.

Urdhva Dhanurasana stretches your hip flexors, including the psoas, pectineus, adductors longus and brevis, sartorius, and rectus femoris. Your abdominals also stretch in this pose.
Temporarily activate the hamstrings to extend your hips. The cue for this action is to attempt to drag the soles of your feet toward your pelvis. Your feet are glued to the mat, so the force of the contraction is transmuted to lifting your hips. Then engage the gluteus maximus, medius, and minimus be squeezing your buttocks to extend the femurs and retrovert the pelvis. A beneficial effect of contracting the gluteus maximus is the downward tilt of your pelvis, which protects against hyperextension of the lumbar spine.
Engage the quadriceps to straighten your knees. This indirectly extends your hips because your feet are glued to the mat. They cannot kick out in front, so the quadriceps act like a hydraulic lift to raise your pelvis.
Plantar flex your ankles and press the weight into the soles of your feet, activating the gastrocnemius and soleus muscles. Begin by pressing your heels into the mat, and then evert your ankles to distribute the weight evenly into the balls of the feet. This engages the peroneus longus and brevis on the sides of the lower legs. These actions secure the feet on the mat and are the first steps in addressing the splaying of the thighs caused by the gluteus maximus.
Pronate the forearms to press your hands into the mat, spreading the weight from the mounds of your index fingers across the rest of your palms. Contract the triceps to straighten your elbows. Firmly engaging this muscle aids to rotate the scapula away from the humerus and prevents impingement on the acromion process. This gives more room to flex your arms above the head. Activate the infraspinatus and teres minor muscles to externally rotate your shoulders, creating a helical action down your arms and through your elbows.
Draw the shoulder blades toward the midline to engage the rhomboids. Note that the scapulae rotate outward when the arms are above your head. Use the lower third of the trapezius to depress the scapula and draw your shoulders away from your neck. The rhomboids and trapezius muscles combine to exert a tethering effect on the shoulder blades, stabilizing them.
Excerpted with permission from The Key Poses of Yoga and Anatomy for Backbends and Twists by Ray Long.
ADVERTISEMENT
Put Upward-Facing Bow Pose into practice
Ready to put this backbend into practice? Here are a few flows to try:
6 Yoga Poses for People Who Sit All Day
10 Yoga Poses to Boost Your Immunity
ADVERTISEMENT
About our contributors
Teacher and model Natasha Rizopoulos is a senior teacher at Down Under Yoga in Boston, where she offers classes and leads 200- and 300-hour teacher trainings. A dedicated Ashtanga practitioner for many years, she became equally as captivated by the precision of the Iyengar system. These two traditions inform her teaching and her dynamic, anatomy-based vinyasa system Align Your Flow. For more information, visit natasharizopoulos.com.
Ray Long is an orthopedic surgeon and the founder of Bandha Yoga, a popular series of yoga anatomy books, and the Daily Bandha, which provides tips and techniques for teaching and practicing safe alignment. Ray graduated from the University of Michigan Medical School and pursued post-graduate training at Cornell University, McGill University, the University of Montreal, and the Florida Orthopedic Institute. He has studied hatha yoga for over 20 years, training extensively with B.K.S. Iyengar and other leading yoga masters, and teaches anatomy workshops at yoga studios around the country.