What You Need to Know Before Practicing Shoulderstand

(Photo: Andrew Clark)
The benefits of practicing inversions are believed to be vast. According to yoga tradition, poses that position the head below the heart or the feet above the heart bring harmony to body and mind. These are considered a crucial component of any yoga practice. Supported Shoulderstand (Salamba Sarvangasana) is a pose that has been practiced for centuries in support of mental and physical health.
What Is a Shoulderstand?
Although the word Sarvangasana translates as “all limbs pose,” the posture is commonly referred to as Shoulderstand because your body weight rests on the upper outer edges (the bony parts) of your shoulders. Folded blankets placed underneath the shoulders make it possible for the neck to be free to lengthen and get a mild stretch while the rest of the body lifts straight toward the ceiling in a single line. The blankets also prevent you from putting pressure on the delicate vertebrae in your neck. Without this propping, the pressure can, over time, flatten the neck’s natural curve.
Benefits of Inversions
Research shows that inversions such as Shoulderstand help improve blood flow, lower the resting heart rate, and improve endurance over time. Some people have reported feeling calmer and experiencing better sleep when practicing inversions (like Legs Up the Wall) before bed. In yoga tradition, Shoulderstand is believed to help ease digestive issues.
Contraindications
It’s recommended that people with high blood pressure, risk of blood clots, glaucoma, detached retinas, and those who are pregnant avoid inversions. If you aren’t sure whether you should be practicing Shoulderstand, consult with your doctor.
Tips for Doing Supported Shoulderstand
Before practicing the three versions of Shoulderstand below, keep the following in mind:
- Have three folded blankets handy to place underneath your shoulders.
- If, while in the pose, you find that the backside of your shoulders and upper back or on the inner edges of your shoulders meet the floor, add another blanket or two to the stack. It’s important to center yourself on the blankets, not turn your head, and look gently toward your chest to avoid injuring your neck.
- Throughout each Shoulderstand variation, continue to press down through your upper arms and shoulders to prevent pressure on your neck.
- If you find the below wall variations challenging, continue to work on them until you feel stable and strong. You can also try using the variations to enter full Supported Shoulderstand away from the wall. For those who already practice Shoulderstand, these variations will refine your understanding and skill, and may boost your ability to remain in the pose longer.
- After practicing any of the variations, rest on your back for a few moments before you sit up.
If you feel discomfort in your neck or back at any time, slowly come out of the pose. If you have neck injuries, consult with your physician prior to practicing Shoulderstand.
2 Variations to Practice Before Shoulderstand

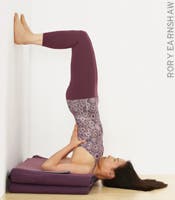
1. Supported Shoulderstand With Feet Against the Wall
The first variation at a wall builds a foundation that begins with the proper placement of the shoulders and upper back and an opening of the chest. Your feet press onto a wall, which takes some weight off your shoulders and gives your upper arms and shoulders a moment to rotate outward and the chest to open.
Here, you can also work on outwardly rotating your upper arms and bringing your outer shoulders closer to each other while lifting the upper back, sides of the chest, and tailbone away from the floor.
How to: Begin by placing your mat against a wall. Stack 4 folded blankets on the mat and situate them so the folded edges will be underneath your shoulders. Fold half of your mat over the blankets and bring your setup an inch or two from the wall.
Lie on your back with the tops of your shoulders a couple of inches closer to the wall from the edge of the blankets. Let your head rest on the floor behind the blankets so that it’s lower than your shoulders. Bend your knees 90 degrees and place your feet on the wall, shins parallel to the floor. If your entire back can’t rest on the blankets and your torso curls into a ball, you’re too close to the wall.
Press your heels lightly into the wall and isometrically drag them down toward the floor to lift your pelvis. Clasp your hands under your body and straighten your arms. Rotate your upper arms outward to roll the outer edges of your shoulders down. Lift your shoulder blades toward your low back.
Once you feel as though you’re high on your shoulders’ tops, lift the sides of your chest and pelvis toward the ceiling. Lift your buttocks away from your lower back until your torso is perpendicular to the floor. Continue to press your upper shoulders and arms into the stacked blankets.
Release the clasp of your hands and turn your upper arms out as you bend your elbows and take your hands to your upper back. Roll your outer shoulders down and turn your arms outward. Place your hands as high on your back (close to the blankets) as possible to support the lift of your upper back off of the floor. Don’t let your buttocks and tailbone sink back toward the wall. Lift your heels and press your toes into the wall to bring your pelvis farther away from the wall.
Breathe normally and remain in this position for up to a minute. On an exhalation, gently release your hands and lower yourself down to rest on the blankets. Then slide away from the wall until your shoulders come off of the blankets. Keep your knees bent and stay on your back for a few moments.

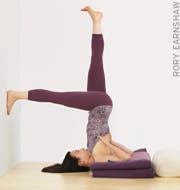
2. Supported Shoulderstand With One Leg Extended
Practicing Plow Pose (Halasana) with a wall to support your feet makes it easier to learn how to come into Shoulderstand with proper alignment. Turn your blanket and mat setup 180 degrees from the first variation so that now the folded edges of your blankets face the wall. Place your blankets leg distance from the wall. To measure that, sit on the floor next to your blankets in Staff Pose (Dandasana) with your soles touching the wall, and place the folded edge of your blankets in line with your hips. Place a bolster or a couple stacked pillows behind the blankets.
How to: Face away from the wall, and lie down on the blankets with your head on the floor and pelvis over the bolster. Turn your upper arms out and broaden your chest. Press your hands on the bolster by your hips, bend your knees toward your chest, and roll onto your shoulders to take your feet overhead to the wall behind you, legs parallel to the floor. Press into your shoulders to lift your lower body away from the floor. If you have tight hamstrings, walk your feet higher up the wall.
Look toward your chest, stretch your arms away from the wall, and rotate your upper arms out, with palms facing away from each other as you roll onto the outer edges of your shoulders as you would in Bridge Pose. Lift the upper back, sides of the torso, and shoulder blades away from the floor. Straighten your legs and lengthen your lower back toward your heels on the wall. Relax your throat and jaw as you look toward your chest.
Lift your left foot off the wall and straighten it toward the ceiling until your left leg is perpendicular to the floor. Let it help lift the entire left side of your body. Keeping your right leg foot pressing into the wall, lift the right side of your rib cage and torso so that the sides of your waist are even. Now lower your left leg to the wall, walk your hands up your back, and change sides. This will give you the feeling of lift and extension through your legs that’s required for doing the final version of Shoulderstand.
To come out of the pose, take both feet back to the wall. Stretch your arms overhead, palms facing the ceiling, and look toward the wall as you slowly roll down, first onto your upper back and then onto your middle and lower back. When your buttocks are on the bolster, bend your knees and place your feet on the floor.

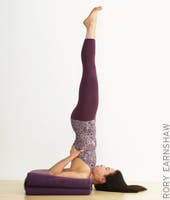
3. Supported Shoulderstand Off the Wall
Bring your mat and stack of blankets to the middle of the room. Lie down on the blankets and place your hands beside your hips on the floor. Bend your knees and take your legs into Plow Pose so your feet touch the floor behind you. If your feet don’t reach the floor, use the wall or a chair to support them. Adjust your arms and shoulders, then take your hands to your back. Come into the pose one leg at a time to maintain the lift of your rib cage. (If you lift both legs at once, you might harm your shoulders and neck.) When you lift your right leg, straighten your knee and extend your leg strongly toward the ceiling to pull your torso up. Raise your left leg. Lift the fronts of your thighs straight up and away from your pelvis.
When you’re up, continue adjusting your hands by walking them up your back toward the floor to prevent your upper back from sinking and to lift the sides of your chest. Broaden the chest as you roll your outer shoulders down and pull the elbows in toward each other. If they splay apart, try looping a strap around your upper arms, just above your elbows.
Lift your lower back toward your heels as you lengthen your inner thighs and reach through your big toes. Breathe normally.
Although you are working the entire body, let your throat relax Practice coming down into Plow Pose slowly and with control. Through regular practice, you can stay in the pose longer without strain. After Supported Shoulderstand, you should feel calm and quiet.
This article has been updated. Originally published March 2, 2010.